V5 WMS
Application Overview

Introduction
V5 WMS (Warehouse Management System) focuses on providing warehouse operators with a user friendly interface, capable of being operated in cold environments with operators wearing gloves.
Commonly used to perform all warehouse functions including ingredient receiving, trailer inspection & QA, staging, put-away, allergen control, order picking, shipping and cycle counting.
In a typical installation, V5 WMS is deployed on tablet computers (which can be mounted onto fork lift trucks) operating on a wireless network. The system connects to networked digital scales, label printers & barcode scanners.
V5 WMS is highly configurable. Providing a simple to use, engaging user experience for warehouse personnel is the top design priority.
This section provides an overview of V5 Warehouse Management System.

1. Login Screen
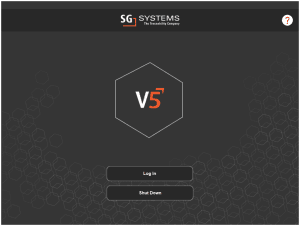
Upon launching the WMS software, users will have to log in using their unique 4-digit pin.
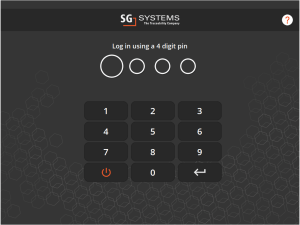
Users can also log in more securely using a username/password combination. If this mode is enabled for WMS the login screen will instead look like this:
More information on this alternate login type can be found here.
Don’t have a pin code?
Pin codes are created by managers and supervisors in Control Center. If you aren’t sure what yours is, or require an account to be set up, contact your local system administrator.
Want to change the default language?
This can easily be done once the user has logged in my heading to the settings section of WMS.
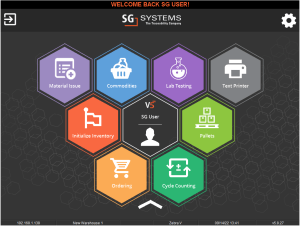
2. WMS Main Screen
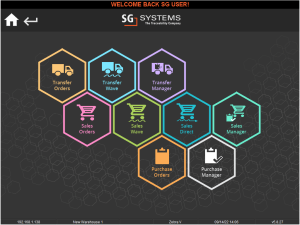
Once logged in, operators will then be taken to the main screen, where they will be presented with 6 tiles which can be used to access the features of the software.
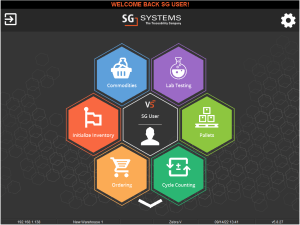
Using the white chevron at the bottom of this main page further expands the number of tiles to up to 10.
The overall number and order in which these tiles appear, and which ones appear in the initial 6 is set via the application configuration and can be fully customized depending on individual application requirements. Please contact SG support for help implementing this.
See below for a full list of possible tiles and their functions.
2.1. WMS Settings
From the main menu, the user can log out using the top left icon, or customize their settings using the cog in the top right. If they hit this cog they will be taken to the following screen:
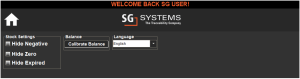
Here we can select the application language, calibrate any attached scales, or change our stock settings to show or hide negative, empty, or expired lots of commodities.
3. WMS Section Guide

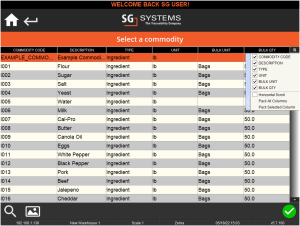
Users can use this section to manage the stock of the various commodities present in the system’s database, as long as they are non-palletized. Palletized items can be edited in the ‘Pallets’ section (see below).
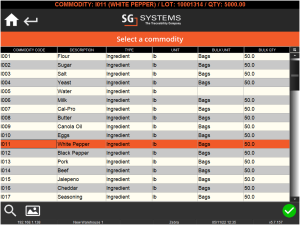
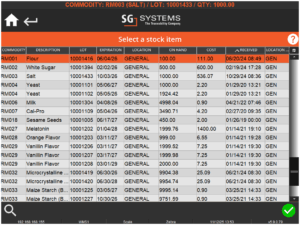
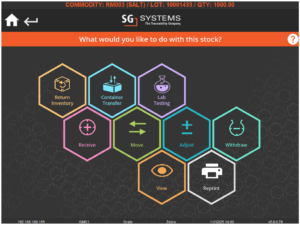
Entering this menu bring up a commodity select, followed by a lot select for a selected material. From here, selecting a specific lot of an item will bring up the following menu (alternatively SG stock label barcodes can be scanned to bring the user straight to this menu):
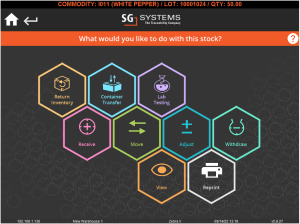
As we can see, the system now gives us several options to manage the stock levels of the selected commodity. For more information on this section, click here.
For a full detailed breakdown of all available configuration options for these functions, click here.

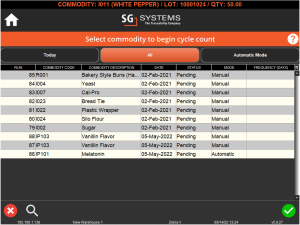
Selecting this option allows the user to undertake Cycle Counting as scheduled in Control Center. There are 3 tabs in this page that will show the user what Cycle Counting has been scheduled for that day, what has been scheduled overall, and then give them an option to enter automatic mode, where the system will automatically assign the user a lot to count.

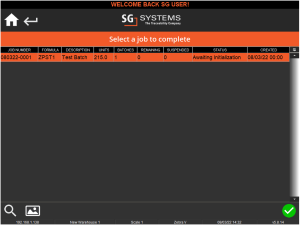
Initialize Inventory is used to return inventory to stock (or zero it) after job production at a particular Terminal. If we are using the system in this way, jobs will not be marked as complete in Control Center if this step is not followed. More information on this functionality can be found here.

Selecting this tile will take the user to the lab testing page where they will be able to select a commodity and pick a lot to sample from. They will then be presented with lab testing questions and procedures as set up in the Q&A section of Control Center.

The ‘Locations’ section of WMS is another way for operators to view/manage stock in a similar way to the ‘Commodites’ tile. The main difference here is that, upon using this tile, a list of locations present in the system is shown.

And selecting one of these location will show all stock present in that location, for example with the ‘GENERAL’ location here.
While lots of Palletized stock are shown, they cannot be managed here and must be managed via the ‘Pallets’ tile.
Note that this views stock by lots, i.e. individual lots are shown rather then a list of commodites which then expand to the lots, as with the ‘Commodities’ tile.
Selecting a lot here will allow the same stock management options as see when using the ‘Commodities’ tile.

Material Issue is used to look at a particular terminal in the system and analyze the raw material requirements for that terminal based on the current production schedule.
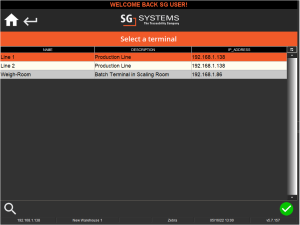
This ensures that sufficient raw materials are present at the terminal prior to starting a production run and is a key feature in operating production without interruption. Further information on how this module works can be found here.

This section allows the user to manage the different type of orders that the V5 system facilitates. Transfers, sales orders and purchase orders can be managed and process by selecting the relevant tile.

The ‘Pallet Builder’ tile allows for either:
- The creation of a new pallet.
- The management of an existing pallet.
In both cases the operator can use the interface to scan items onto pallets, allowing further action such as assigning to a sales order.


This page allows the user to search for a pallet by commodity, location, pallet number, or PO number. Once a pallet has been located, the user will then be able to make changes to it using the ‘Pallet Manager’ functions.

More information on pallet management can be found by clicking here.
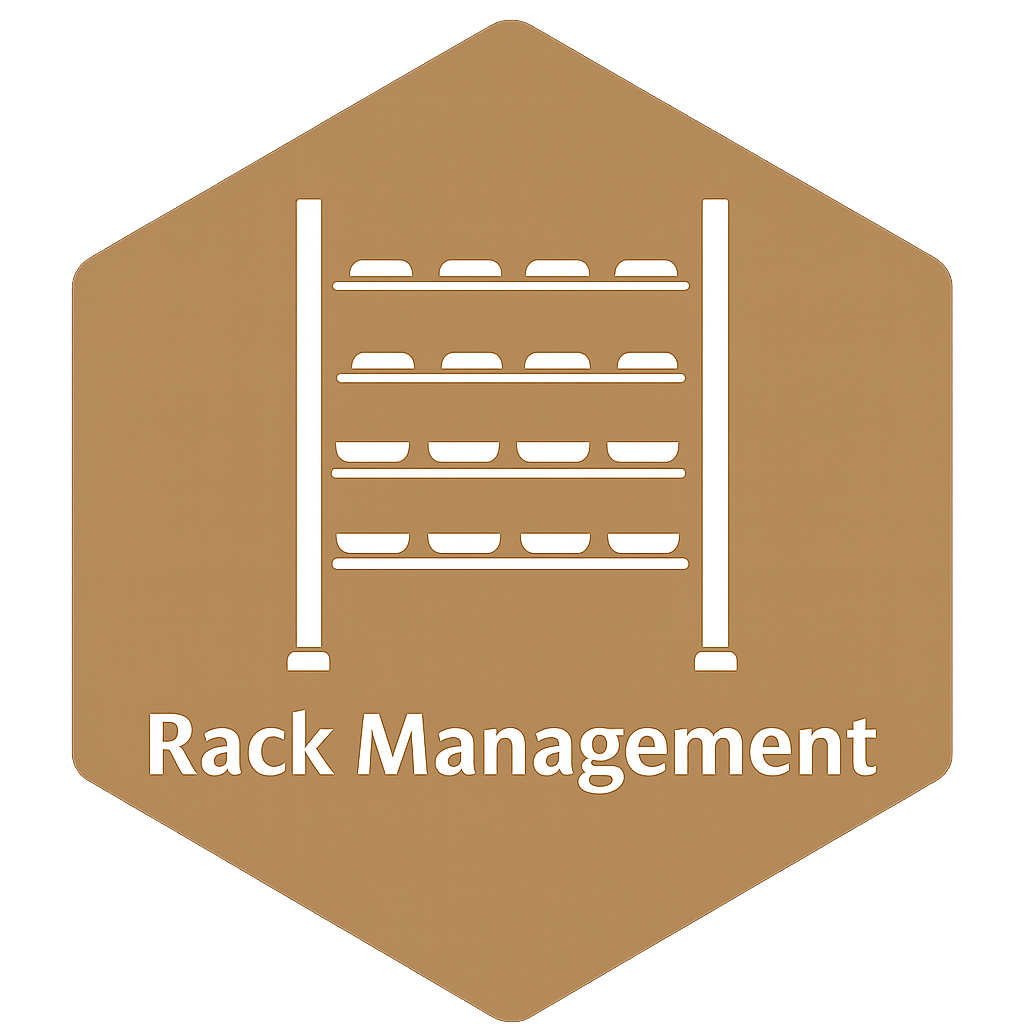
Rack Manager allows the operator to manage stock present in the ‘Rack’ type locations, provided these are configured correctly.

The Sample Manager allows operators to either take or manage samples based upon AWCs created within the LIMS module (guide coming soon!).

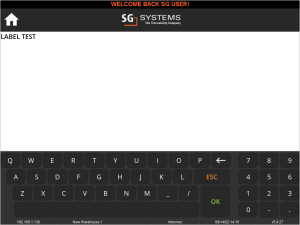
Allows freetext input that can then be printed to a connected/networked printer. This will require a custom label set to be created. Please contact SG support for assistance in setting up this feature.

Trailer Manager can be used in conjunction with the ‘Sales Order Allocation’ module to facilitate and streamline the loading of outbound orders onto delivery trailers. (guide coming soon!)
The Transform function allows users to quickly convert one or multiple stock items into another one at the click of a button, saving users time that would otherwise be wasted by withdrawing and adding to inventory manually. For more information on how this module works please click here.
4. WMS Interface Guide
This messaging banner will display various messages to the operator as they perform various tasks. Aside from confirming login as is the example above, the banner will also display messages relating to commodity lot selections, the choice of sales/purchase order to process etc. Clicking the banner causes a list of previous messages to appear and also prompts new messages to rescroll. This marquee scroll can be disabled if desired by SG support.
The orange question mark can be used by the WMS operator in order to get further help and information for the page/function they are currently using.

4.1. Button Help

- Shown on the main page, hitting this button will log the user out of WMS.
- Shown on the main page, this button will open the user settings section of WMS.
- Returns the user to the main home page of WMS.
- Use this button to move a step forward in a process. An option in that particular menu will often need to be selected.
- This button is used to go back a step in a process.
- This button can be used to create new entries in certain areas of WMS, e.g. in ‘Purchase Orders’ it can be used to create a new PO directly from WMS.
- Used at certain points in order receipt to allow the user to take a photo that will be uploaded to the system.
- Displays additional information in a particular window.
- Allows the user to view an image of the relevant product/commodity. Useful to make sure they are handling the right item.
- Allows the user to search for an item within a particular module of WMS. Presents the user with a variety of filters that are specific to that module to aid in searches.
- Opens a window to allow for the collection of a signature e.g. from a delivery driver.
- The IP address of the machine running WMS.
- The name of the WMS machine in use.
- The currently selected scale (if attached). This is a button and can be used to swap between attached scales.
- The currently selected printer (if attached). This is also a button and can be used to swap between attached printers.
- The current local time & date.
- The WMS version number.
4.2. Column Settings
All WMS windows (except ‘Setup’ and ‘Text Printer’) also feature a column editor at the top right of the window. This can be used to select what columns the operator will see on their device. Columns can also be dragged and dropped as required by the user. All these customizations will be saved for that particular user.