
V5 Integration with Oracle Netsuite
Your Guide to V5 Integration!
Introduction
Integrating Oracle Netsuite with V5 Traceability offers several benefits that we will explore throughout this piece, including:
- Real-Time Data Exchange: Enhances accuracy and efficiency in managing manufacturing and supply chain processes.
- Batch Consistency and Audit Compliance: Ensures consistency in food manufacturing and upholds strict compliance standards.
- Familiar Working Environment: Allows customers to schedule orders in V5 Traceability from within Netsuite.
- Paperless Operations: Facilitates warehouse management and reduces paperwork.
- Error Prevention: Reduces manual traceability errors, enhancing data accuracy.
- End-to-End Traceability: Provides comprehensive traceability across the entire production cycle.
- Operational Flexibility: Customizable to various business needs and scalable for growing businesses.
Table of Contents
1. Overview of Netsuite Integration with V5
An overview of how the V5 Traceability integrates with Netsuite Oracle can be seen below.
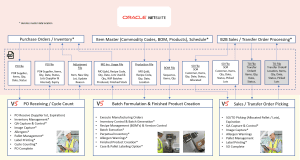
Note here that, in the discussed case studies below, we will be covering the integration of formulas (BoMs), work orders (production schedule/jobs), purchase orders, and sales orders, shown here in the white boxes.
1.1. Purpose & Scope of the Integration
The purpose of the V5 integration with Netsuite is to allow customers who are accustomed to working within Netsuite’s workflow to be able to easily create purchase/sales orders, as well as schedule production for entered BoMs from within Netsuite itself.
The scope of this integration covers all major aspects of a customer’s production facility, including:
- Raw Material Codes
- Formulation/BoMs
- Inventory Management
- Production Orders
- Sales and Purchase Orders
- Transfer Orders for intra-business goods movements
As we can see in the overview above, this allows Netsuite to continue to act as a customer’s master location for BoMs/raw material codes/inventory levels etc., with any updates to BoMs and orders to be sent instantaneously to V5.
In this instance, V5 would be passing back shipped/received/production/consumption data back to Netsuite, updating inventory levels and order statuses in real time.
2. System Configuration
2.1. Hardware Setup
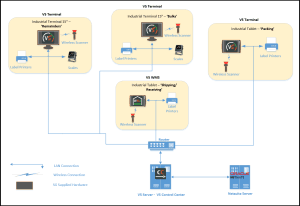
For an on-site deployment of the V5 Traceability system, SG Systems require access to a validated server (hardware or virtual) to install the V5 database and required middleware to enable the integration with Netsuite.
Production Terminals and Warehouse Management System tablets can then be installed as needed throughout the production facility. In this document we will be mainly focused on production, which features the V5 Terminal software application installed on the following:
- Industrial Terminals (15” Touchscreen)
- Bulk Terminals – handles bulk quantities of raw materials (bulk dispense or bag dumping).
- Remainders Terminals – hand additions/manual weighing of non-bulk raw materials.
- Industrial Tablets
- Packing Terminals – process component batches, produced at the bulk/remainder Terminals, and pack them into finished products.
- Shipping/Receiving WMS – Picks stock for sales order fulfillment & receives new inventory into the facility.
Each Terminal or WMS can be connected to:
- Scales – either networked or by direct serial connection (a wide range of scale/balance manufacturers are supported by SG Systems).
- Label Printers
- Terminals – to print bagging and batch labels, followed by product labels for finished products.
- WMS – to print shipping labels for picked goods, and to print stock labels for incoming goods.
- Barcode Scanners
- Terminals – allows the scanning of raw materials and WiP batches to ensure that the correct items are used at the correct point in the manufacturing process.
- WMS – Ensures that correct items (following FEFO/FIFO rules) are scanned onto sales orders. Also allows for incoming goods to be scanned in/moved using printed stock labels.
A simplified top-down view of a typical hardware setup in a customer’s facility could look like this:
2.2. Software Requirements
The requirements to install required software to facilitate the running of the V5 Traceability system can be viewed here.
In addition to this, for integration between V5 and Netsuite, an internet connection is required to communicate with Netsuite.
3. Data Exchange Using SOAP XML
3.1. SOAP XML Basics
SG Systems utilizes SuiteTalk to process Javascript input into XML data. This XML data is then sent and received via the SOAP protocol.
SOAP, which stands for Simple Object Access Protocol, is a protocol specification for exchanging structured information in the implementation of web services. It uses XML to encode its messages and relies primarily on application layer protocols, most notably HTTP or SMTP, for message negotiation and transmission. Here are the basic elements and concepts associated with SOAP:
- Envelope: The core element that defines the contents and structure of the message.
- Header: An optional section to define operational parameters like authentication credentials.
- Body: Contains the XML data of the message, including call and response information.
- Fault: Provides error details if issues occur during processing.
3.2. Advantages of Using SOAP XML
There are several advantages to using SOAP:
- Standardization: Ensures interoperability across different platforms and languages through a well-defined protocol.
- Formal Contracts: Utilizes WSDL to clearly define service methods and operations, aiding in development and maintenance.
- Security: Supports comprehensive security features such as encryption and message signing through WS-Security.
- Extensibility: Allows for extensions to add functionalities like transactions and enhanced security without altering core operations.
- Stateful Operations: Capable of maintaining session state over multiple requests, useful in complex transaction scenarios.
- ACID Compliance: Ideal for critical, transactional systems requiring robustness and reliability.
- Transport Independence: Works over multiple transport protocols (HTTP, SMTP, TCP), offering deployment flexibility.
- Error Handling: Provides detailed error reporting with structured information, aiding in troubleshooting and correction.
4. Integration Process
4.1. Step-By-Step
A simplified overview of the setup process for V5 Integration with Oracle Netsuite an be summarized as follows:
- The V5 API will be installed – this provides the initial link to and from the V5 database.
- V5 Connect will then be installed – this acts as the middleware between the V5 API and Netsuite.
- V5 Connect with then be configured using the TBA (Token Based Authentication) and Netsuite URL provided by the customer.
- The customer would need to create any custom fields that will be implemented as part of the integration.
- V5 Connect will then create saved searches, enabling it to effectively search Netsuite for:
- BoMs/Formulas
- Raw Material lot numbers
- Raw Material stock levels and availability
4.2. Configuration Settings
From the customer’s point of view, to enable connectivity with V5, they would need to:
- Enable SOAP web services for Netsuite.
- Provide credentials for authentication using TBA.
5. Operational Workflow
5.1. Batch Execution Workflow
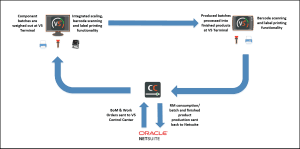
We can take a look at an example workflow where finished products are being made from component batches produced from raw materials.
- RM inventory, formulas/recipes/BoMs and work orders/jobs are all held in Netsuite.
- Work orders using BoMs stored in Netsuite are sent to V5 Control Center and scheduled.
- Batch production occurs at V5 Terminals. Customization options are available here for:
- Batch size calculation
- Use of bulk and remainder
- Integration of bulk dispensers
- Assigning production based on physical locations
- Custom label fields
- And much more!
- Batches are then processed into finished products using V5 Terminal.
- Data is then returned to Netsuite to account for:
- Raw material consumption for batches
- Produced batches data
- Batch consumption into finished products
- Finished products now in inventory
A simplified top-down view of this can be seen below:
5.2. Purchase Orders Workflow
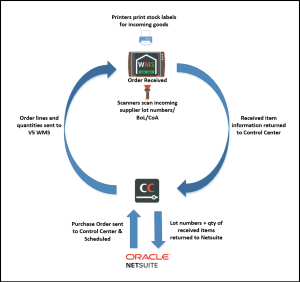
We can take a look at an example workflow for a purchase order.
- Purchase orders are scheduled in Netsuite.
- Material codes for ordered items are held in Netsuite & synced with V5.
- Purchase Orders are then sent to V5 Control Center and scheduled automatically.
- Order lines and expected quantities are sent to V5 WMS tablets.
- V5WMS receives the order. Configurable options are available here to enter information against received lots such as:
- Internal & supplier lot numbers
- Manufacturing & expiry dates
- BoL/CoA numbers & image capture
- Stock labels can also be printed by V5 WMS automatically upon receipt.
- Data is then returned to Netsuite to account for:
- Quantities of order line items received
- Lot numbers & any other associated information
- Internal locations of newly received lots
A simplified top-down view of this process can be seen below:
5.3. Sales Orders Workflow
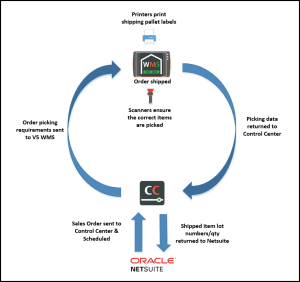
We can take a look at an example workflow for a sales order.
- Sales orders are scheduled in Netsuite.
- Product codes for ordered items are held in Netsuite & synced with V5.
- Sales Orders are then sent to V5 Control Center and scheduled automatically.
- Order lines and required quantities to be picked are sent to V5 WMS tablets.
- V5WMS ships the order. Configurable options are available here to ensure that:
- Correct items are picked/scanned onto the order by connected barcode scanners
- FEFO/FIFO rules are enforced
- Shipping pallet labels and order delivery notes can be printed here to attach to the order.
- Data is then returned to Netsuite to account for:
- Quantities of items shipped
- What lots these were picked from
A simplified top-down view of this process can be seen below:
5.4. Hardware & Software Interaction
As we can see in the flow diagrams above, once V5 Traceability has the BoM/work order/Purchase & Sales Order information from Netsuite, there are several instances where the V5 software will interact with SG supplied/customer hardware. These interactions are:
- Scales – V5 Traceability provides full connectivity with scales and balances from a wide variety of manufacturers. These can either be connected via the local network, or via a direct serial connection. This allows floor operators to be able to accurately weigh raw material requirements using the V5 Terminals built in weighing dial.
- Label Printers – Labels can be printed at all stages of the production process, including:
- Stock labels can be printed at receipt
- These labels for raw materials are scanned at the batching Terminals
- Batch labels that are scanned at the finished product Terminals
- Finished product labels to meet a wide variety of requirements for product distribution
- Sales/shipping pallet labels when products are shipped
- Barcode Scanners – Whether wired or wireless, barcode scanners can be connected to the V5 Terminal apps to ensure that floor operators are always selecting the correct raw material/batch submix at the correct stage of production, eliminating incorrect material or lot choices. The same can be done at the V5 WMS tablets to allow for newly received goods to be scanned into inventory, and also to ensure that the correct lots of the correct items are scanned & picked for sales orders.
6. Benefits of Integration
So what are the major benefits of choosing V5 Traceability integration with Netsuite for your business?
- Familiar Working Environment – Integration with V5 Traceability allows Netsuite users to interact with V5 from the familiar Netsuite environment, reducing the need for additional training for employees that often comes with the incorporation of new software to a business.
- Real-Time Data Exchange – Ensure seamless and instantaneous data sharing between Oracle NetSuite and V5 Traceability. This integration keeps your manufacturing and supply chain operations synchronized, enhancing overall efficiency and accuracy.
- Batch Consistency and Compliance – Maintain impeccable batch consistency and meet stringent audit standards effortlessly. This integration is crucial for food manufacturing industries, where regulatory compliance is non-negotiable. The system provides precise control over production batches, ensuring every product meets the required standards.
- Paperless Operations – Transform your warehouse management with a paperless approach. This feature drastically reduces administrative tasks and paperwork, leading to a more streamlined, efficient, and error-free operation. Imagine a digital workspace where all information is readily accessible and easy to manage.
- Error Prevention – Eliminate the risk of manual errors with automated traceability and integrated label/barcode scanning. The integration captures data accurately, ensuring that your traceability records are precise and reliable. This reduces the risk of costly mistakes and enhances the trustworthiness of your processes.
- End-to-End Traceability – Achieve complete visibility across your production cycle, from raw materials to finished products. This comprehensive traceability ensures that you can monitor every step of the process, providing transparency and accountability. It’s a critical feature for industries where tracking product history is essential for safety and quality.
- Operational Flexibility – Benefit from a highly adaptable system that can be customized to meet the unique needs of your business. Whether you’re expanding operations or tailoring specific processes, the integration supports your growth and adaptability. It scales with your business, ensuring that your systems evolve as you do.
7. Case Studies
In the case studies below we will be looking at examples of how BoMs and works orders sent from Netsuite are produced using V5 Terminal, as well how we can view the consumption and production data that is sent back to Netsuite.
We will also see how Purchase and Sales orders can be scheduled within Netsuite for receipt/shipping using V5 WMS, as well as how the received/shipped item information is subsequently fed back to Netsuite.
7.1. Production
7.1.1. Formula/BoM Management
Master data for formula structure/bill of materials are held in Netsuite as described above. In this case we are working with a WiP batch formula that is then consumed along with packaging to make the finished product.
We can see an example of this product formula setup in Netsuite below:

So we can see the first 2 items are packaging, and then our WiP formula (Z-Raw…) is included as a ‘submix’ component (also referred to as a ‘Phantom’ item when it comes to the work order creation – more on this below).
This component batch formula can also be viewed/managed separately within Netsuite:
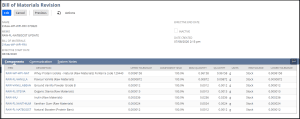
Parameters such as target quantities, weight tolerances, units of measure etc. are all managed here as part of the master data that is sent to V5.
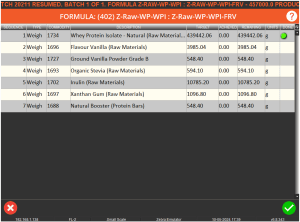
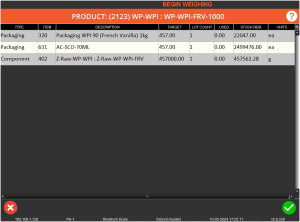
Once imported into V5 as part of a work order, on production Terminals the formulas will look like this (for 457 required final products).
Batching Terminals (Bulk and Remainder Terminals):
Product (Packing Terminal):
7.1.2. Formula Custom Fields
As part of the Integration services offered by SG Systems, custom fields can be utilized to help customers better manage the data that is sent to V5 and subsequently included in formula setup/production/data return. This customized data can also be applied to product labels.
In this example if we check the BoM setup for the product formula we can see the following:
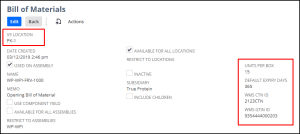
So for this implementation we have created the following custom fields:
The ‘V5 Location’, which will tie to a production location set within V5. This enables Netsuite users to specify the correct location for the formula to be produced in.
‘Units Per Box’, which in this case is tied to the ‘Batch Labels Quantity’ field in the formula header in V5, which tells the production Terminal of the required amount of labels to be printed per run as well as defining the amount of packs of the product go into a box.
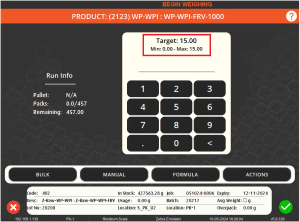
We can see the impact of this field when making the final products, so the V5 Terminal is using 15 as the default quantity of packs per box (unless the operator specifies otherwise).
Boxes can then be produced in bulk:
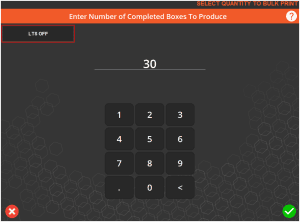
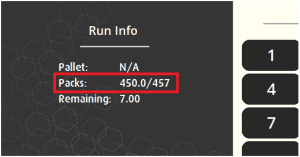
And we will see the use of this field reflected in the pack count after processing 30 boxes (30 x 15):
‘Default Expiry Days’, which ties to the field of the same name within V5. This sets the expiry time (in days) from when the product is produced.
‘WMS CTN ID’: Allows for the input of an associated CTN (Cargo Transport Number) for the product in question.
‘WMS GTIN ID’: Allows for GTIN entry that will be applied to the product.
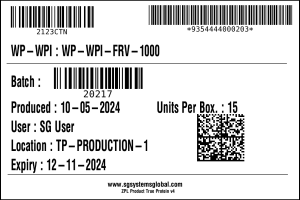
In this example these 2 fields are being fed into extra ‘datafields’ within V5 that can then be recalled to the labels printed for each product.
We are also managing several properties of the formulas via hard coded parameters for each type of formula. Both this, and the implementation of custom fields above, can be designed in tandem with each customer to provide the best possible fit for how their facilities operate.
7.1.3. Work Order Management
As with our BoMs above, work orders are also managed and sent from Netsuite to V5. Below we can see an example work order in Netsuite that uses the product formula that we saw above.
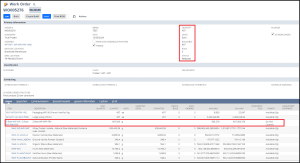
So we can see our product formula is scheduled for 457 products, and in the lower area of the screen we can see the batch formula scheduled as part of this, as the ‘Phantom’ object. This will become the product formula’s ‘component’ part as we saw above.
Note the ‘V5 Work Order’ box here (top right). In this example, this is used to tell Netsuite to push this to V5. If this isn’t checked it is sent elsewhere. This kind of customization is especially useful if a customer is operating more than 1 production system at a time and wants to specify where a work order should go.
So once this order shown in Netsuite is ‘Released’ this will automatically be sent to V5 and appear in the production plan as a scheduled job. Each time a job is sent to V5, the latest version of the BoM and raw material information will be pulled at the same time, eliminating any formula version mismatches or out of date ingredient information.
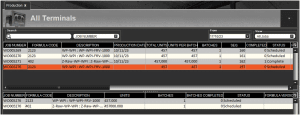
Both the product and the component (WiP/submix/’phantom’) batch formulas have been scheduled here in the lower panel. Note that no input is required from the customer in this example, the work order will automatically be scheduled for production upon import.
Production can then happen on the batching & product Terminals.
7.1.4. Batching & Product Creation Screens
The first stage here would see us adding raw materials to the scales for the submix batch that will later make out finished products.
Let’s look at an example here. If we look back to the released work order from Netsuite we will see the requirements for the ‘Flavour Vanilla’:

We can see that the same requirements for this step then appear at the V5 Terminal, allowing the floor operator to use the attached scales to weigh the correct amount (taking tolerances into account within the weigh dial’s green zone) of that raw material:
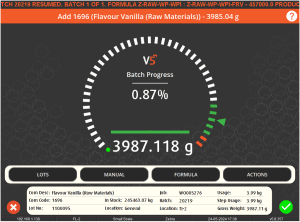
In this example we are splitting the weighing into bulk and remainder, with the above image taken from a remainder Terminal where smaller amounts are added.
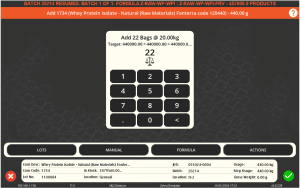
An example of a bulk screen can be seen below, where the operator can be asked to dump a number of bags of a known weight (22 bags @ 20kg each in this case) into the mix:
7.1.5. Data Return to Netsuite
Once production is complete, V5 will return consumption and production data back to Netsuite.
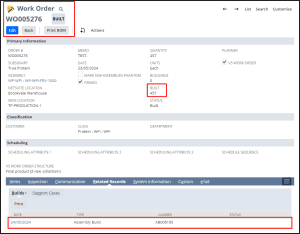
So we can see here the information that is being fed back from V5:
- The work order has been marked as ‘Built’, confirming that the work order is complete.
- Total number of product made compared to what was requested.
- Consumption data – this can be accessed in the lower area of the page under ‘Related Records’, where we can see the ‘Assembly Build’ that contains the consumption data.
Opening this ‘Related Record’ show the details of this assembly build:
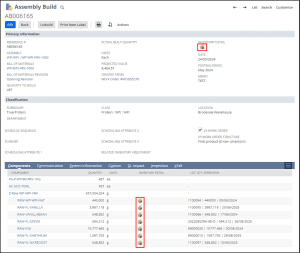
Clicking here on either of the highlighted icons will show us related lot information:
Component view (bottom panel) – this shows the details for the lot(s) that were used for that particular formula step (note here that packaging items in this example are not being traced).
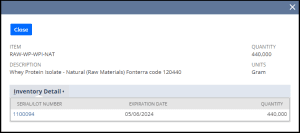
Here we can see the 440 kg that were consumed at the bulk Terminal.
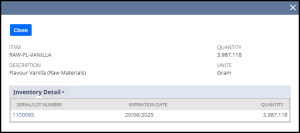
If we check the same information for the ‘Flavour Vanilla’ then we will see the recorded consumption from the Terminal screen that we saw above:
Inventory Detail of produced product (top right) – this shows the lot details for the product produced by the work order.
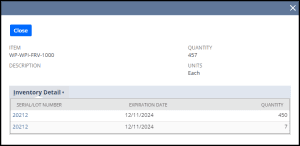
We saw above how the box count and pack quantity produced our 450 units here, with the final 7 being produced in the next run by simply entering 7 to produce the remaining packs. This overrides the default value of 15 and allows for these final units to be produced as needed.
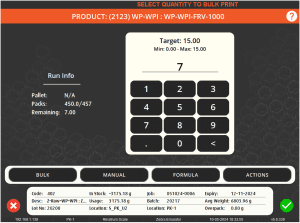
These final 7 packs would also give a final label for the run:
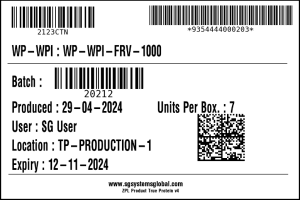
This information is then deducted/added as appropriate to the inventory master held within Netsuite.
7.2. Purchase Orders
Purchase Order synchronization from Netsuite to V5 Traceability works in a similar way to what we saw with the formulation and work orders above.
We can see a scheduled purchase order in Netsuite below:
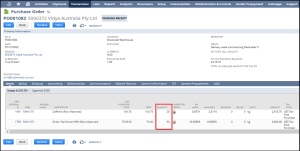
So we can see here that for this PO (PO001082) we have ordered 25kg of caffeine and 50kg of green tea extract. Also note that we have a supplier assigned, as well as the cost from this supplier. There are also ‘Memo’ notes that can be used within Netsuite to add extra information to the order.
Once this is sent to V5 Control Center, we can see it as a ‘pending’ order (matching the ‘Pending Receipt’ status in Netsuite) in the ‘Purchase Order’ window.
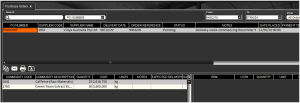
So here we can see that the relevant amounts that were ordered, as well as the costing for these, the assigned vendor, and the ‘Memo’ field, which has been brought into V5 under the ‘Notes’ column.
Since the order is imported to V5 Traceability as ‘Pending’, it will immediately be visible for the V5 WMS (Warehouse Management System) in the receiving location.
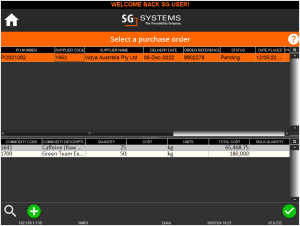
Selecting and entering an order will then show the order lines that are awaiting receipt.
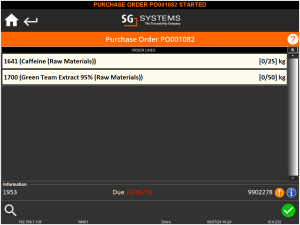
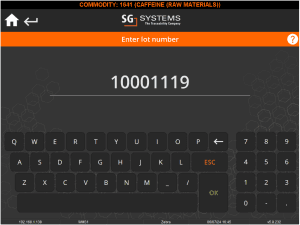
Selecting a line to receive will then allow the operator to receive that item. Several optional triggers are available here to enter additional information against the received lot such as internal & supplier lot numbers, manufacturing and expiry dates, costs etc. Here we can see an example with our operator entering the desired internal lot number.
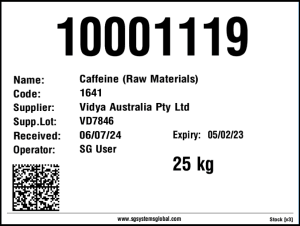
Labels can then be printed and applied to the received items. The number of labels made here can be fixed, or a request can be presented to the operator. Label design can be determined by each customer depending on their individual requirements.
We would then be returned to the order line view where we can see that this line has successfully been received.
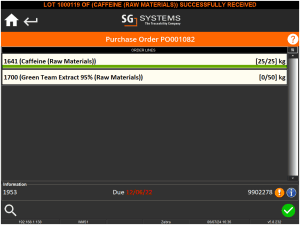
We would then receive the other order line in a similar manner, after which we can complete the order using the green check in the lower right corner.

Once received we can see the completed Purchase Order in Control Center.

So we can see in the bottom right panel the information for the received lots, containing the lot numbers for the received items.
Returning to the order in Netsuite, the status here has now changed to ‘Pending Bill’ indicating that we’ve moved from receipt to the billing stage.
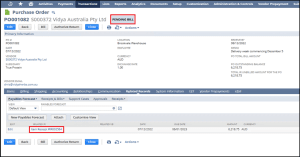
If we then open the ‘Item Receipt’ at the bottom of the page here we can find more information about the received items.
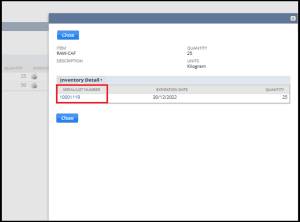
As we saw above with raw material use and batch/product creation, we can check the inventory tab for each item that was received. In this case we can see that the 25kg of caffeine was received and given the lot number assigned in V5 (10001119).
7.3. Sales Orders
Sales orders work in a very similar manner to what we have just seen with purchase orders. So first we would start with an order entered into Netsuite.
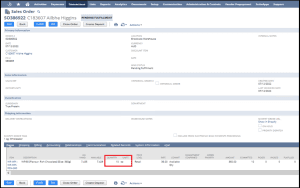
Similar to the Purchase Order example above, we can see that we have the item to be shipped, its quantity and cost, as well as the customer to ship to.
With the status of this order set to ‘Pending Fulfilment’, this order will be sent to Control Center and will appear in the ‘Sales Order’ window. Here we can see the order number, customer information, and required items to be shipped along with the price have all been synchronized from Netsuite.
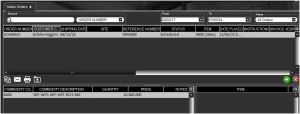
As with Purchase Orders, the sales order here is imported as already scheduled, so no action from the Netsuite user is required for the order to be ready and available for fulfilment by the V5 WMS tablet in the sales department.
Once scheduled the order will then be able to be picked by the WMS tablet.
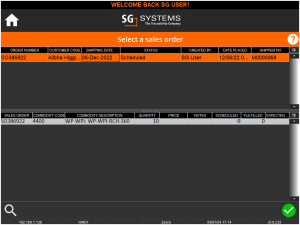
Within V5 there are several options for picking orders, with the option to choose by FEFO/FIFO rules, as well as directed wave picking modes to assist the sales operators. QA questions and answers can also be added here to direct the operator.
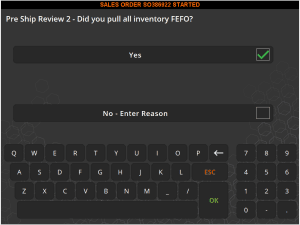
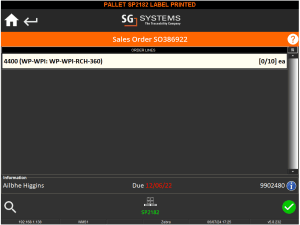
As above we will then see the order line view for the order, listing its requirements.
If we select this line then we will be given the option of lots to pick from. Again FEFO/FIFO order can be enforced here to prevent the operator choosing the wrong lot to pick from.
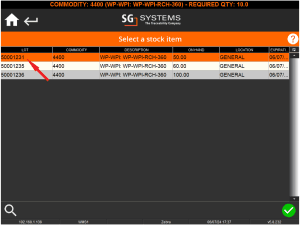
Once the lot is selected we can assign the stock. Note that if not following strict FEFO/FIFO order, then lots can be mixed onto the order. Here we are picking from lot 50001231.
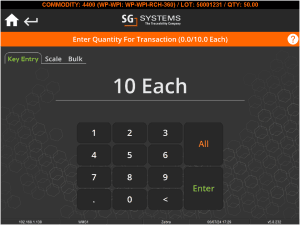
Once we have picked the correct amount this line will be fulfilled.
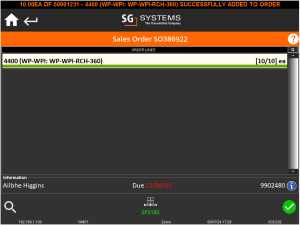
Note at the bottom here that a ‘sales/shipping pallet’ has been created. This is an optional process offered by the system that allows the quick printing of pallet labels for the shipment.
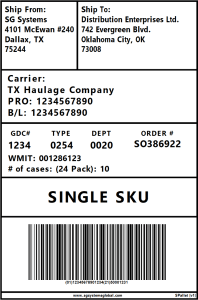
Once all lines are fulfilled then, as above, the order can be completed (shipped) by using the green check in the bottom right of the screen.

Back in Control Center we can see that the order status has been updates, and the lower right panel now contains the information about what lot was picked for the order.
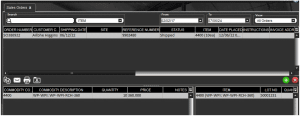
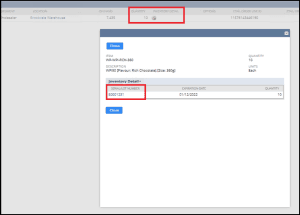
Returning to Netsuite, we can see that this picking information was transmitted and stored against the inventory present in Netsuite.
8. Conclusion
In summary, integrating Oracle NetSuite with V5 Traceability can benefit your business by ensuring real-time data exchange, maintaining batch consistency and compliance, and enabling paperless operations. It prevents manual errors, offers end-to-end traceability, and provides operational flexibility, adapting to your growing business needs. This integration enhances efficiency, accuracy, and scalability, making it an indispensable asset for modern enterprises.
Discover more about this transformative solution by contacting us today!
