App Licenses
Module Guide - A Deeper Dive!

Introduction
‘Licenses’ in V5 Traceability refer to installed instances of either the V5 Control Center, V5 Terminal, or V5 WMS software. These instances will form the backbone of the client’s manufacturing and traceability system, and this module guide will aim to provide a guide to their setup and use within this system.
Licenses are provided at the point of ordering V5 Traceability, however, systems are often expanded to include additional licenses or modules which are not part of the standard installation suite.
This module guide explains how licenses are deployed and activated. This process is exclusivly performed by SG Systems Global and affiliated companies and this guide is for information and documentation purposes only.
Please note that this guide refers to the behavior of App Licensing post the v5.8 update.
Table of Contents
1. License Activation & Setup
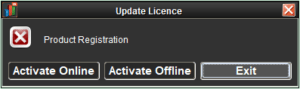
From v5.8 onwards, V5 Traceability will be activated and app license numbers maintained by using a client’s unique product key, which can be entered when first setting the system up to ‘Activate Online’. The system can also be activated offline. Please contact SG Support for help with activation.
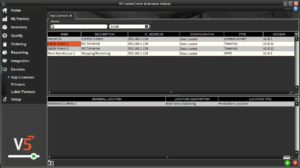
When the system is first set up, desired app names (e.g. ‘MIXING TERMINAL’, ‘MANAGER CONTROL CENTER’, ‘SHIPPING WMS’ etc.) and MAC addresses must be submitted to SG Systems to facilitate integration with the product license. From here, and only if the name and MAC address of the app match what was submitted to SG, the device will be activated and subsequently visible on the ‘Licenses’ tab in Control Center.
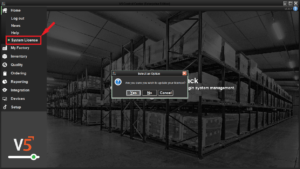
If a new app license is purchased and needs adding to the system, again the desired device name and MAC address must be submitted to SG. Once this has been done, the license can be updated online by using the ‘License’ button under the ‘Home’ header in Control Center.
For help updating a license without an active internet connection, please contact SG Support.
2. Configuration
If we double click in the ‘configuration’ cell of any of the apps, we will be presented with the configuration file for that particular station. Below is an example of a Control Center configuration file.
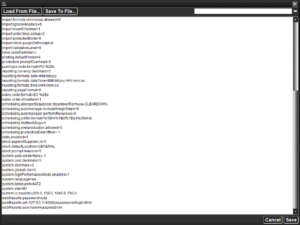
Initially each piece of software will appear in the system with ‘No Data Set’ in this field, and will instead reference a default settings file that comes with each install of a piece of V5 software. If we then enter data in control center however, this data will sync with the software when it next loads, and replace the local settings file with the one sent down from Control Center.
Please contact SG Support for help with setting different app configurations.
3. Linking to Visible Locations
Terminals and WMS apps can be linked to ‘Locations’ within the production facility, specifically to help segregate batching and production in different areas of the warehouse.
Linking Terminals to Production Locations
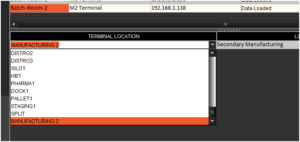
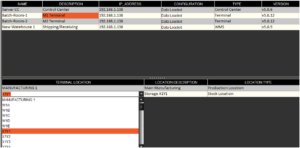
We can set this up initially by creating a new production location in the ‘Locations’ area of Control Center. For our example, we already have a location called ‘MANUFACTURING 1’, so we will create a new production location called ‘MANUFACTURING 2’.
After this we can assign any of our terminals to this location. We will assign the Terminal ‘Batch-Room-2’ to this new production location.
We can then assign a default production location to a formula in ‘Formulas’.
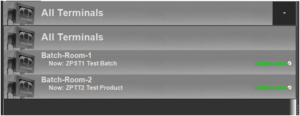
Once this is done, and we schedule these formulas for production, their production will be set to take place at these respective locations. We can see that in our example here, our batching Terminal ‘Batch-Room-1’ is set to be located in ‘MANUFACTURING 1’, whereas ‘Batch-Room-2’ is located in ‘MANUFACTURING 2’. Jobs are scheduled to these production locations, providing control over which jobs or purchase/sales/transfer orders appear at which terminals/WMS instances.
Linking Terminals to Stock Locations
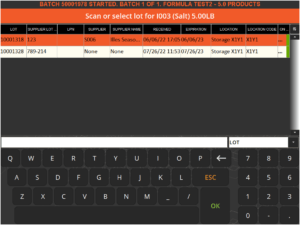
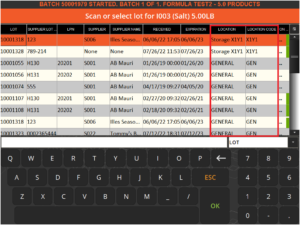
We can also link Terminals to the location of stock that is used for batching/production. This can be done in the same way as linking to a production location above, except this time we will link to a visible stock location. In this example we will link our ‘Batch-Room-1’ Terminal to stock location X1Y1. Before we do this, if we take a very simple example batch that requires salt and go to produce this before making the link to the stock location, when we come to add the salt, we will be able to see lots of salt that are stored in all locations around the warehouse.
If we then make our stock location association in Control Center:
And then try the same process again at the ‘Batch-Room-1’ Terminal, we will see that our only lot options for salt are from stock location X1Y1.