
Production Planning
Module Guide - A Deeper Dive!

Introduction
Efficient Production Planning requires knowledge of current, unfulfilled sales orders, material requirements and current inventory levels. Over Production is costly and can lead to product expiration. Under Production impacts order fulfillment and increases product lead times. For these reasons production planning is vital.
To ensure optimized Production Planning – V5 Traceability merges data from current finished product SKU inventory, WIP and raw materials. This data is then used to create the ‘shortfall analysis’ that allows the scheduler to create production orders that either meet the immediate minimum requirement or allow for additional stock to maximize batch efficiency.
Optimized Production Planning benefits companies by reducing waste, holding less inventory, and reducing time manually planning production.
This module guide will focus on the use of ‘Production Plan’ and ‘Planning’ in Control Center to schedule the production of batches and products within V5 Traceabilty.
Table of Contents
1. Basic Scheduling
1.1. Creating & Scheduling Batches & Products
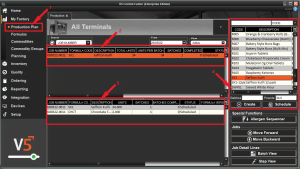
We can begin to schedule batches by logging in to Control Center and opening up the ‘Production Plan’ tab under ‘My Factory’ (1). We will then see the Production Plan window, which displays a list of already created/scheduled/completed jobs (2), along with the batches required for the highlighted job (3). On the right-hand side we can also see a list of formulas that are entered in the system, along with the ‘Create’ and ‘Schedule’ buttons.
For further information on column definitions for this page, please see the Control Center guide here.
-Creating a Batch or Product
Using the ‘Create’ button while having a formula highlighted in the right panel will generate a job with all its requirements, and then this will appear in the job list as ‘Pending’. This means that it will not immediately be visible to the relevant production Terminals. This method of creating jobs has a few benefits:
- It allows jobs to be modified before they are sent down to the production Terminal. For more information on this please see below (link to batch manipulation below).
- Allows managers and supervisors to create jobs in the future without these jobs cluttering the screens of the Terminal operators.
-Scheduling a Batch
If we click on a batch formula that is contained within the right panel, the system will automatically populate the boxes underneath for 1 batch.
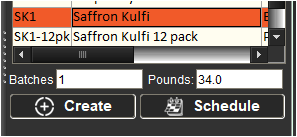
The left-hand box is the number of batches that we are going to schedule, while the right-hand box is the automatically populated with the standard base size of the formula in the formula’s default Unit of Measure.
We can then schedule whatever combination of weight and batches are appropriate for a particular job/order.
We could schedule more than 1 batch at the standard base size:

We could schedule more than 1 batch with a different base size (the system will perform the appropriate calculations for required ingredients and submixes:

Or we could schedule 1 large batch (again the system will perform the appropriate calculations for ingredient and submix requirements):

The limit on how much of a formula can be produced in 1 batch is controlled via Min and Max Products, which can be set against the formula when it is created. For our Saffron Kulfi example we set the following:
So we can see here that when we have gone to schedule 500 lbs, as the maximum is 340, the system has split this into 2 batches of 250 lbs each. It is worth noting here that the batches field must be left blank for the system to make this calculation.
Notice here how the system has split this into 2 even batches, but it can also be configured to schedule a batch at the maximum quantity, and then schedule the remaining quantity in a second batch.
Scheduling a Product
Scheduling a formula with the type of ‘Product’ works in a similar way to ‘Batch’ formulas above. The major difference is that if we schedule more than 1 product, the system will not multiply weight requirements based on the base size.
Let’s see how this works by looking at our ‘Saffron Kulfi 12 pack’ product formula.

This says that there are 34lbs of Saffron Kulfi per pack, so when scheduling this product, if we ask for 2 finished products, we won’t see 1 batch at 68lbs as we would with a batch, but instead it will schedule 2 packs with 34lbs of Saffron Kulfi each.

1.2. Job Numbering & Sequencing

-Numbering (1)
When a job is created, the system will automatically assign it a job number. The default format for this is mmddyy-0000. The numbers at the end will increment by 1 whenever a new job is created on the same day. This default format can be changed globally if desired (please contact SG support) or we can simply type a custom job number into that cell (this must be unique).
-Sequencing (2)
When jobs are created, they are also automatically assigned a sequence number (Seq). This sequence number represents the order that the jobs will appear in on the Terminals. This sequence can be changed by using the ‘Move Forward’ and ‘Move Backward’ buttons in the right-hand panel.
By default, Terminal operators will be able to undertake jobs in any order, but a strict order can be enforced at the Terminal level to force operators to complete jobs in sequential order.
1.3. Assigning Jobs to Different Terminals
When we create a formula, we can assign a production location to it. We can also assign Terminals to the same production location(s). Both of these functions allow us to keep production of different batches or products to specific areas of the warehouse. If we do neither of these, then all scheduled formulas will be visible to all Terminals.
If we add production locations to our Saffron Kulfi batch and product:

And assign 2 Terminals to these different locations:


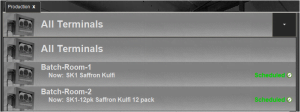
We can see how this works if we then schedule a batch of Saffron Kulfi and 1 finished 12 pack in production plan. We can use the Terminal dropdown menu at the top of the page to view the different jobs that are scheduled for our different Terminals.
Selecting one of these Terminals will only show the jobs assigned to that Terminal in the production plan window.
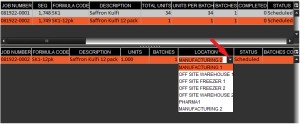
We can change the production location from the formula’s default if required. This can be done in the bottom panel by using the drop-down menu in the ‘location’ cell.
1.4. Production Date Assignment
By default, when we create or schedule a job, it’s production date will be blank, meaning that it will be immediately viewable to the relevant Terminal, and will continue to be so until it is processed. However, we can use the drop-down menu under the ‘production date’ cell to specify a production date.
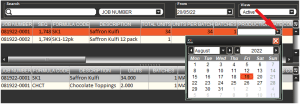
By default, Terminals can only view jobs with no production date, or jobs that are scheduled on the current date. This can be changed to allow Terminals to view jobs scheduled at various points in the past and future.
1.5. Additional Job Statuses
We have already seen a few potential job statuses in ‘Pending’ and ‘Scheduled’ above, but there are other statuses that we can see while dealing with jobs in the production plan. The total list of different statuses is as follows:
- Pending – The status the job will have if it has been generated using the ‘create’ button but has not yet been scheduled. The job will not yet be visible to the relevant Terminals
- Scheduled – The job is scheduled for production and will be visible to the relevant Terminals.
- Testing – If this status is selected then only 1 batch within the job can be produced, and then the job will be put on hold until a supervisor check/override takes place.
- On Hold – Behaves the same as ‘Pending’, but this status can be manually selected if jobs have previously been scheduled. This will hide the job from the relevant Terminals.
- Complete – The job is complete and is no longer visible to the Terminals
- In Progress – The job is currently under production at the relevant Terminal.
- Awaiting Initialization – The job is complete but requires initialization to return commodities to their stock location.
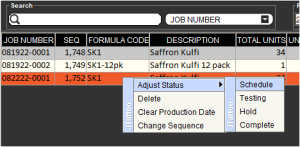
Job statuses can be changed by right clicking on the job and selecting a new status from ‘Adjust Status’ menu.
2. Advanced Scheduling
In addition to the methods of creating and scheduling jobs using the ‘Production Plan’ described above, there are a few other ways in which jobs can be managed and scheduled in Control Center.
2.1. Planning
Another way that jobs can be scheduled in Control Center is by using the ‘Planning’ window under the ‘My Factory’ header. This allows us to select already scheduled sales orders and identify the requirements to fulfil these orders. The system will then amalgamate the requirements, check to see what is already in stock and then provide a list of jobs that would be needed to complete the relevant orders.
For this example, let’s take use our ‘Saffron Kulfi 12 pack’ product. We have 3 separate sales orders for this product, one for 20 packs, one for 10, and the last one for 30.
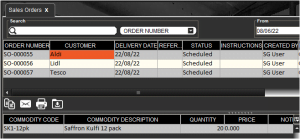
If we then head to the planning tab, we can see that the top left panel has been populated with these sales orders.
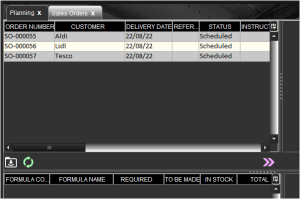
We can then select either, a selection, or all of the orders to identify their requirements. For this example, we will select all 3. If we highlight all of these (1) and hit the pink arrows under this panel (2 – which will be referred to from here as the ‘Identify Requirements’ button), we will see the top right panel become populated with the requirements for this product.

As we can see, since we have none of this product in stock, we will require the full compliment of 60 packs to fulfil these 3 orders. If we select the requirements in the top right panel (3), and then hit the green ‘+’ in the bottom right of that panel (4), the relevant number of jobs will automatically be scheduled. We can see this in the production plan.
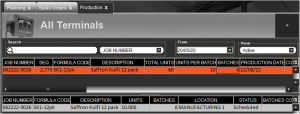
It is worth noting here that our batch submix of Saffron Kulfi is not scheduled for production as this was not set to ‘schedule’ in the product formula steps. However, we can fulfil these batch requirements by again using the Planning tab.
Once we follow the step above to schedule the original job, and if the submix of our Saffron Kulfi batch has not been automatically scheduled, we will then see these requirements populate the bottom left panel of the planning tab (1). If we select this list of requirements and hit the identify requirements button below it (2), the unit and batch requirements will populate the lower right panel as a new job (3). If we then highlight this job and hit the green ‘+’, this will schedule another job in the production plan to meet these batch

We will then see this second job scheduled in the production plan. Note how the system is already using the ‘In Stock’ value to reduce the amount of Saffron Kulfi we need to batch before making the finished products.
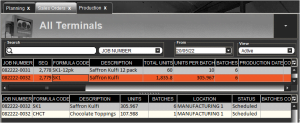
If our Saffron Kulfi batch was scheduled to be produced in the product formula steps, then the system would automatically schedule all the batch requirements for 60 finished products and ignore any on hand quantity.
2.2. Scheduling with Gateway & ERP Integration
Control Center features the Gateway which can be used to import and export .csv files in order to allow jobs to be scheduled via regular imports to the V5 Traceability database. More information on this can be found here.
SG Systems can also provide integration options for a wide variety of ERP solutions. More information about this can be found here or by contacting SG support.
2.3. Allergen Sequencing
When dealing with allergens in the production facility, it may become necessary to schedule line clean-down operations if a particular line processes batches that contain different allergen types.
For this purpose, there is a built in ‘Allergen Sequencer’ that can be used to automatically schedule cleardown operations between these batches.
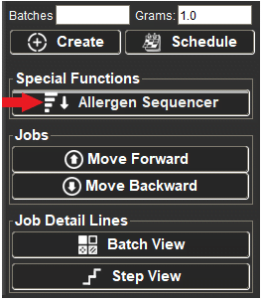
For more information on how this works, and how to set it up, please see our module guide here.
2.4. Batch Manipulation
Within the Production Plan tab there is a job details lines section contained at the bottom of the right panel. This allows managers or supervisors to change jobs in the schedule on the fly, even after they have already been confirmed and scheduled.
-Batch View
If we start by looking at batch view, in our example here we are using the batches of Saffron Kulfi scheduled above.
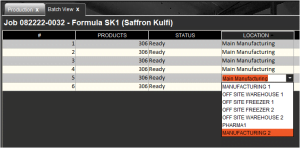
Here we can edit the amount of products in each batch, as well as change the production location for each batch if desired. Note that this will not be possible if a batch has already been completed.
We can also add or remove batches here using the add/remove buttons in the bottom right.
-Step View
We can also utilize step view to directly manipulate the formula steps for the selected job, for example if we want to add rework to a batch.

We can edit all elements of the formula here, adding or removing steps, changing step types, or reordering steps if required. Any changes made here can be applied to select batches (if there is more than 1 batch in a job) but will only apply to batches that have not been started.
Using this functionality will create a new formula version, but this new version will not be saved as the active version. It can however be recalled by using the formula version history functionality.
