
Label Formats
Module Guide - A Deeper Dive!
Introduction
V5 Traceability facilitates the creation and printing of barcoded labels at various points/for various events in a manufacturing facility.
This could be for labeling new commodities as they are received into stock, labeling manufactured batches and products as they are produced, labeling pallets prior to shipping, as well as many others.
This module guide will look at the various label types, how these are created and assigned, and finally, how custom fields can be used to recall different information for different commodities.
Label formats are created and set up by SG Systems Personnel, however, this guide is designed to be used for customers requiring documentation.
Ad hoc label modifications are covered within the subscription. Please contact us for modifications.
Table of Contents
1. Label Format Types
V5 Traceability supports the printing of labels for a variety of different purposes throughout the manufacturing facility. To do this, the system supports both the Zebra and Intermec/Honeywell label formats across a wide range of printer manufacturers that are compatible with these formats.
Once printers have been configured and set up on the system, we can use them to print label sets.
2. Label Set Setup
As standard, V5 Traceability is set up with 2 default label sets, one for Intermec format printers (DEFAULT-I) and one for the Zebra format (DEFAULT-Z). These sets contain a selection of the different label types and can be useful for testing that printers are working when the system is first set up. They will be a generic template which, once the system is up and running, we can proceed to customize or create whole new sets to meet our requirements.
We can use the default label sets as a starting point and create new labels within them, but for the purpose of this guide we will start from scratch by creating a new set. This is done in the ‘Label Formats’ tab under the ‘Devices’ header in Control Center.
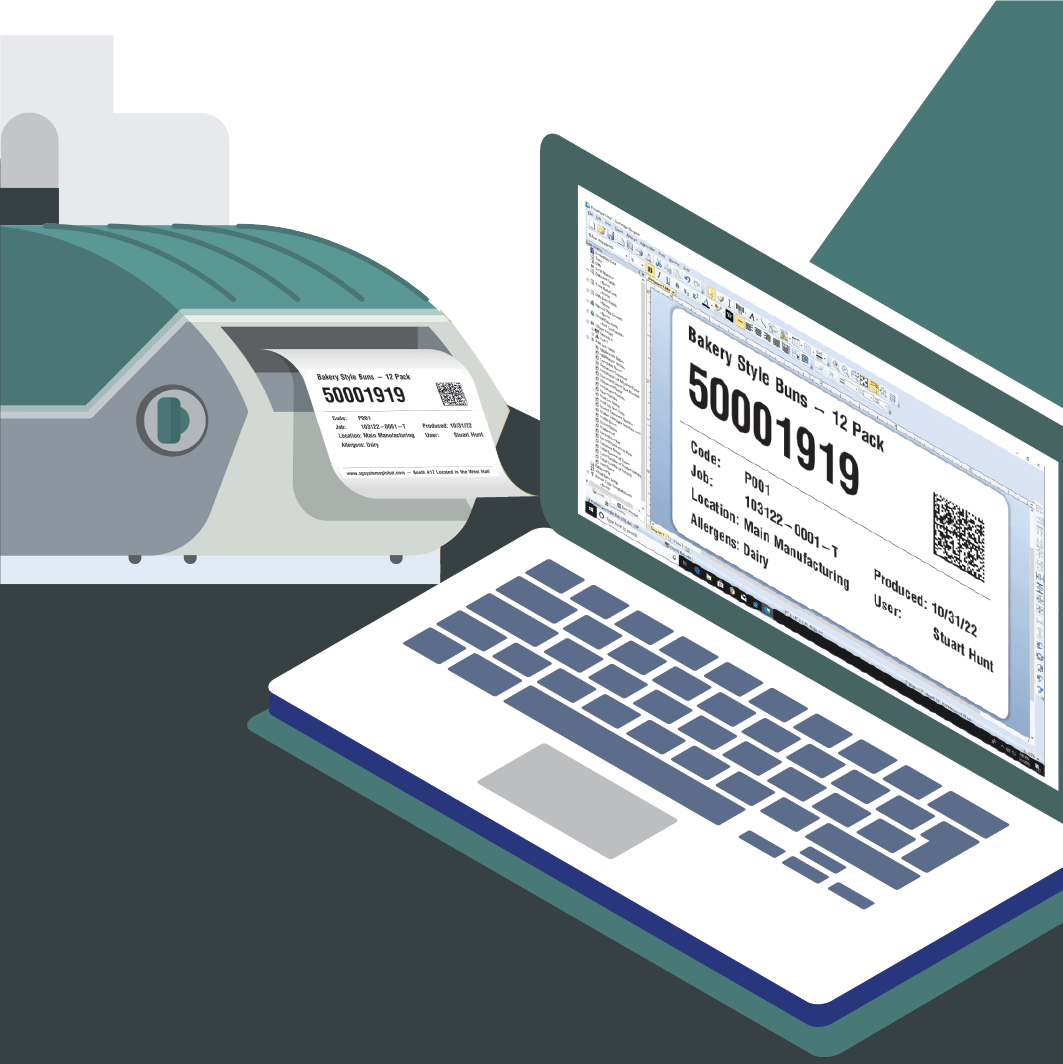
We would first add a new row (1) before giving our new set a name (2) and finally assigning a printer/format type to this new set (3). In this case we are going to create a set called ‘Batching’ that will utilize the Zebra format.
We can then use the bottom panel to add a new label.
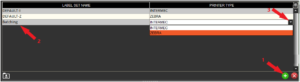
Again, we would add a new row (1), select a type of label (2 – in this case a ‘Batch Label’) and once this is done, we can double click in the ‘Label’ (3) cell to enter our label code (or blob). We will look at how to create these below.
3. Creating Labels
SG Systems are able to facilitate the creation and editing of labels, but the system is fully user customizable to allow clients to create and modify their own labels as they see fit. This can be done by using label creation software, such as ZebraDesigner (for Zebra labels) and BarTender (for Intermec) that allow a ‘print to file’ function that will give us a label blob.
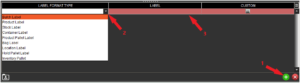
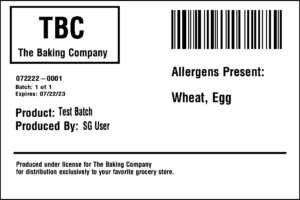
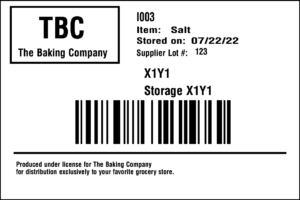
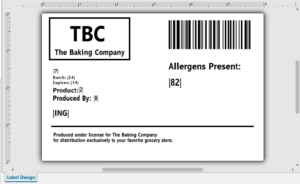
Using ZebraDesigner, we will create a simple batch label that contains basic information about batches being produced by ‘The Baking Company’.
The V5 label formats use common parameters contained within the bars (|?|). We can see these being used in the above example, and a list of what data these are associated with can be found in the ‘res’ folder of any Terminal install. So in this case |7| is the job number, |24| is batch, |14| is expiry date etc. It is also possible to embed this information in a barcode which can then be quickly scanned by V5 Traceability.
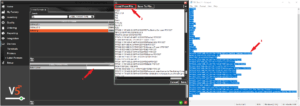
Once we are done with designing our label, we need to print to file (or in the case of ZebraDesigner ‘Test Print’ – highlighted above) in order to generate the code that we will then use in Control Center. This will usually be saved in the form of a .prn file, which can be opened in an application such as notepad.
From here we can load this data into Control Center in a few different ways.
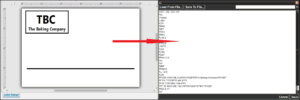
First, we need to double click the ‘Label’ cell (1), which will open the label code dialogue. From here we can either hit the ‘Load From File’ button (2) and navigate to the appropriate .prn file and load it, or we can simply copy/paste the code from the .prn file itself (3) into Control Center. Once the code is in place, we then hit save, after which our label will be set up in the system.
We could then proceed to create different types of labels within this set if desired. The different types of labels we could create are:
- Batch Label – A label that will be printed once a batch is completed in Terminal. This is the type created in our example above.
- Product Label – A label that will be printed onto a finished product when produced in Terminal.
- Stock Label – A standard inventory label for tracking lot numbers upon receipt.
- Container Label – A label that can be printed for a generic container during batching to identify particular ingredients.
- Product Pallet Label – A label which can be automatically applied to finished goods pallets and can contain a LPN/SSCC.
- Bag Label – Same as container label, but used if we are using a bag.
- Location Label – A label that can be printed to identify a location in the warehouse. These can be printed or etched to metal barcodes which can then be placed in the required warehouse locations.
- Hold Pallet Label – A label that can be printed when a pallet is held, and can be configured to contain the reason for this hold.
- Inventory Pallet Label – Like a stock label, these labels are useful for tracking the receipt and movement of pallets in the warehouse.
We can also check the ‘Custom’ checkbox against our label. This is used if we are using a custom label format that is not one of the format types listed above. This can then be recalled when required in Terminal via the ‘Actions’ menu. The Terminal can also be configured to print a label after each formula step. Contact SG Support for further information and help setting this up.
4. Assigning Label Sets
Once a label set and associated labels have been created, we can assign these for printing in a few ways:
Assign to Printers
This is the most common way of assigning labels to be printed. If we go to the ‘Printers’ tab, we can use the ‘Default Set’ dropdown to assign a label set to a particular printer. This will make that printer use that particular label set, and it will produce a label for each event (batching, product finishing, stock, container as listed above) if these label types have been created within that set.

Assign to Formulas
Another way of assigning labels to be printed is to assign them to individual batches or products. This can be done in ‘Formulas’.

If, for example, we are using a batching Terminal with an attached printer with the ‘DEFAULT-Z’ set assigned, but then produce a batch that has been assigned the ‘Batching’ set, the ‘Batching’ set will take precedence as this has been explicitly assigned to this batch.
This is useful if we want to create bespoke labels for specific batches or products but maintain a standard label for others. The system can also be configured to prompt for a label format selection rather than using the default set.
If we want to unassign a label set from a formula, we can do this by selecting ‘Terminal Default’ for that individual formula.
5. Printing Labels
So, if we use the examples we’ve laid out above, and use a Terminal with ‘Zebra V’ attached (using the ‘Batching’ set) and produce the ‘Test Batch’ (in this case using ‘Terminal Default’), when the batch is complete, the system will print our created label from the ‘Batching’ set, filling in our parameters with live information from the system.
6. Custom Fields Setup
As we have seen above, we use default label parameters (i.e. |7| for Job Number etc.) to populate our labels with the relevant information for the batch/product/container etc. that we are dealing with.
We can go a step further and create our own custom parameters which can then be used when we design labels. We can create these within Control Center in 2 ways. Both of these are done in the ‘Custom Fields’ section, which can be found under the ‘Setup’ header.
6.1. Default Parameters
This is the easiest custom field to create, and can be done just using the fields in the top panel of the ‘Custom Fields’ tab.
If we take the batch label we created above, most of the information contained in the top part of the label could be considered ‘batch label’ specific. However, what if we wanted to use the text (Produced under license… etc. etc.) in the lower part of the label on other labels? To save us having to create and position this text each time we create a label, we can create this as a custom parameter field.
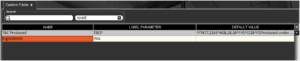
We would start by adding a new row to the top panel (1), and inputting a custom name for this new parameter. We will call this ‘TBC Produced’ (2). This name must be unique.
We will then need to add our custom parameter to the ‘Label Parameter’ column. This is important as this will be the command that we use within the label’s code/blob to recall our custom parameter. We will call this ‘TBCP’ (3). This must also be unique.
Our final column (4) is then populated by whatever data we wish to recall whenever we use this custom label parameter. This could simply be our ‘Produced under license…’ text, or could be the data from the label code that contains information such as coordinates and font data. The latter is most useful if we want this particular information to be displayed in the same position on all labels and the former if we want to recall this text in different positions on different labels.
For this example, we will go for the latter and have coordinate and font information for our custom parameter. If we look at the label blob in notepad, we can see the relevant lines for this text, complete with associated coordinate and font information.

We can then copy/paste this data into the ‘Default Value’ cell.

We can then use this information in a few ways. We can go back to our label designer and use the custom parameter in the design itself. In this case for a stock label.
Notice how our ‘TBCP’ parameter is not in the same position as we would want our resulting text to be. This doesn’t matter though, as when the parameter is recalled, any positional information relevant to this element will be overridden by the information contained within the custom parameter when it is referenced, producing the below label:
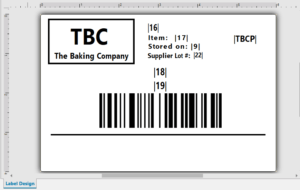
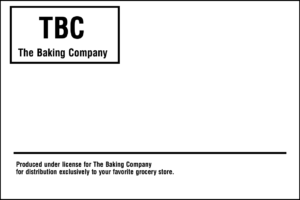
We can also use the custom parameter to directly manipulate the label blob itself in Control Center. If we take a very basic label layout, such as the one below, we can take the label blob and import it into Control Center:
We can then simply add |TBCP| to the blob in Control Center (this can go anywhere since it contains its own coordinate data), and the resulting label will now contain our custom field.
As mentioned above, we can also just input the plain text into the ‘Default Value’ field, and recall it using the same custom parameter. The major difference here is that our parameter would not have any font or coordinate information contained within it, so we would either have to manually enter this into the blob in Control Center, or manually position |TBCP| in our label designer.
6.2. Multi-Use Parameters
The functionality above is fine if we just want to use our custom parameter for 1 purpose, but what if we want to use the same parameter to recall different data depending on what commodity or formula we are dealing with?
This is where we can combine the top and bottom panels’ functionality to make this happen!
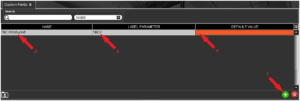
For the purposes of this example, we will create another row in Control Center and call this ‘Ingredients’ and have ‘ING’ as our parameter.
We can then go to the bottom panel and start adding rows (1) to make commodity or formula associations. Commodity codes will be populated automatically once we select a commodity/formula from the drop-down menu (2).
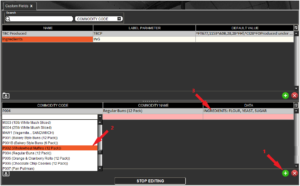
Our custom data can then be entered in the ‘Data’ field (3). In this example we will have a brief list of ingredients for each formula.

If we then go back to our label designer we can use ‘|ING|’ where we want to recall this information.
With this label loaded into Control Center, this time as a ‘Product Label’ (since the 2 formulas we are using are entered in the system as products rather than batches) when produce each product, the labels produced will contain the relevant different ingredient information based on what we entered in the bottom panel of ‘Custom Fields’.

If ‘|ING|’ was used at a point where we were NOT handling any of the selected formulas/commodities, then the system will revert to the ‘Default Value’ in the top panel, which in this case, is empty, so no information will be printed.
7. Using Multiple Printer Types
As we have discussed above, label sets can be assigned to be either a Zebra or Intermec set. But what if we have both types of printers in our facility?
In these cases, we can create a label set of each type, and then name them the exact same. Terminal and WMS will then detect the type of printer that the print request is being sent to and select the correct label set.
This allows us to assign label sets to formulas as we saw above, but then be able to print either format depending on the selected printer. In these cases it does not matter which of the Zebra or Intermec set is assigned to the formula.