
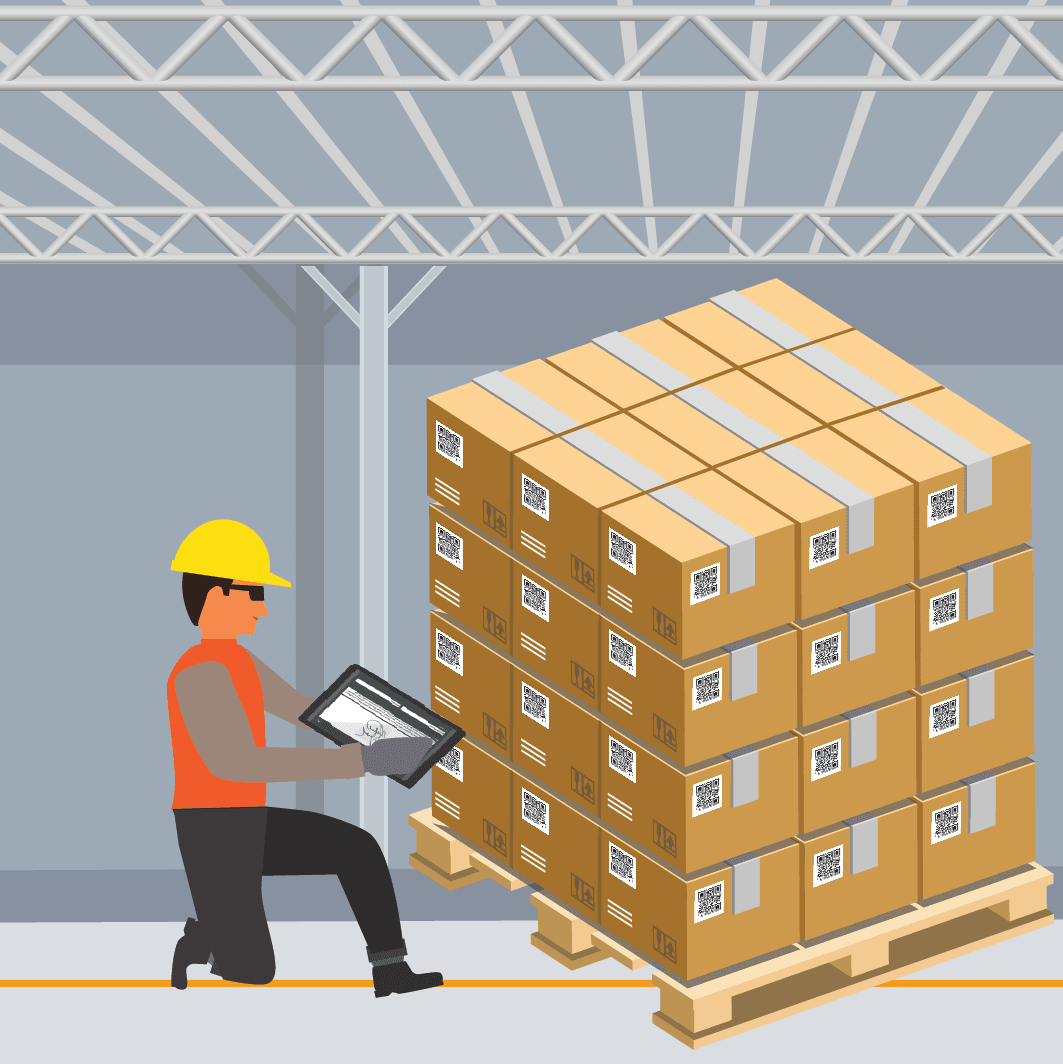
Palletization
Module Guide - A Deeper Dive!
Introduction
V5 Traceability simplifies pallet management in manufacturing and storage facilities by allowing easy construction & labeling or breakdown of pallets. By scanning the system generated pallet label, V5 Traceability identifies which cases belong to the pallet and which should be removed for individual orders.
Moreover, V5 Traceability generates shipping documentation based on pallet information, saving time and ensuring accurate product shipment. You can easily print documentation and attach to the pallet for efficient and informed transportation. This feature saves you time and ensures that the correct products are shipped to the correct destination.
V5 Traceability provides comprehensive supply chain support by tracking products and pallets throughout the supply chain, as well as managing pallets within the manufacturing facility, thereby simplifying and streamlining logistics operations.
Table of Contents
1. Types of Pallets
There are several different types of pallets that can be used for different purposes and at different times. These are:
- ‘Receipt Container’ – Receipt pallet onto which ‘Containers’ (mainly used for receiving containerized commodities) go to be stored. Both types’ ‘Tare’ values can then be combined to give an accurate weight of the commodity on the pallet as a whole.
- ‘Product Pallet’ – A pallet in which a finished product can be stored.
- ‘Batch Pallet’ – A pallet that can be used to hold finished batches before the next stage of production.
- ‘Shipping Pallet’ – Used to ship goods on when processing sales orders.
- ‘Inventory Pallet’ – The main type of stocking pallet we will see used, these are employed when a commodity or formula is marked as ‘Palletized’ in ‘Commodities’ or ‘Formulas’
2. Receiving
If a particular commodity is set as ‘Palletized’ when it is set up in ‘Commodities’ in Control Center, when we receive it in the warehouse via a ‘Purchase Order’, we will be asked to record the number of pallets we are receiving, and how much of the commodity is on each pallets.
As mentioned above when discussing types of pallets, these ‘Palletized’ commodities will be booked onto ‘Inventory Pallets’. More information on receiving pallets and receiving in general can be found in our ‘Purchase Orders’ module guide here.
Also note the ability to received palletized containers, which is also covered in the same module guide. Further information on how palletized containers can be set up and managed can be found in this guide here.
3. Palletization in Batching/Product Creation
When batching with palletized commodities, Terminal operators must scan the relevant pallet(s) that they are to source their ingredients from (as well as abiding by the Terminal’s chosen FEFO/FIFO rules). A supervisor override is required if the operator attempts to choose a lot without scanning.
For batch/product formulas themselves, if they are set as ‘palletized’, there are several options for how we can set up the pallets in the individual Terminal configuration as well as in the formula setup itself.
In the formula setup we can set:
- Whether a batch or product formula is ‘Palletized’.
- The ‘Max on Pallet’ value can be set, limiting the number or quantity of items that can be put on a single pallet.
In the Terminal configuration we can set:
- A label to print when a new pallet is created.
- A label to print when a pallet is closed.
- The pallet to close once the job is complete.
- The system to warn when we are getting close to the ‘Max on Pallet’ value, and for the pallet to close once it is full, i.e. this value is reached.
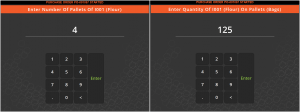
With these configuration options in mind, let’s take a look at how we can go about producing products to pallets by running through a quick example. Let’s imagine that we have 4x 12 packs of Saffron Kulfi to make, and in this case, the ‘Max on Pallet’ value is 4. This will let us see a lot of this functionality in action.
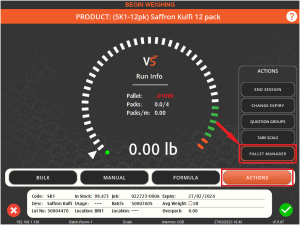
Upon commencing the production run, the Operator will be able to see that a pallet has already been selected to produce onto. In this case this pallet is red as it is almost full, so we would want to either create a new pallet to use, or use an existing one. We can do this by making use of Terminal’s ‘Pallet Manager’, which can be found by using the ‘Actions’ menu in the bottom right of the screen.
In Pallet manager we will be able to see all the pallets that are available for the Terminal to use (based on location and the quantity of other items on them). We can see that we could make use of pallets ‘1115’ and ‘1124’ here, but in this case we will create a new pallet by using the ‘Add Pallet’ button in the bottom left. We could also use the ‘Revive Pallet’ button in the bottom right to revive a previously closed or discarded pallets.
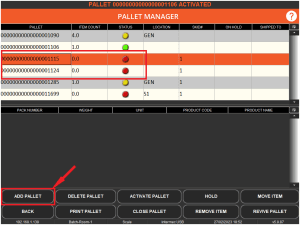
The system will then create a new pallet (‘21678’) and activate it (and print a label for it if configured to). Note that this pallet will be created in either the first storage location assigned to the Terminal in ‘App Licenses’, or the default production location set in the configuration if no locations are assigned. If we were going to use one of the older pallets we would have highlighted it and hit ‘Activate Pallet’ (1) instead. We can see our active pallet indicated by the green light. With our new pallet active, we can go back (2) to the main Terminal window.

We can then proceed to create our products to complete the order, packing onto this pallet in the process. We can see the correct pallet is now selected in the ‘Run Info’ section in the center of the screen (this view can be accessed by tapping on the user icon if the operator is in that view).
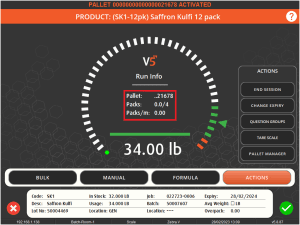
Once this job is complete we will be able to see our pallet (of type ‘Inventory Pallet’ here) in Control Center, with the 4 packs of our product on it.

We noted above that when we started this job, the pallet number was red, indicating that it was full for this particular commodity (using the aforementioned ‘Max on Pallet’ setting in ‘Formulas’). If we were to try and pack another product onto this pallet, the operator would be presented with the following warning message.
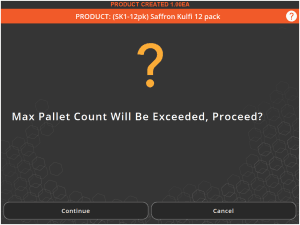
The operator’s privilege/supervisor level that is set in Control Center will determine whether they will be able to override this maximum count.
4. Sales Orders & Pallets
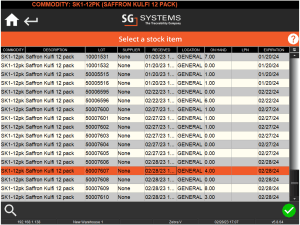
We can add palletized items to sales orders the same way we would for non-palletized or containerized. If we schedule a sales order for the 4 products we made above, we can see that when presented with our list of stock items we can see the lot we just produced. The operator could either select this or scan the pallet label to add it to the order.
We can also make use of sales pallets specifically for Sales Orders. More on this can be found in our module guide on that topic here.
5. WMS Pallet Manager
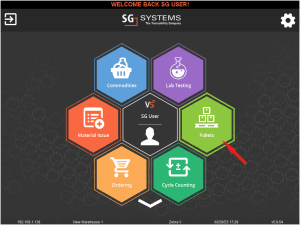
We have seen in the WMS Inventory Functions guide (available here) that we can use the commodities screen in WMS to manage non-palletized commodities. To use palletized commodities however, we can use the Pallet Manager, which can be accessed by using the ‘Pallets’ tile on the WMS main screen.
Once here we can either scan the pallet we wish to manage, or we can search for pallets via several different parameters.
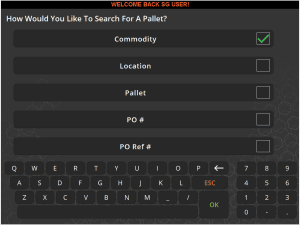
These are:
- Commodity – selecting this option will allow us to either search by commodity code or show us the full list of commodities entered in the system to choose from.
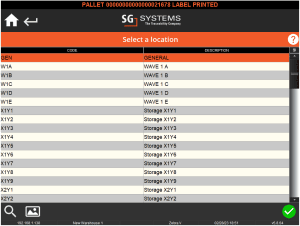
- Location – this option will allow us to view all pallets stored in a particular location. These locations must be visible to the WMS device for any relevant pallets to be shown here.
- Pallet – this allows us to search by pallet number to find the correct pallet.
- PO # – Here we can search by purchase order number to find any pallets that are associated with it, i.e. the pallets that commodities were received on.
- PO Ref # – Similar to ‘PO #’ above but allows for a search by the PO’s ‘Order Reference’, which can be entered in Control Center when the PO is created/scheduled.
In this case we will use the commodity search to look at all the pallets that contain Flour.
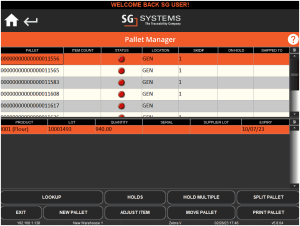
We can see a similar function panel here to what we saw in the Terminal version above, but there are some slight differences here, so let’s take a look at these functions for the WMS pallet manager here.
This will return us to the previous screen here and allow us to search for (or lookup) another pallet/collection of pallets.
The ‘Holds’ and ‘Hold Multiple’ functions of WMS’s Pallet Manager is explored more in our Quarantining module guide. To learn more click here.
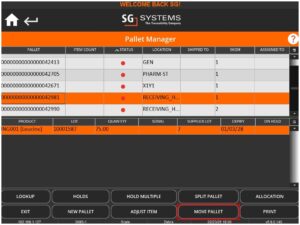
The split pallet function here allows us to move lots (or parts of lots) of a commodity on the pallet to another pallet. To use this, we much have a pallet and a lot of commodity selected.
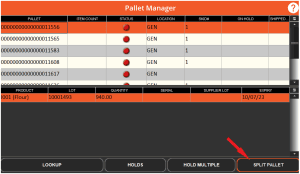
We can then hit this button to be asked how much of that commodity we want to move. Let’s say that we want to move 500lbs of the Flour here to pallet 11565 in the list below.
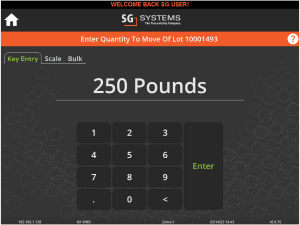
After confirming this we can have the option to create a new pallet, or use an existing pallet.
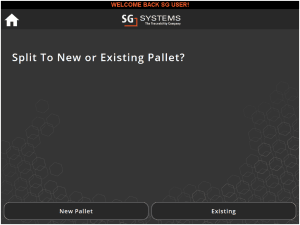
Selecting ‘Existing’ here will give us the further option to ‘Scan’ or ‘Lookup’ a pallet.
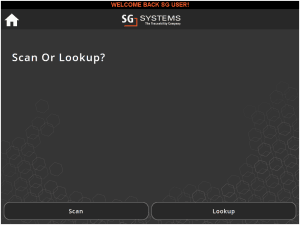
Choosing lookup here gives us a list of pallets in our pallet manager that we can select from by using the checkbox on the right hand side (1).
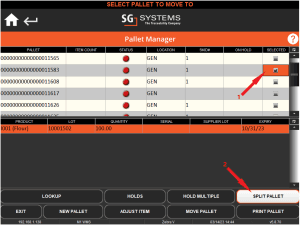
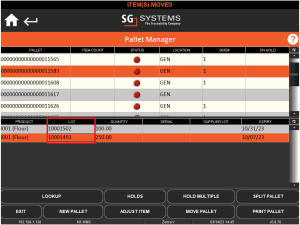
Selecting the appropriate pallet and then hitting the ‘Split Pallet’ (2) button again will move the desired amount of that commodity to that pallet.
Note here that original lot numbers will be retained after any splits.
This will print a pallet label for the currently selected pallet.
Allows us to move a pallet from one location to another, either by selecting or scanning the relevant location. WMS can be configured here to only be able to see locations that are assigned to it in ‘App Licenses’, or see a selection of all locations to move our pallet to.
This allows us to adjust the quantity of a commodity of an item on the pallet. A relevant lot must be selected in the lower panel in order to do this. Reasons (Pallet Adjust reasons) can be assigned to this event to allow operators to explain why this adjustment was necessary.
Allows us to create a new pallet. If we are using the commodity view as we are here, we will be automatically asked how much flour we want to book onto this pallet. In the other modes discussed at the top of this section, we will be asked to select a commodity and quantity to put on this new pallet. This allows a similar functionality to ‘Receiving a New Lot’ in the commodities section of WMS, used for non-palletized commodities.
Hitting the ‘Exit’ button will exit the Pallet Manager and return the user to the WMS main screen.
6. Managing Palletized Containers
With the introduction of containerized pallet handling comes an update of how stock can be managed here. This is similar to the previous options that were present when handling palletized stock, but with container additions to allow for more granular stock management.
To enable this functionality for stock, both the ‘Containerized’ and ‘Palletized’ boxes must be checked against each commodity that is intended to be treated in this manner:
Note that if stock was not previously palletized, any stock for commodities intended to be used in this manner must be zeroed before the ‘Palletized’ checkbox can be used.
When utilizing the new container label format, scanning the barcode here will take the operator to the same pallet manager view as scanning the pallet label’s barcode.
Moving Stock
Pallet movement, which would also move all containers present on said pallet, behaves the same as it did previously, so a pallet would be scanned (or looked up in the pallet manager section of WMS), where the ‘Move Pallet’ button would be used:
And then a visible location would then either be manually selected or scanned by the operator to move the pallet (and all containers on that pallet) to this location.
Adjusting Palletized Stock
When adjusting stock levels under the palletized containers mode, this works in a similar way to adjusting regular palletized stock, but allows more control over the individual container amounts.
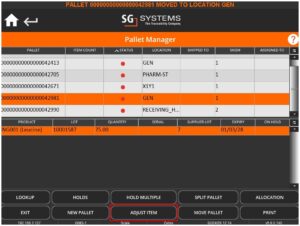
If we take the pallet that we just move to ‘GENERAL’ above, we can highlight the pallet and the line in the lower panel and tap the ‘Adjust Item’ button.
Now, rather than adjusting the entire pallet quantity, a list of containers will then be shown:
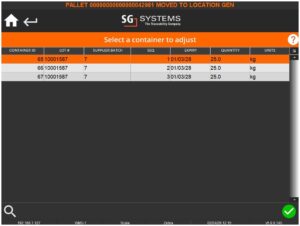
So here we might adjust this container’s quantity down to 20 from 25:
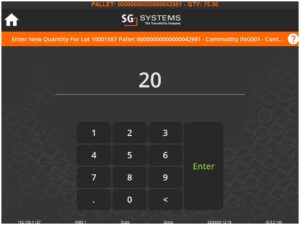
Any ‘Pallet Adjust’ reasons will then be prompted, after which the quantity will be revised for that container. Container labels can then be reprinted by tapping the ‘Print’ button and selecting the option to reprint the container labels.
Splitting A Pallet
As well as moving and adjusting stock on the pallets, we can also split items off from pallets, choosing to either move them to a new pallet or to an existing one which can be looked up or scanned.
Note that, as we saw with Material Issue, we can mix and match different materials on the same pallet if desired.
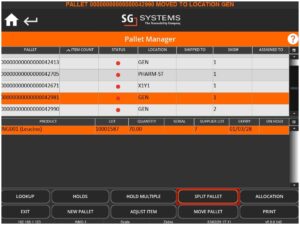
Let’s look at an example using the same pallet we adjusted a container for above.
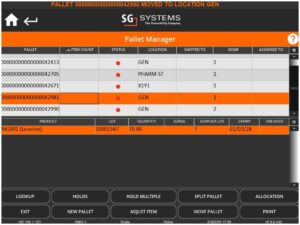
In this case we might imagine that we’ve taken various containers off this, and the next pallet below it, which also contains Leucine, for production purposes.
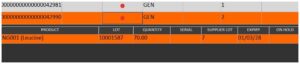
As a result of this we now might want to merge these 2 pallets, moving all the contents to ‘42990’, so we would highlight the ‘42981’ pallet and use the ‘Split Pallet’ button:
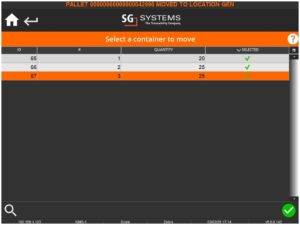
This would show us the containers on the pallet, which we can then manually select or scan, so in this case let’s scan/select all of them:
We now have 2 options:
- New pallet – This will immediately create a new pallet and move the selected containers to it.
- Existing – This will move the selected containers to an existing pallet, for which there are 2 further options:
- Scan – Pressing this button will then prompt for a scan of a pallet label to move the selected containers to
- Lookup – Pressing this button will show the previous pallet view and allow the operator to use the ‘Selected’ column to pick a pallet to move to, after which tapping the white ‘Split Pallet’ button will move the selected containers to the selected pallets.

The system will then reprint the pallet and container labels for the moved items, and we can see our total quantity of 145 now on a single pallet.
