
Inventory/Stock Location
Your Guide to V5 Integration!

The integration of Inventory/Stock Location between V5 Traceability and a customer’s ERP system allows for commodity inventory details such as lot numbers, on hand quantities and locations to be sent to V5 Traceability. These details will then allow such commodities to be used for production/ordering etc.
Depending on our ERP setup, there are a few different ways that we can handle inventory/stock:
- ERP as stock master: Here the ERP would feed inventory data into V5, and then V5 would return adjustments/consumption/production/etc. (most common) (stock in, logs out). This can be done 2 ways; The updated stock value from the log (Lot 123 is now 50LB); Or you can look at the adjustment value in the log (Lot123 -50LBS). The first option keeps things more in sync but has more potential for missing a transaction.
- V5 as stock master: V5 feeds inventory data to the ERP. The ERP then feeds back updated inventory levels at regular intervals. (stock out, stock in)
- ERP as stock master: The ERP feeds V5 stock, then V5 returns stock levels on a regular basis and the ERP updates its count. This is beneficial because the ERP and V5 will always sync up. However, this can be problematic due to the timing and frequency of sync, especially if stock can be deducted in the ERP itself, these adjusted levels may be overwritten on the next V5 sync. This method can be useful if the ERP/MRP doesn’t directly adjust inventory, but rather just holds it for financial data. (stock in, stock out)
If you are unsure of the best route to take for your particular ERP setup, SG Systems can arrange for a consultation session to best assess the optimal methodology for your system.
Table of Contents
1. Control Center Layout
In terms of how we can relate Inventory/Stock Location details to what we see in Control Center, we will be using this endpoint primarily to populate the lower left panel to import and export our stock levels/locations for existing commodities.
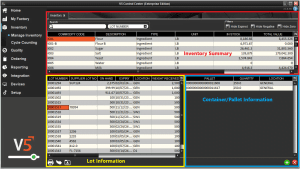
Using the V5 Gateway we can easily populate the data here using two endpoints, ‘Stock’ and ‘StockLocation’.
2. API Links
To find out more about the definitions for these database classes please see the following links:
3. Integration Template
The integration template for Stock Location can be downloaded here.
4. StockLocation Field Guide
4.1. Primary Keys
Primary Keys are the unique identifier for each table within the V5 API. For StockLocation, these are:
location.code – The unique identifying code for the stock location.
stock.commodity.code – The unique identifying code for the commodity
stock.lotNo – The lot number of the stock.
For Stock, the primary keys are:
lotNo – The lot number of the stock.
commodity.code – The unique identifying code for the commodity.
Note that lot numbers can be automatically generated by the system or entered manually. Supplier lot numbers can be entered using the field described below. Lot numbers can be generated globally (no 2 lot numbers can be the same), or on a per-commodity basis.
4.2. Required Fields
Other fields that are required by SG to populate a valid commodity line in V5 Control Center are:
stock.expiry – The expiry date of the particular lot.
qty – The quantity of the commodity in that lot.
4.3. Preferred Fields
Preferred fields serve to add more information against the commodity in question, and while not required, are useful when it comes to added functionality within V5 Traceability.
stock.supplier.code – The code of the supplier who provided the lot of the commodity.
stock.cost – The cost (per UoM) of the commodity.
stock.dateReceived – The date that the lot was booked into inventory.
stock.supplierLotNo – The lot number assigned by the supplier.
4.4. Additional Fields
Additional fields can also be included, such as:
stock.commodity.description – The description of the commodity.
stock.commodity.units.code – The default UoM of the commodity.
stock.commodity.recordStock – Whether the use of this commodity will be tracked with V5 Traceability.
Note that these additional fields can be used to create commodity entries in V5 Traceability as well as assigning stock locations and quantities against them. When using the CSV method of data exchange we must ensure that ‘Create Child Entities’ is selected in Control Center’s ‘Gateway’. However, existing commodities cannot be updated in the V5-API using this endpoint, instead we must address these directly using the ‘Commodity’ endpoint instead.
5. Methodology
Depending on the purpose of our API integration, we can make use of the ‘StockLocation’ or ‘Stock’ endpoint for both JSON and CSV imports and exports. We can now look at this below.
5.1. JSON – Import
StockLocation:
We can make use of the ‘StockLocation’ endpoint to insert stock records against commodities (existing or not) into V5 Traceability that contains information pertaining to received/expiry dates, lot/supplier lot numbers and of course, stock location.
‘StockLocation’ import Endpoint/URI –
http://host:port/V5-API/api/integrate/import/stock_location
For this sample import using the ‘StockLocation’ endpoint, we can structure a basic import file for a single lot as below:
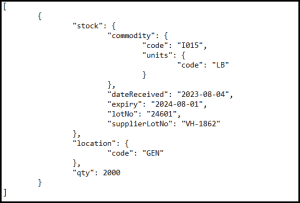
This sample JSON file can be downloaded here.
Using the API manual we can see here that we are using only the ‘qty’ value from the ‘StockLocation’ class, with all other values nested under either the ‘stock’ or ‘location’ class. We can also see that the ‘code’ and ‘units’ datapoints are nested further under the ‘commodity’ class.
We can see a summary of this dataflow process below:

If we run the JSON file above, we will see that our lot for commodity ‘I015’ (Jalepenos) now has this lot imported to Control Center.

However, what we cannot do with the ‘StockLocation’ endpoint is change values such as the supplier lot number and expiry date of existing inventory. To do this we would need to use the ‘Stock’ endpoint.
Stock:
As mentioned above, the ‘StockLocation’ endpoint can be used to insert stock records and their associated locations. However, if we want to update and details for these lots that fall under the ‘Stock’ header, we must use the ‘Stock’ endpoint. This includes details such as the supplier lot number, expiry date and the weight received.
‘Stock’ import Endpoint/URI –
http://host:port/V5-API/api/integrate/import/stock
For a very basic ‘Stock’ import file that will update the expiry date and supplier lot number of the lot we created above, we can use the following:
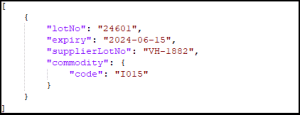
Resulting in the lot information being updated within V5:

5.2. JSON – Export
In terms of receiving files relating to inventory stock locations back from the V5 API, if we check the method summaries under the IntegrationExport class, we might think that ‘StockLocations’ (export/locations/stock) would be what we are looking for. This isn’t the case however as this endpoint will export a list of stock locations (vs. production locations) that exist within the system.
To receive location and inventory levels information for our commodities we can use:
Individual Commodity+Lot Stock:
Export Endpoint/URI –
http://host:port/V5-API/api/integrate/export/stock/{commodityCode}/{lotNumber}
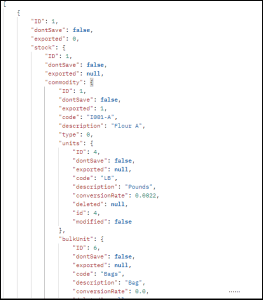
This endpoint will export a JSON file with all related information for the specified lot of a singular commodity. If we run this request using the lot information we have just imported, we will get a file that looks something like this:

A sample JSON files of this type can be downloaded here.
All Stock:
Export Endpoint/URI –
http://host:port/V5-API/api/integrate/export/stock/{all}
This endpoint will export a JSON file that includes a list of all the related information for all lots of every commodity in the system, depending on the value of the {all} field. If this is ‘true’ then we will pull all inventory lots, whereas if ‘false’ then we will just get a return for new inventory items (i.e. lots of commodities that are not marked as already exported).
If we run this request as ‘true’ (so http://host:port/V5-API/api/integrate/export/stock/true) , we will get a file that looks something like this:
A sample JSON files of this type can be downloaded here.
The above endpoints will only provide the current stock levels. But what if we want to track our stock levels as production takes place? Here we have a few different options depending on how we are using the API and integrating with an ERP system.
We can also utilize a variety of transactional and log endpoints to retrieve more relevant information about inventory level changes.
For System Log endpoints, these are:
For Transactional/Generic endpoints, these are:
5.3. CSV – Import
Header/column definition filename: “stockLocation.csvh”
Completed header files should be placed in: “<installdir>\SG Control Center\gateway\import\column_defs”
Import CSV filename: “stockLocation-datetime.csv”
CSVs for import should be placed in: “<installdir>\SG Control Center\gateway\import”
Header File:
Header files will generally be compiled by SG Systems prior to CSV integrations taking place, but we can see a basic example of one we can use for inventory/stock, using the previously defined class definitions, below:

For further information on how we structure these files, please see the main integration page. This sample header file can be downloaded here.
CSV Import File:
We can then use the defined order of data points in the header to structure our import file. SG Systems can supply a template file for this, listing the data point for each column to make things clearer when populating the list. Note that this first row can be ignored by Control Center and so can be kept in the file when submitting for import.
An example csv import file could look something like this:

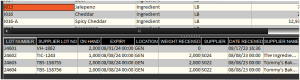
Here we can see that we are importing 3 new lots from 2 different suppliers. This sample import file can be downloaded here.
With the import complete, we can see that these additional lots of Jalapeno have been added to Control Center. Note the difference here between ‘Qty’ (on hand) and ‘Stock_WeightReceived’ in our import csv.
5.4. CSV – Export
As with JSON exports, we have a couple of different options here:
StockLocation:
When exporting commodities using this method then we can use the same endpoint and class definitions as we did for imports.
Header/column definition filename: “stockLocation.csvh”
Completed header files should be placed in: “<installdir>\SG Control Center\gateway\export\order”
Export CSV filename: “StockLocation-datetime.csv”
CSVs for exports will be generated in: “<installdir>\SG Control Center\gateway\export”
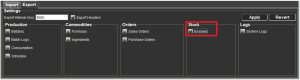
This export would also need to be enabled in the Control Center’s Gateway section. We can choose here to export ‘Stock’ .
Header File:
From here it would be a simple case of structuring our export header file to suit what information we want to receive back from the system.
We could structure it in a very similar way to how we structured the import header:
This sample header file can be downloaded here.
CSV Export File:
This would give a return csv for our recent imports that would look something like the below example. We can see here that we’ve retrieved all previously un-exported stock lines, including the addition of some products that were made earlier in the day.

This sample export file can be downloaded here.
However, as with the JSON exports above, this would not return any transactional data, so again we can make use of the ‘SystemLog’ endpoint instead to retrieve more relevant data in terms of transactions and inventory adjustments.
SystemLog:
This endpoint can be used to extract a wide variety of data by traversing the available datapoints linked out from here. We can see the definitions that we can use here.
Header/column definition filename: “SystemLog.csvh”
Completed header files should be placed in: “<installdir>\SG Control Center\gateway\export\order”
Export CSV filename: “SystemLog-datetime.csv”
CSVs for exports will be generated in: “<installdir>\SG Control Center\gateway\export”
As above, this would need to be enabled in the Gateway section of Control Center:

Header File:
From here we can structure our header depending on what transactional data we want to receive back to the ERP. For our purposes here this could look like this:

This sample header file can be downloaded here.
CSV Export File:
So we can see here that we are going to receive data back specifically tailored for our needs, including data such as the commodity, its lot number, original quantity, any adjustments and the user who performed the action, along with any reasons and relevant job/batch info.
If we run the system log with the above header we will get an export that looks something like this:
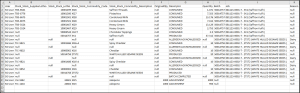
This sample export file can be downloaded here.