Locations
Module Guide - A Deeper Dive!
Introduction
Dividing a factory into separate locations for warehousing and production can improve efficiency and organization.
Warehouses can be used to store raw materials, finished goods, and other supplies, while production areas can be dedicated to manufacturing and assembly.
This separation allows for more efficient use of space and can reduce the risk of delays caused by materials being in the wrong place at the wrong time.
The module guide explains how V5 Traceability can be used to setup and configure all the locations within the building. Accurate and simplified location management results in a rapid selection and streamlined process, minimizing opportunity for human error.
Table of Contents
1. Production Locations
Production locations in V5 Traceability refer to locations in the facility where batch/product production takes place. These can be set up in Control Center, where we can also assign Terminals and formulas to these locations.
This is useful in order to segregate the production of different types of batches and products to the areas of the facility where they are best suited. This also helps to avoid all Terminals seeing all jobs, further streamlining production by making it easier for operators to see exactly what they should be producing at their station.
Let’s take a look at Control Center and we can begin to set up some locations and see how this works in practice.
We can start by heading over to the ‘Locations’ page of Control Center, under the ‘Setup’ header.
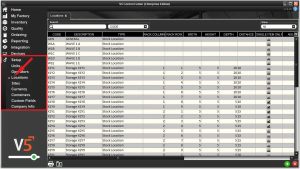
Here we will be shown the list of current locations in the main panel, and we can use the green + in the bottom right to add a location. For this example, let’s create 2 new production locations, ‘BAGGING’ and ‘COLLATION’. Bagging will be used to bag individual elements of a formula, and these will then be combined with other commodities at the collation station.
Creating production locations is as easy as filling in the first 2 columns and then selecting the correct location type from the drop-down menu, as seen here. The assigned code must be unique.

Once this is done, we can similarly create our collation station and utilize them in production.

2. Stock Locations
Stock location are locations where inventory can reside. These could be ingredients, produced batches or products, as well as incoming and outgoing purchase/sales orders. Stock locations and their setup also plays a big role when it comes to directed putaway and allergen separation.
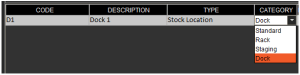
We can set up stock locations as we did above by hitting the green ‘+’ and assign a code and description to them (the code must be unique). We should then define it as a stock location by using the drop-down menu.

We should then decide what type of stock location this will be but using the drop-down menu in the ‘Category’ column.
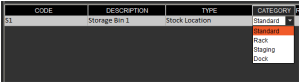
We have 4 options here, which we can now look at:
- Standard – this is the default stock location type and should be used when the other categories don’t apply to the location. These could be storage bins/lockers
- Rack – Setting the location as a rack enables us to use the ‘Rack Column’, ‘Rack Row’ and ‘Aisle’ to program a basic layout of rack/shelving units and their aisle numbers into the system. More on how to set this up below. Required for wave picking.
- Staging – Setting this location category indicates that this location is an area that can be used to hold commodities or products post receipt or prior to shipping. Also required for wave picking.
- Dock – Used in conjunction with staging above, this category indicates that this location will be used as a final location for dispatching goods, or as a location to receive incoming deliveries from purchase orders. Again, this type of stock location is required for wave picking.
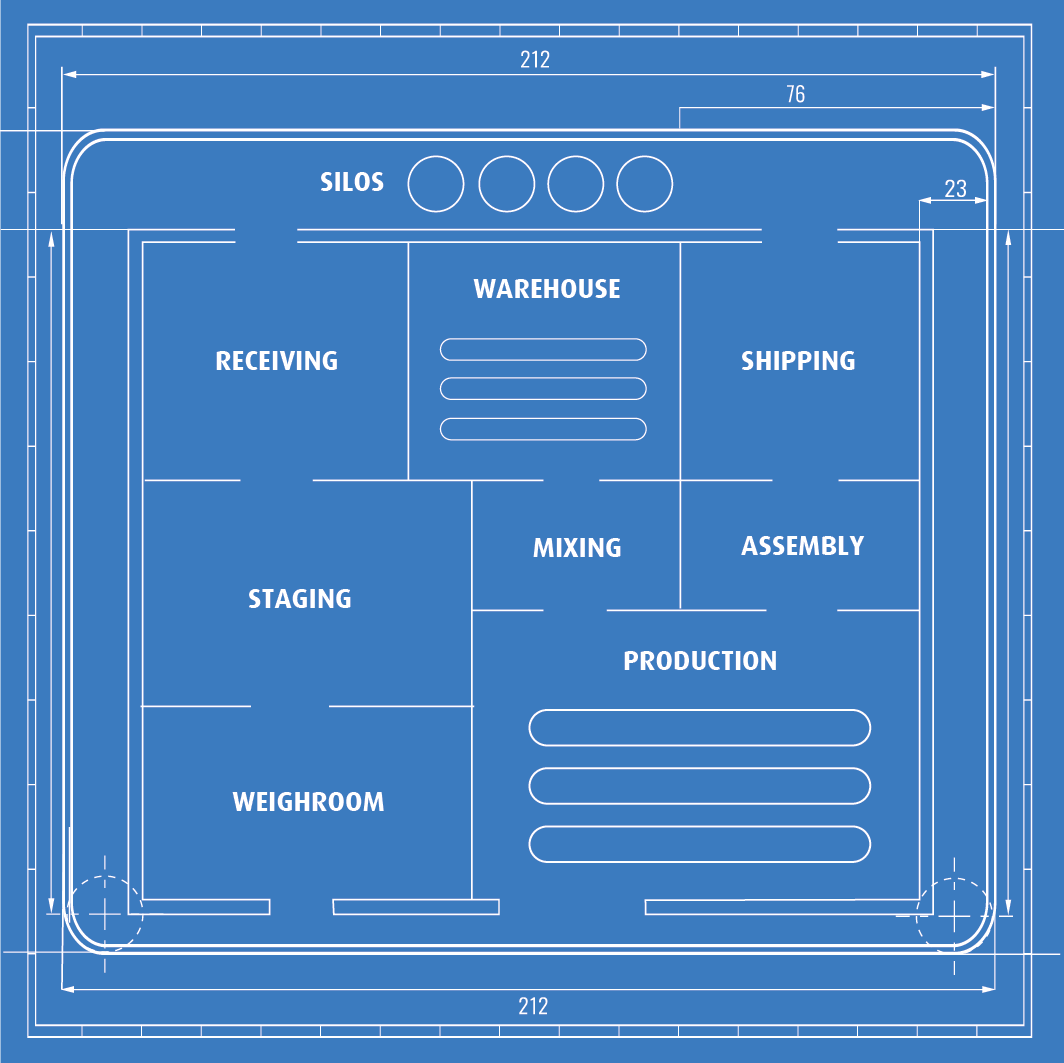
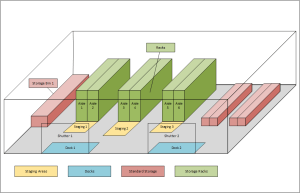
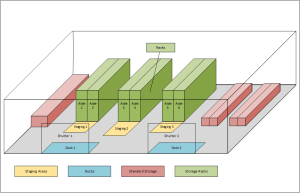
These different location types can be visualized if we look at a basic warehouse layout example below.
So, let’s create another location, this time a dock location.
With these 2 locations created, we can run a quick example of how these would work for receiving a purchase order, and then moving it to another location.
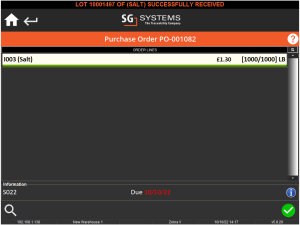
Creating a purchase order for 1000lbs of salt, we can go to WMS to receive this.
Each instance of WMS has a default stock location assigned to it, and it is this that, depending on the configuration of that WMS instance, that stock will automatically be booked into upon arrival at the warehouse. We will configure WMS to ask in this instance.
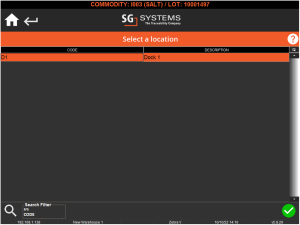
With this setting enabled and we go to receive the purchase order we can select our Dock from the list, or search for it using the function in the bottom left.
With a location selected we can then receive this lot of salt and complete the purchase order.
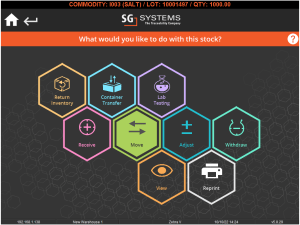
2.1. Moving Stock Between Locations
This lot of salt will now be held at ‘Dock 1’, but what happens when we want to move it? Well this can be done easily using the ‘commodities’ section of WMS. If we head to this section, we can either scan the stock barcode of the lot (which will be printed at the end of the PO process) or navigate to it manually/search for the lot number using the built in search options.
Selecting our new lot of salt will bring up the commodity management window, where we can select the ‘Move’ option.
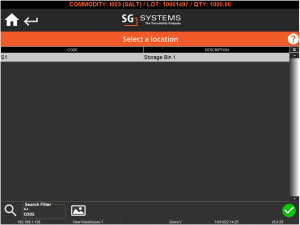
We can then search for our previously created ‘Storage Bin 1’ and move the lot. Depending on the WMS settings we will be asked to specify the weight to be moved.
More information on how WMS handles commodities can be found here.
Lots can also be moved in Control Center in the ‘Manage Inventory’ page under the ‘Inventory’ header.
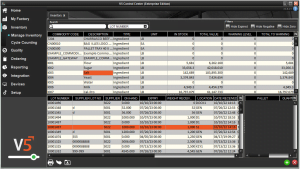
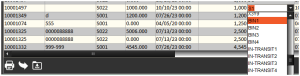
If we navigate to our recently received lot here, as shown above, we can simply use the drop-down menu in the ‘Location’ column in the bottom left panel to do this. Note that this should only be used as a management override in event of an error.
These above processes only apply to non-palletized commodities. Pallets of commodities can be moved in a similar way by using WMS’s pallet manager. More information on how this works can be found here.
3. Assigning Devices to Production & Stock Locations
Any V5 device (running Control Center/Terminal/WMS) can have multiple visible locations. Locations can likewise be assigned to multiple different devices. This functionality serves to separate what jobs or stock can be seen by each device and streamline the functionality of the facility’s production.
This process is described in more detail here.
4. XYZ Stock Location Declarations
If we go back to our layout of a basic warehouse:
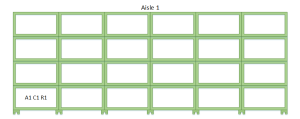
We can now look at how to set up our racks. If we imagine that each rack on each aisle has 4 rows and 6 columns, we can begin to build this up in Control Center. So, beginning with ‘Aisle 1’, we can create a new entry here for Column 1 and Row 1 for this rack unit. This would look something like this in Control Center.

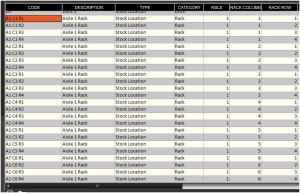
If we then translate this to an X/Y coordinate for Aisle 1’s rack unit, on the rack itself this would look something like this.
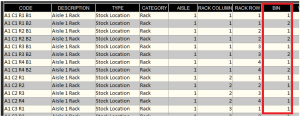
We can go on like this, adding more storage locations as ‘Racks’ to build up V5 Traceability’s virtual model for this shelf. So for Aisle 1 on our shelving units with 4 rows and 6 columns, this would look like this. Note again how the ‘Codes’ must be unique, but ‘Descriptions’ can be used to group the entries together.
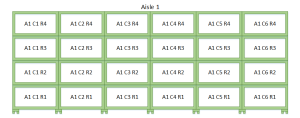
So coming back to our shelving unit on Aisle 1, this would be represented in reality like this.
We have specified Bin 1 for the remainder of the racks, but this is not strictly necessary. However, if these locations are to be used for Wave Picking stock for Sales Orders or Transfers, then we need to have entered the full Aisle + X/Y/Z (column/row/bin) designations for each rack location that needs to be used.
We will be able to print out location labels to match all these different racks, which allows operators to scan against them when they are moving things to/from these locations.
Of course, with the layout of the warehouse as shown above, we might want to reverse this order (i.e. start with column 1 on the right rather than left), so that all the columns run from 1-6 from the front to the back of the warehouse. This would simply be a matter of switching the labels around to reflect this order.
All of our individual racks can now be used to store commodities. How these, and standard stock locations, are now used to depends on a few other settings that we can also apply while performing this initial setup:
- Height/Width/Depth/Weight Limit – We can use these cells in to define the physical dimensions/capacity of each location and ensure it is not overloaded. These are used in conjunction with commodity/formula weights that can be defined when we create these within V5 Traceability.
- Distance – This relates to the distance of the location from the main shutters/loading dock.
- Single Item Only – Only allows for 1 lot or pallet to be stored at this location.
- Single Commodity Only – Only allows for lots of a single commodity to be stored at this location.
- Mix Allergens – Allows for allergens to be mixed at this location. Normally allergens will be kept strictly separate to avoid cross-contamination.
All of these additional settings will play a role in the system’s implementation of directed putaway, allergen putaway, sales orders, transfers and wave picking.
We can also assign locations to specific ‘Sites’, which we will look at below.
5. Sites
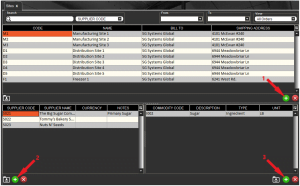
Sites in V5 Traceability are used to further segregate a business’s operations into different buildings, into which we can place production and storage locations. These sites can be assigned default suppliers for specific commodities, which again helps to break down and separate what production happens where.
Sites are also integral to the correct setup and execution of transfers.
Sites can be set up in control center by creating a site in the top panel (1). We can then, if desired, add suppliers (2) and commodities (3) to associate with this site.