
Batching
Module Guide - A Deeper Dive!
Introduction
Batches can be made using a variety of methodologies, depending on industry requirements, production volumes, and quality assurance requirements. Some batching operations require hand-weighed ingredients, whole bags and units, bulk ingredients and so on.
The are also many production styles in batch weighing. Vertical batching (regular batching), horizontal batching (campaigning), and global horizontal (weighing a common ingredient across various jobs).
V5 Traceability supports the vast majority of production and batching manufacturing processes. This guide helps the user understand what’s possible and how to configure the system to reflect the needs of these processes.
For a look at how finished products are made in V5 Traceability after the batch process is complete, please see our separate module guide on that topic here.
Table of Contents
1. Batching Screen Overview
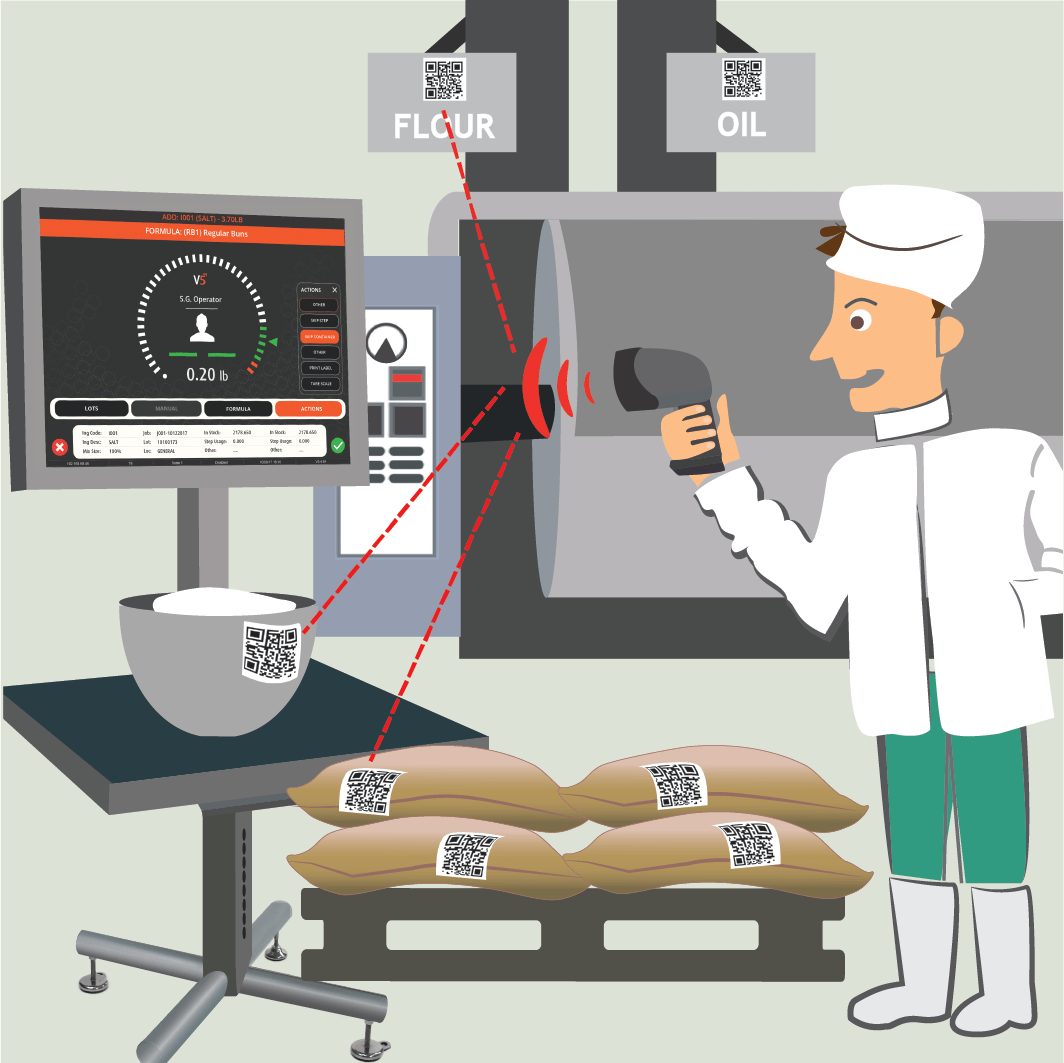
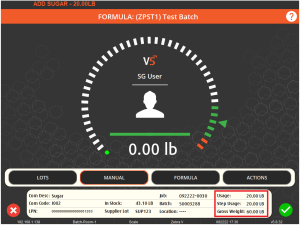
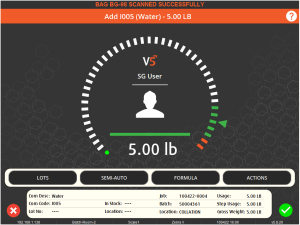
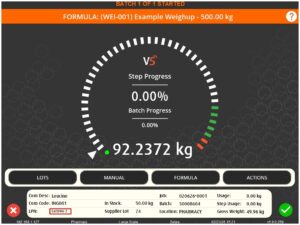
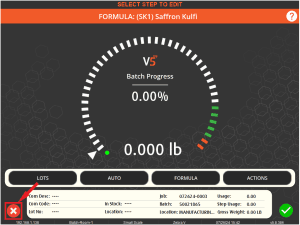
Before we take a look at the different batching types, it would be useful to take a quick look at the main batching screen in Terminal and run over the basic layout.
- Marquee messaging screen – this will display any messages to the operator throughout the process.
- Batching instructions – this will display instructions on the current batching step.
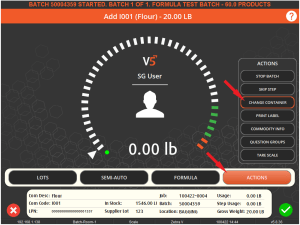
- Weighing interface – by default this will appear as a ‘speedometer’ to guide the operator towards the acceptable weight for the particular step. Alternate weigh screens are discussed here.
- Button panel – Contains 4 buttons:
- ‘Lots’ – for selecting a lot/pallet to draw ingredients from
- Batching mode – this can be set to ‘Manual’, ‘Semi-Auto’, or ‘Auto’. This affects lot selection and when the Terminal will accept the weight on the scale. More information on what this means can be found here.
- Formula step view – Allows the operator to view the formula’s steps (if they have sufficient permissions).
- ‘Actions’ panel – Provides the operator with additional options for the batching process. Note that the options here are different between batching and product Terminals.
- More information on all of these buttons can be found here.
- Info panel – This contains information related to the currently selected commodity lot, as well as information about the current job and batch.
2. Vertical Batching
Vertical batching can be considered the ‘normal’ or ‘default’ way of batching in V5 Traceability. This works on a per-batch basis, where all ingredients will be picked and weighed out in the sequence defined by the formula steps until the batch is complete. After the batch is complete, the operator will then move on to the next one, and the next, until all batches have been produced and the job is complete. Batch labels can be printed after every batch.
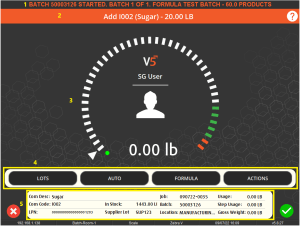
If we take a very basic formula, such as the one below with 3 weigh steps, and schedule it for production, we can see how this mode works.

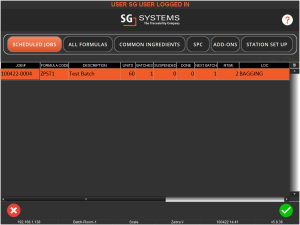
With this scheduled, if we go to the ‘Scheduled Jobs’ tab in Terminal, we will see the job waiting to be completed. We have scheduled 1 batch of this ‘Test Batch’, and can use the green ‘check’ button to proceed to batching.
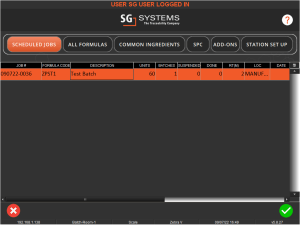
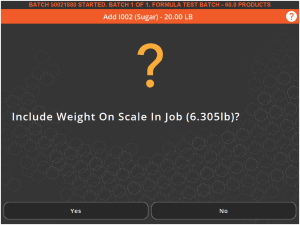
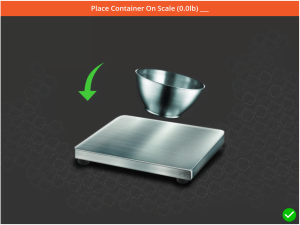
Any allergen or hazard warnings, as well as any Q&A events that have been set up, will display before the batching begins. After these, the first step will usually be to add a container to the scale, after which we can hit the green ‘check’ again. The system will then tare the scales ready to begin adding commodities.
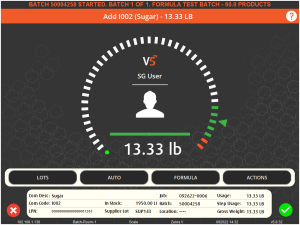
We can then proceed to begin weighing our commodities on the scale. Here, depending on the batching mode set for the Terminal (manual/semi-auto or auto as discussed above), the operator can be asked to select a lot from a list:
Or they can be forced to scan a stock label for the relevant ingredient:
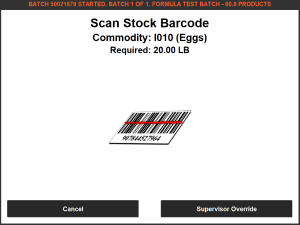
Or, if on auto/semi-auto mode, the lot will automatically be selected by the Terminal based on FEFO/FIFO rules. However the lot is selected, once it is chosen we can then proceed to weigh it out, guiding the arrow on the speedometer into the green zone. The green zone here represents the step tolerance set in the formula setup in Control Center.
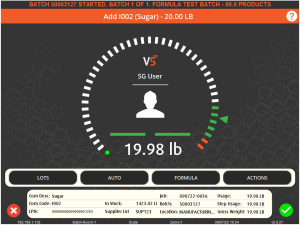
Again, depending on the batching mode being set to manual or automatic/semi-automatic, once the arrow has reached the green zone, Terminal will either proceed to the next stage automatically, or require the operator to use the green check to advance to the next step.
Once all ingredients have been weighed, the batch will be complete and a batch label will be printed. If multiple batches are scheduled for the active job, the Terminal operator will then have the option to proceed to the next batch, or suspend the job.

If the batch is suspended then when the operator returns to the ‘Scheduled Jobs’ tab, they will be able to see how many batches they have completed, and how many remain.

If the operator proceeds to the next batch, then they will be asked to change the container for the next batch, after which the process will repeat itself until the job is completed.
2.1. Complete/Suspend/Abort Batch
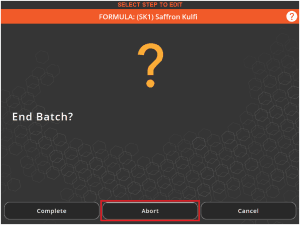
At any time during the batching process, if the operator either uses the red x in the lower left corner, or uses the ‘Stop Batch’ button under the ‘Actions’ menu, they will be presented with the following options:
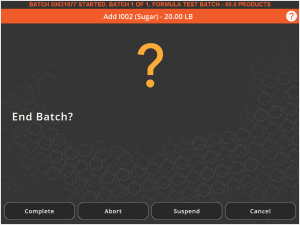
- Complete – Forces the batch to be completed regardless of whether all steps have been sucessfully completed. Note that this option’s appearance here depends on whether the operator has been granted this permission in Control Center.
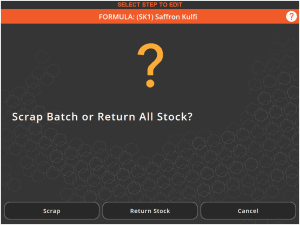
- Abort – Aborts the batch. Under the default Terminal settings this will automatically scrap/waste all ingredients that have already been weighed out for the batch. However, the Terminal can be set to present the operator with an option to ‘Return Stock’ to the lots that they came from as the batch is aborted. ‘Scrap’ will revert to the default Terminal behavious and waste all consumed ingredients. This function is also available when editing a batch via the Terminal. Note that a supervisor override can be enabled for this function, preventing operators from aborting batches without approval if required.

- Suspend – Suspends the batch at the current point, meaning that all previously accepted ingredients will be retained when the batch is reopened. If ingredients are already on the scale at the point the batch is suspended then the operator will have the option to include this weight in the batch before it is suspended. If the operator answers no here then the amount on the scale will be scrapped/wasted.
- Cancel – Will return the operator to the batching screen.
3. Horizontal Batching
Vertical batching is useful if we are producing small numbers of batches at a time, but what happens if we want to produce larger numbers of batches in our jobs?
If we are working with the same formula as in vertical batching above:
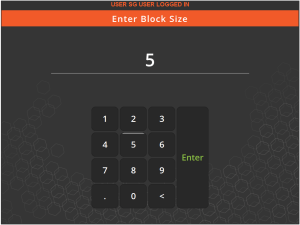
Producing 1 batch of this formula is relatively quick and straight forward, as we saw above, but what happens if we need to produce 10 batches for a job? Or 20? This is where horizontal batching comes in. Horizontal batching in V5 Traceability allows for multiple batches to be completed at once by dividing the job into ‘block sizes’, whereby the operator will specify the number of times the same ingredient will be weighed in sequence before returning to the ingredient select screen. This number can usually be defined by the weight limit of the scale we are using.
So let’s see how this works by scheduling 10 batches of our test formula above.

If we then go to our Terminal, horizontal batching can be performed under the ‘Common Ingredients’ tab.

Each Terminal can be configured to always use the same block size every time, or to prompt for one. In this case we are being prompted, so we will enter a block size of 5. In this theoretical example, let’s say our scale capacity is 120lbs. This means that we would be able to weigh out at least 5 lots of each commodity required at once (100lbs) plus enough spare capacity for any containers we might use.
After confirming our block size, we are then taken to the next screen which can be configured to allow us to select a commodity for weighing. It can also be configured to enforce the step order of the formula. If this is the case we will be taken straight to the weighing screen.
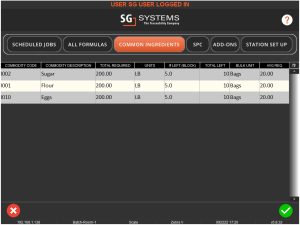
We can see here that 10 batches are required (under ‘Total Left’), while the number to the left in this session is 5 (# Left (Block)). If we select Sugar and hit the green check we can see how this works.
First, we will be asked to place our container on the scale:
This could either be one large container for the commodities, or if we are keeping our batches separate, 5 containers. As above with the weight, this will be defined by the size/capacity of our scale. Once this is done, we can begin weighing.
We will then be directed to weigh out 20lbs of sugar (the amount for 1 batch) 5 times. A strict order of weighing the requirements for each batch can be enforced automatically, or the operator can be allowed to weigh the requirements in any order. We can see the gross weight of the job increase as we weigh these out.
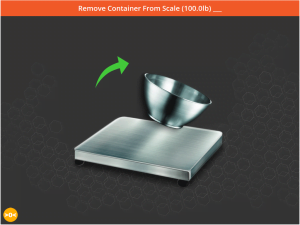
Once we have completed these 5 steps, we will be direct to remove the container from the scale:
After we have done this, the process will repeat itself after we select another commodity to weigh out 5 times. Once we have completed these steps for each commodity our session will be complete and we will be returned to the main job select screen. If we then go back to ‘Common Ingredients’ again, we can complete the remaining 5 batches.
4. Bulk Batching
For information on batching using a bulk dispenser please click here. This is not the same as using the system’s bulk units that will be discussed below.
Bulk batching is a function that can be used with both vertical and horizontal batching, and utilizes bulk units to enable whole bags/packs of commodities to be used and recognised by the system without the need to weigh them out. The system will then calculate the remainder quantity required once all bulk units of the commodities being used have been taken into account.
If we take the same formula we used above, but increase the quantities required, we can see how this works. For this example, all the commodities have bulk bags of 50lbs set against them in commodities.

If we go ahead and schedule a batch of this modified formula we can see the bulk function in action. The batching process will start in the same way(s) we have seen above, but when we come to the first weight step for 70lbs of sugar, we can see that instead of being asked to weigh the whole 70lbs, we are instead asked to add 1 bag @ 50lbs (our bulk unit).
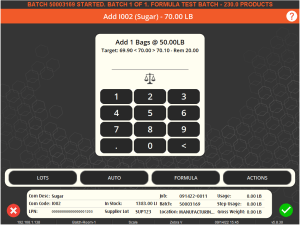
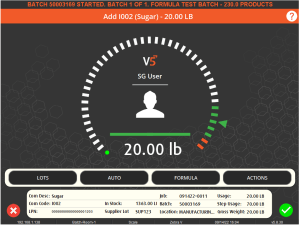
We can then use to key entry panel here to confirm that we are adding one bag, after which we can proceed to the next step, where, with the Terminal loaded with the default ‘combined’ bulk mode, we will be asked to weigh out the remaining 20lbs.
The batch will then proceed in this fashion, so for the next step, we will be asked to add 2x 50lb bags of flour then to weigh out the remaining 20lbs. Finally, we would weigh 40lbs of eggs, as this quantity did not meet the bulk unit threshold of 50lbs. After this the batch will be complete and a batch label can be printed.
4.1. Bulk Vs Remainder
As indicated above, with the Terminal set to the default ‘combined’ bulk configuration, the system will first ask for the bulk unit, then the remainder, adding them to the same container. However, this can be setup in a couple of different ways depending on the way the warehouse functions, allowing us to split these functions over multiple Terminals.
-Bulk Mode
Setting the Terminal to ‘bulk mode’ will only allow that Terminal to add the bulk elements of the batch to the job. So, in this example, we would only be able to add 1x bag of sugar and 2x bags of flour. The remainders will be ignored by this station. This could be handy for Terminal stations that might not have scales attached, such as conveyer belt/bag drop/mixer station setups.
-Remainder Mode
Setting the Terminal to ‘remainder mode’ will only allow the Terminal to weigh out the remaining required quantity of our commodities once the bulk units have been subtracted. So, in this example we are using here, we would only be able to weigh out 20lbs of both sugar and flour, and then 40lbs of eggs. This could be used at a ‘pre-scale’ terminal, and could be done a day or two before the bag additions are made, palletized and set ready for the job.
Contact SG Support for help configuring these different bulk modes.
5. Bagging & Collation in Batching
Another way we can batch in V5 Traceability is to make use of the bagging modes. These allow us to perform the batching of certain formulas at one Terminal, and then for the collation of these with other commodities or formulas at another. This can be useful for dry/wet style batching, where we might want to weigh all our dry components and then collate them at a different Terminal with the wet components.
Let’s see how this works. If we take our example formula we’ve been using so far, we can take our existing formula as the ‘dry’ steps, and then create another formula which features this as a submix as well as 5lbs of water as the wet component. We are also going to use the ‘schedule’ checkbox in the formula steps to schedule the production of the ‘Test Batch’ whenever we produce ‘Test Batch (Wet Additions)’.

Also note how we have set the production locations of these formulas to ‘BAGGING’ for ‘ZPST1’ and ‘COLLATION’ for ‘ZPST1-W’. This helps to separate production in our facility, keeping the wets to one area, and the drys to another.
To make this work correctly, we need make sure that the production locations of our two Terminals are also set to our ‘BAGGING’ and ‘COLLATION’ locations. This can be done in the ‘App Licenses’ tab of Control Center.


Finally, the Terminals must be configured correctly for this type of bagging mode. Contact SG support for help setting this configuration.
With this setup complete, we can then proceed to our Terminals to see this in action. At our ‘bagging’ terminal, we will see the submix formula waiting to be batched.
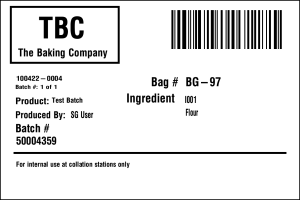
From here we will process the batch in as normal (we could use vertical or horizontal batching styles for this), but after each weigh step, a bag label will be printed which can be attached to the container (or bag) that this commodity has been weighed into. Container changes between these steps can also be mandated in the Terminal configuration, or the operator can do this manually via the ‘Actions’ menu.
Bag labels can be customized as with any label in V5 Traceability, to include barcodes and human readable elements that will identify the bag/batch number and contents for collation. An example of one of these labels can be seen below.
Once we have weighed out our dry formula at the ‘bagging’ station, the batch will show as complete on this Terminal and a batch label can be set to print. We can then move to the ‘collation’ station to complete this job.
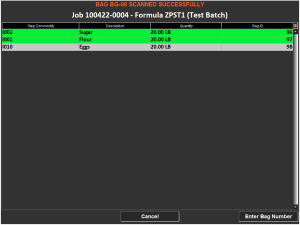
At first we will see a similar view on the scheduled jobs tab as we did on our first Terminal, but once we select this job, we will be asked to scan each of our bags that we produced at the bagging station. Bag numbers can also be entered manually, though this can be restricted to a scan only action through Terminal configuration. As we proceed to scan the bags we will see a live view of how many we have already scanned and what still needs adding to this job.
After all bags are scanned onto the batch, we can then add our wet element (water) to complete the batch.
After we have done this, the final batch label can be printed and the job will be flagged as complete.
We can also utilize bagging modes in a slightly different way that would allow us to collate commodities at the collation station in an order set in the formula steps of the main collation formula. So in this example we have just completed, if we wanted to add the sugar and flour, followed by water before finally adding eggs, we could make use of this additional mode to allow for this to happen.
6. Batching Using Mix Containers
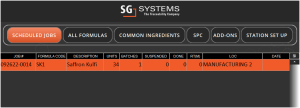
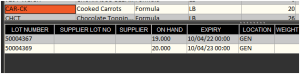
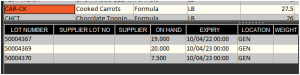
Batching using mix containers can be useful for batches or products that contain submixes. Use of these modes allows submixes to be prepared at one station and batched into a specific mix container. This mix container will then be requested by another Terminal which will weigh the rest of the required commodities and collate the submix. If we take our Safron Kulfi formula from the Formulation and Scheduling guides, which contains the ‘Chocolate Toppings’ submix, we can see how this works.
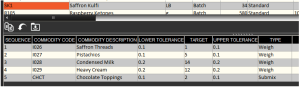
For the purposes of this example, we will have the chocolate toppings being made by one Terminal, and then collated at a second. More information on how locations affect production can be found here.
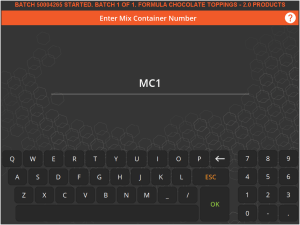
At the first Terminal we can select our chocolate toppings batch as we would normally, but before we are asked to weigh anything, we will have to specify a ‘Mix Container’ number.

Mix containers can be created in Control Center, and must be designated as the ‘Batch Mix’ type of container to be eligible for use with this process. These containers can then be barcoded and scanned onto and off jobs as needed.

When presented with the following screen, we can either scan our container, or manually enter its code.
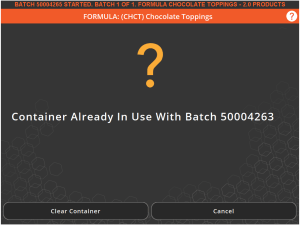
After we have done this, and if the container is available, we will be taken to the main batching screen. If the container is still in use for a previous job then the system will tell us and give the option to clear the container’s association with the previous batch it was used for.
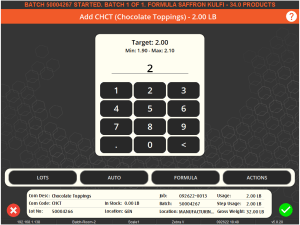
We can then continue to create our chocolate toppings as normal, after which a batch label can be printed. We can then go to our second Terminal where we will collate this submix with the rest of the required commodities.
Our batch will proceed as normal, except when it gets to the collation stage (determined by the formula step order set when the formula was created), at which point it will ask us to scan or manually enter our mix container.
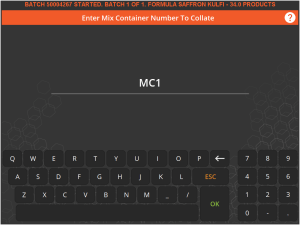
Again, we will select/scan ‘MC1’ for this. We can then add this submix, in this case via key entry as the weight of this submix will have been weighed correctly at the previous batching stage.
We then get the option to clear down the mix container.
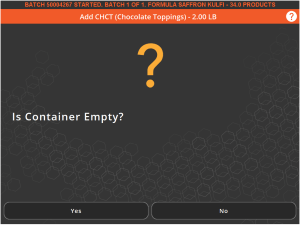
Since we are only making 1 batch here, we will do this. Obviously if we are making several batches then we wouldn’t do this and continue to use this container to add more of the submix for subsequent batches.
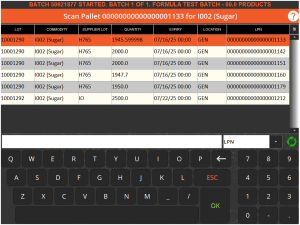
7. Batching Using Palletized Containers
Note that in order to use ingredients in this way the commodities we wish to use must be configured correctly in Control Center.
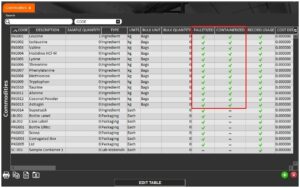
To enable palletized containers for stock, both the ‘Containerized’ and ‘Palletized’ boxes must be checked against each commodity that is intended to be treated in this manner:
Note that if stock was not previously palletized, any stock for commodities intended to be used in this manner must be zeroed before the ‘Palletized’ checkbox can be used.
This example will make use of a weighup kit that was issued via Material Issue. Once these items have been assigned and finalized via WMS, these ingredients will then be available for use at the production Terminal.
The batching process would initially proceed as normal (note that this stock handling method is available whether using vertical or horizontal batching) until the stock is requested, at which point, depending on the ingredient required, the operator would be shown the relevant pallet(s) to select.
So initially, and remembering that in Material Issue, we assigned a full pallet of Leucine, this pallet is now available for selection:
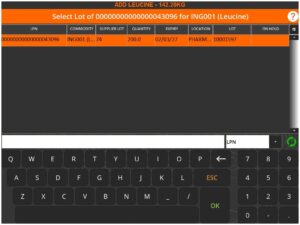
The pallet label could then be scanned to select it, or this can be done manually by the operator.
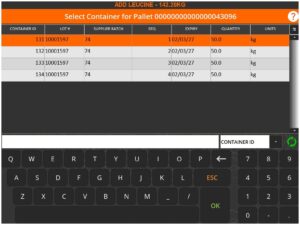
A list of available containers will then be shown, and again the desired container can either be scanned or manually selected:
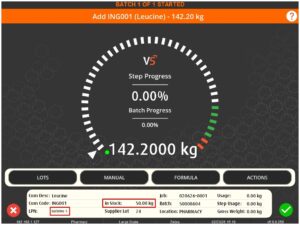
Once a container is selected, we can see that the available amount under ‘In Stock’ on the main Terminal screen, and then the container’s contents can then be weighed up:
And once this container has been weighed and the green check is pressed, the process will repeat to select another container from the relevant pallet.
Note here that a container label can be scanned at the pallet selection to immediately select this container. So we weighed the first container first, so at the pallet select we can scan container #2 to immediately select it:
Weighup would then proceed using whichever containers that were issued for the job until the requirements are fulfilled.
Once we move to the remaining ingredients, the second pallet that we issued will then be shown and we can select/scan the relevant pallet/container labels to select which container to use.
This process would then repeat in order to use the assigned materials to complete the job.
8. Additional Batching Functions – Operational Modes
8.1. Master Batch
Master batch is an Operational Mode (or ‘Op Mode’) option we can select when we set up a formula in Control Center. The default option is ‘Standard’, but if we use the drop-down menu in the ‘Op Mode’ column, we can select ‘Master Batch’.
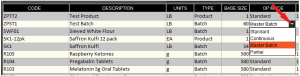
What we are affecting here is the assignment of batch numbers in production. In the standard mode, each batch will be assigned its own batch number. This means that if we schedule 5 batches for a job under the standard mode, they will all have different batch numbers. Doing the same under the ‘Master Batch’ mode however, will result in all 5 batches in the job having the same batch number.
Under master batch, the batch number will only change once we move on to another job.
8.2. Super Batch
‘Super Batch’ is the latest Op Mode available in V5 Traceability and can be found in the same drop-down menu in newer versions of Control Center.
Super batch essentially works the same as master batch in terms of giving all resulting batches from a job the same batch number, but it allows the scheduler to split batches according to min/max/base size, and schedules individual batches where master batch would just schedule 1 in production plan -> batch view.
These individual batches will have their own batch record, but will be grouped under the first batch number used when entered into inventory.
8.3. Continuous
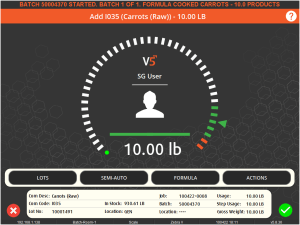
Continuous is another ‘Op Mode’ option that we can select when setting up a formula in Control Center. Using the same drop-down menu as in the discussion on master batch above, we can select it and see how this mode works in a very basic sense. Here we are going to work with a simple formula for turning raw carrots into cooked ones.

Scheduling a batch of this formula now, we can see in Terminal that when we select the job to process, instead of heading straight to the main weighing screen, we are instead shown the following screen, which shows our required commodities along with any instructions entered against the formula.
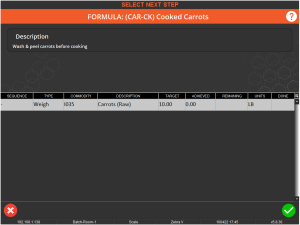
After highlighting our raw carrots commodity, we can then proceed to the usual weighing screen. In continuous mode, this screen now works slightly differently to how it would in previous examples. Instead of commodities being consumed and a set weight of a formula being produced automatically, here we have to specifically tell the system what we are consuming and producing. So, let’s can go ahead and weigh up 10lbs of raw carrots.
From here we will be returned to the previous screen, where, if we were dealing with a more complex formula, we could add more commodities. Here however, we are going to hit the green check again to return to the weighing screen. We can note here that we have not actually produced anything yet, something we can check by looking at our inventory in Control Center. If we make a note of the batch number at the top of the previous screen we can see that this batch is not present, i.e. nothing has been produced for it yet.
So how do we tell the system what we have produced? Let’s say we’ve taken our 10lbs of raw carrots, peeled and washed them, and then cooked them. We can then weigh these carrots again, either on the scales attached to this Terminal, or at a different one. If, for example, we end up with 7.5lbs of cooked carrots produced from this, we can tell the system this by hitting the ‘Produce Stock’ button under the ‘Actions’ menu.
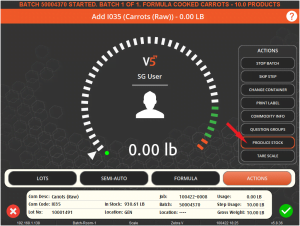
We can then enter the desired weight via key entry:

We can then see in Control Center that this batch has now appeared, with 7.5lbs entered against it.
We can then proceed to repeat this process as many times as we like, consuming more raw carrots and producing more cooked ones. When we are done we can hit the red X at the bottom of the Terminal window to complete the batch.

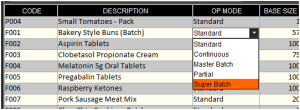
8.4. Partial
The final batching ‘Op Mode’ option we can look at here is ‘Partial’, and as with the other options above, this can be selected by using the drop-down menu in that column.
So, let’s schedule a batch of this formula with this setting and head to Terminal. We can select the job as normal, but before we get to the weighing screen, we will be asked the quantity to produce. In this example 60 is the batch size, so we can enter any value between 0 and 60. Let’s go for 40lbs.
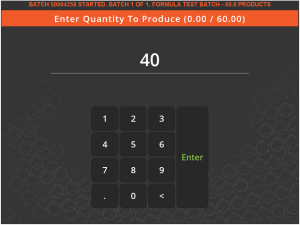
We will then put a container on the scale and produce the batch as usual. The main difference here is that instead of default 60lbs that would have been produced by default, 40lbs will be produced instead, so the batch requirements will be 2/3 of what they would be for the full batch.
9. Additional Batching Functions – Production Styles
Production styles in V5 Traceability apply to batch production and is used to select how we define the output of a batch. There are 3 options that we can use here, which we will look at now.
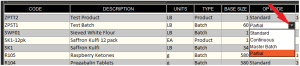
9.1. Calculated
This is the default production style that will be assigned to formulas. If we take our example test formula we can see how this works.
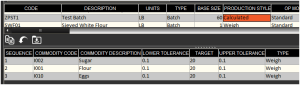
Then we can see that 20lbs of each commodity is required, with a tolerance of 0.1 either way. When a batch of this is sent to the Terminal for production, the operator will be allowed to weigh between 19.9 and 20.1lbs of each commodity. When the batch completes, the system will automatically add up all these weights and calculate the final weight of the batch, which could be between 59.7 and 60.3lbs.
9.2. Input
If we use the drop-down menu in the ‘Production Style’ column, we can select ‘Input’ from the list.

The batching process for this will work exactly the same as it would for ‘Calculated’, but instead of the system automatically producing the final batch weight, the operator will be asked to key this in using the on-screen keyboard.

This keyed in amount will then be recorded as the batch’s final weight.
9.3. Weigh
Again, using the drop-down menu, we can select ‘Weigh’ as our production style option.

Similar to Input, the batching process will remain the same, but at the end of the batch, the operator will be presented with a scale screen and asked to weigh the produced batch. Tare controls can be used to offset any container weight etc.
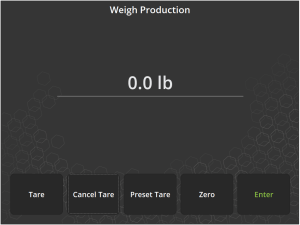
Once they weight the final batch and hit ‘Enter’, the weighed amount will be recorded as the batch’s final weight.
10. Batch Expiry
When a batch or product is produced in Terminal, the system will automatically assign an expiry date to it. This can be calculated in a couple of different ways, depending on the assigned ‘Expiry Mode’.
Fixed
This is the mode that the system will assign to formulas by default, and works off the ‘Expiry Days’ column in the ‘Formulas’ section of Control Center.
With fixed mode selected, the expiry of the batch/product will be dictated by the number entered in ‘Expiry Days’. In this example, a batch of Saffron Kulfi will be set to expire 365 days after it is produced.
Dynamic
Instead of having a fixed expiry, we can use the drop-down menu in the ‘Expiry Mode’ column to select ‘Dynamic’.

This now means that, instead of setting the expiry date from the number in ‘Expiry Days’, the batch or product will take its expiry date from the earliest expiry date of any of the commodities used. We can learn more about how the expiry dates of commodities are set here.
If we are producing a batch or product that features an already produced submix, the expiry date of this submix will also be included in this calculation.
11. Batch Edit
Once batches have been completed in Terminal, V5 Traceability offers the ability to revisit previously completed batches and perform edits on any of the steps involved. This is done on the ‘All Formulas’ tab on Terminal (1).
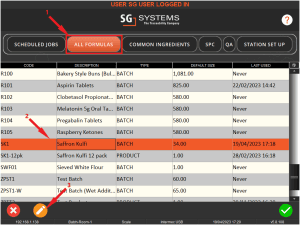
The operator (provided they have the correct permissions) will then be able to select the formula for the batch they wish to edit (2), and then hit the yellow pencil icon (3) to proceed to the batch edit screen.
They would then be taken to a list of visible, previously completed batches for this formula (a time limit can be placed on this).
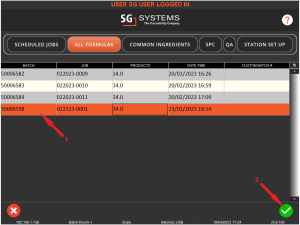
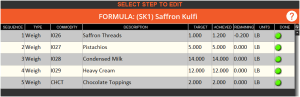
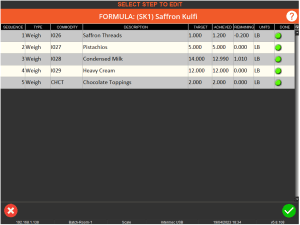
In this case let’s take the lastest batch (1) and hit the green check (2) to proceed with editing. We will then be presented with a list of the formula steps and the targets achieved for them. We would also see any relevant images/descriptions/instructions for the formula here. These are not present in this example.
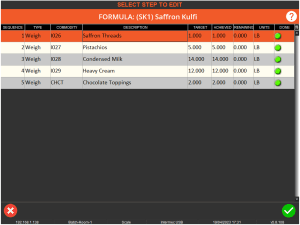
From here we have a few different options in terms of how to manage this already completed batch.
11.1. Additions & Replacements
Additions
If we hit the green check from the screen above, the first option we have here is to simply add more of that particular commodity for that step.
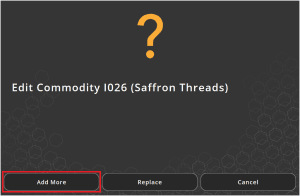
From here we will be asked to ‘Enter Adjustment Quantity’, so here we will add another 0.2lbs to our 1lb that was originally used in the batch.
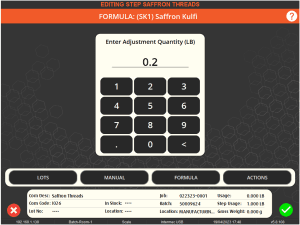
We will then be asked to put the batch container back on the scale, choose an appropriate lot of our Saffron Threads, and then weigh out the extra 0.2lbs. We will then be returned to the main batch edit screen, where we can select other steps to edit, or we can complete the batch again by using the green check in the bottom right.
Note here that the adjustment that we made is added to the ‘achieved’ weight.
Replacements
As we saw above, we also have the ability to ‘Replace’ the lot of a specified commodity (if this is possible with our batching methodology), so let’s see how that works now. Let’s try this with our condensed milk step.

After selecting the step and hitting the green check here we would then choose ‘Replace’.
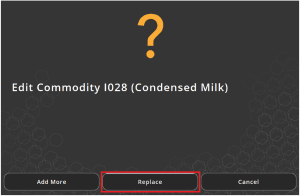
As above, we will first be asked to enter an adjustment quantity. Let’s imagine that for this batching method we are bagging items before a later collation step, and that we actually want to have 13lb of condensed milk rather than 14lbs. Hitting replace will again ask us for an adjustment quantity, but here this will effectively replace the target weight for that step.
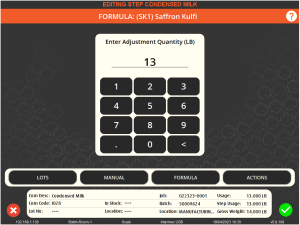
We would then be asked to select a lot and directed to weigh out the adjustment. Note again that we are weighing the full step, rather than adding more as above.
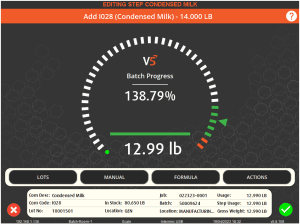
Again, once this is complete we will be sent back to the main batch edit screen. We can see that the achieved amount has now been replaced by our adjustment.
We can repeat the steps above for additions and adjustments until we are happy with the new batch composition. We can then hit the green check in the bottom right once more and complete the batch.
11.2. Abort & Return
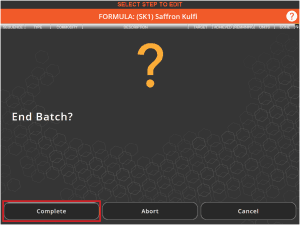
We saw above that hitting the green check when first editing a batch gives the option to add and replace. However, if we hit the red x instead, we will be taken back to the main weigh screen with no step/lot selected. From here we can hit the red x again:
To be given the option to ‘Complete’ (which will simply close the batch again with no edits), or to ‘Abort’.
Here we can be given 2 options, to ‘Return Stock’, or to ‘Scrap’ the batch. Note that the ‘Return Stock’ option would need to be enabled in the Terminal’s configuration. Contact SG Support for help with this.
Here we can:
- Scrap – This will remove the batch from inventory (note that batch records will still exist) and scrap/waste all materials that were used in its production. This is the default behaviour of the ‘Abort’ button if the ability to return stock is disabled in the Terminal config.
- Return Stock – Also removes the batch from inventory, but returns the materials used to inventory, restoring them to their original lots.
11.3. Control Center Options
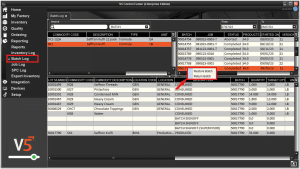
As well as the options for editing a batch via the production Terminal itself, we also have options available within Control Center. Both of these options can be accessed via the ‘Batch Log’ screen of Control Center. This can be found under the ‘Reporting’ section.
We would then need to find the batch that we want and right click it in the upper right panel:
The 2 options here work as follows:
- Restore Batch – This changes the batch’s status from ‘Complete’ to ‘In Progress’, meaning the job will be available again on the ‘Scheduled Jobs’ page of Terminal, allowing operators to reopen the batch. This is useful if weigh targets were not met, a lot of a raw material needs to be changed etc.
- Return Batch – This acts in the same way as the ‘Return Stock’ option on the Terminal discussed above, so all ingredients will be returned to the lots they came from. The job will also be reopened so that it can be processed again.