CustomFieldLink
Your Guide to V5 Integration!

The ‘CustomFieldLink’ import endpoint can be used to quickly assign custom label messages to commodities (usually finished product formulas) that can be printed on product labels on a per product basis.
More information on how this works and different examples of custom field use can be found here.
This guide will focus on how to use this endpoint, both via CSV import and using JSON via the V5 API.
Table of Contents
1. Control Center Layout
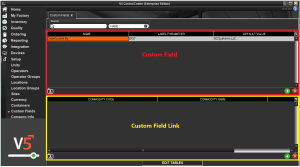
In terms of how we can relate custom field details to what we see in Control Center, we will be using the V5 API and Gateway to populate both the upper ‘CustomField’ panel to name our custom fields and input label parameter details, as well as the lower ‘CustomFieldLink’ panel to assign commodities to the custom field and enter formula specific information that can then be recalled to the label parameter set in the upper panel.

2. API Links
To find out more about the definitions for this ‘CustomFieldLink’ class, please see the following link:
3. CustomFieldLink Field Guide
3.1. Primary Keys
For importing via the ‘CustomFieldLink’ endpoint, the primary keys are:
Field_Name – The unique name for the custom field that we are either adding, or assigning our formula to. We can see this above as ‘Distributed By’.
Commodity_Code – The unique code of the commodity/product formula to be assigned to the Custom Field Group.
3.2. Required Fields
We can add other necessary data to flesh out of import from both the ‘CustomField’ and ‘CustomFieldLink’ database classes. These are:
From CustomField:
Field_LabelParameter – Necessary if creating a new Custom Field group, this is the parameter that will be used on labels to recall custom data from this group. In the Control Center example above we can see that this is ‘DIST’.
Field_DefaultValue – The default value that will be recalled when the label parameter is used, provided there isn’t a commodity/formula specific value to override this in the lower, ‘CustomFieldLink’, panel. In the Control Center example above we can see this is ‘SG Systems LLC’.
From CustomFieldLink:
Data – The information to be recalled on the label for that specific commodity/formula when the custom field group’s label parameter is used on a label.
4. Example Dataset
For this piece we will be looking at a simple example dataset featuring 3 different product formulas that we can assign to the already created ‘Distributed By’, giving them each a unique distribution message. We will also add a new Custom Field group called ‘Preparation Instructions’, with the ‘PREP’ label parameter.

So we will be adding the following data to the system:
- P006:
- Distributed By: ABC Distribution.
- Preparation Instructions: Wash Before Use.
- P007:
- Distributed By: Dave’s Distributors
- Preparation Instructions: Wash Before Use.
- P008:
- Distributed By: SGS Distribution.
- Preparation Instructions: Wash Before Use.
5. Methodology
5.1. JSON – Import
‘CustomFieldLink’ import Endpoint/URI –
http://host:port/V5-API/api/integrate/import/custom_field_link
Samples:
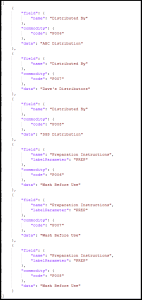
Using the ‘CustomFieldLink’ endpoint, we can structure an import file for the above additions like so:

So note here that, since we were creating the ‘Preparation Instructions’ group, we needed to include the label parameter in this import. For the ‘Distributed By’ group we do not need this and can just reference the name of the group in our import.
This sample JSON file can be downloaded here.
And once we have posted this to the system, we can see that our sample formulas have been added to the ‘Distributed By’ group, with their unique message in the lower panel’s ‘Data’ column:

And we can also see that our new group has been created to have the same ‘Preparation Instructions’ for all 3 of them:

5.2. CSV – Import
For CSV imports we first need to construct a header file for our imports.
Header/column definition filename: “customFieldLink.csvh”
Completed header files should be placed in: “<installdir>\SG Control Center\gateway\import\column_defs”
Import CSV filename: “customFieldLink-datetime.csv”
CSVs for import should be placed in: “<installdir>\SG Control Center\gateway\import”
Samples:
Header File:
An example header file can be seen below. Here we will be assigning our commodities to the defined custom field groups and also adding a new group as defined above:

For further information on how we structure these files, please see the main integration page. This sample header file can be downloaded here.
CSV Import File:
We can then use the defined order of data points in the header to structure our import file. Note that this first row can be ignored by Control Center and so can be kept in the file when submitting for import. An example import based on our requirements above would look like this:

This sample import file can be downloaded here.
In a difference from our JSON import, due to the CSV import mechanism, we would need to include the ‘DIST’ label parameter for the ‘Distributed By’ group in this case.
We can then drop this file into our import folder as defined above, and once the import is complete we can see that the custom field groups have been updated/added accordingly:

And:

