
Rework & Optional Routines
Module Guide - A Deeper Dive!
Introduction
Rework in manufacturing refers to the process of correcting or modifying a batch that does not meet the desired specifications or quality standards. Rework can also be generated deliberately as a result of trim or excess batch production.
Tracing rework is important because it helps manufacturers identify and address the root cause of the issues that lead to the need for rework. By tracking when, where, and why rework is performed, manufacturers can identify patterns and trends that may indicate problems with the design, production process, or quality control.
This information can then be used to improve the overall efficiency and effectiveness of the manufacturing process. Additionally, tracking rework can help manufacturers identify areas of the production line that may need more training or resources to improve quality, and can be used to identify the specific problems that are causing the rework.
Many of the methods that we can use for rework can also apply to optional routines and using the ‘linked step’ functionality of V5 Traceability’s formulation module, which we will also cover here.
Table of Contents
1. Rework
1.1. Specifying an Amount to Add
The rework functionality in V5 Traceability allows for more of a given formula to be used during the production of the same formula. This can be useful if, for example, we are making bread dough and we have leftover dough from other batches that we want to use rather than it going to waste.
There are a few different ways that we can set this up, so let’s take a look at these now.
The first method we are going to look at is, if we know we are always going to add rework to a formula, allowing the Terminal operator to specify an amount of rework to use, and then allow them to weigh this amount out. We can set this up against the formula in question in the ‘Formulas’ page in Control Center. If we take a simple dough formula, we can see how it works.

To set this up we will need to add the same formula to the formula steps in the lower panel of this screen. We can do this as with any other formula step by using the green plus (1) to add another step line, after which we can select our commodity (in this case the same formula – 2). The main difference here from setting up a normal formula step would be that we would leave ALL tolerances, as well as the target weight, blank (3). We will also use the up and down arrows in the bottom left of the window to move our rework step to be step 1. This means we will add our rework before the rest of the batch is added.

If we schedule a batch of this for production and head to our batching Terminal, we can see how this would work in practice.
We can select the job as we would normally if we are performing vertical batching, but when we get to the final formula step, our newly inserted formula, we will be asked to provide a target quantity for the amount of rework we are adding. We’ll enter 10lbs of rework here.
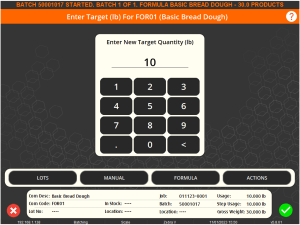
We will then be asked to select a lot to draw this rework from. If in this case, we have 5lb of rework from previously completed batches, we can add 5lbs from one batch, and then hit the lot button to change lots. At the prompt here we would select ‘Change Lot’. This keeps the current quantity from the lot we selected initially allocated, but allows us to select a new lot to weigh out the rest.
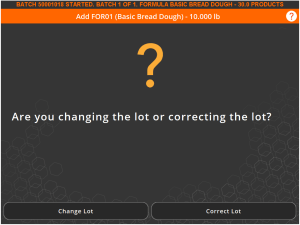
‘Correct Lot’ here will undo the current assignment of the commodity (if any) from the currently selected lot, and allows us to select a new lot to weigh the whole amount from.
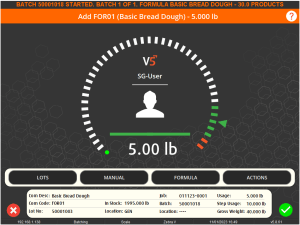
We can then weigh out the remaining 5lbs and hit the green check to complete the batch as normal. We can see that the ‘Step Usage’ here is now 10lbs, fulfilling the specified amount of rework.
If we return to Control Center, we can see that this newly produced batch size has a size of 40 rather than the scheduled product count of 30 for 1 batch, showing that our extra 10lbs of rework has been factored in.

1.2. Adding Optional Rework With A Wide Tolerance
The method above is useful if we know in advance how much rework we want to add prior to starting the batch. However, what about if we want the option to add any amount of rework to a batch within a wide tolerance? We can do this by tweaking a few settings in Control Center compared to what we set up for the last method.
For this method, instead of leaving our tolerances and target weight clear we will enter the following values:
- Lower Tolerance – 1
- Target – 1
- Upper Tolerance – 1000
So in Control Center this would look like this:

So what we are telling the system here is that we can add between 1lb and 1000lbs of rework. Tolerances can be tweaked as desired here to specify the range of rework amount that can be added.
If we schedule another batch of this now, we can see how this works differently to the previous method.
Running this batch in Terminal, once we reach the first step, we will see the following message:
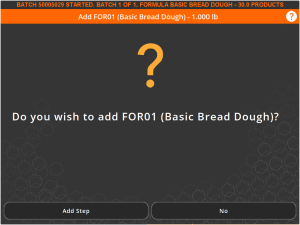
If we go ahead and select ‘Add Step’ here, we can the freely weigh however much rework we like from a selected lot. Bear in mind that for this method, if we try and change lots after adding more than 1lb of rework, the system will accept the current amount as the full amount of rework and proceed to the next step.
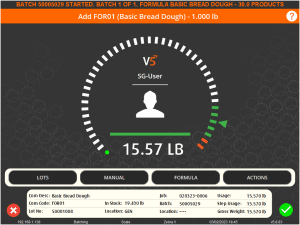
So we can see here that we’ve added 15.57lbs of rework to this batch. Hitting the green check once the scale is stable will proceed with the remaining steps in the formula. When we finish this batch, we will produce a batch size of 45.57lbs, compared to the usual 30lb base size for a single batch.
Once complete we can see this is the case in Control Center.

1.3. Using Optional Steps
We can also allow optional rework to be part of a formula by adding the rework as an ‘Optional’ formula step. Let’s look at setting this up now.
As before, we will add an additional formula step to our formula, but this time we will set this as an optional step (1), and we won’t add a commodity (2). We will also add a question for the operator to answer at this point, asking whether they want to ‘Add Rework?’ (3). This question has to be set up in Q&A for it to appear here. We do not need to set answers against this question.

We can then use the optional button (4) to add optional steps. This button can only be pressed if the optional formula step line is selected/highlighted.
In the optional window we can right click on ‘Optional Step (1)’ (the ‘1’ here refers to the formula step number) and select ‘Add Option’.
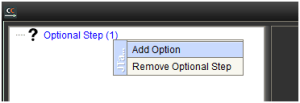
This will create an optional step, which we can rename by left clicking the newly created step (it will take a second for the field to become editable). We will call this step ‘Yes – Add Rework’.
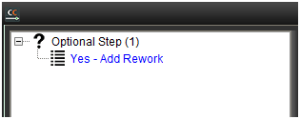
Once this is done on the left of the optional window, and with this new optional step highlighted, we can use the step panel on the right of this window to add our rework step. We can add this in the style of either of the first 2 rework methods discussed above. In this case we will allow the operator to add as much rework as they like, rather than specifying then weighing.

We would then create another optional step as we did above, but this time we will call this step ‘No – End Batch’, and we won’t add any step lines in the right panel for this option.

With this setup complete, we can close the optional window and schedule a batch to see how this would work.
Back at our batching Terminal, we can process the batch as normal, but then when we get to step 5, our optional step, we will be asked the question we set, and be offered a choice between the 2 optional steps we have just put in place.
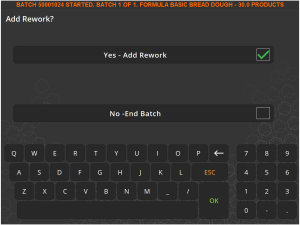
In this case we will add some rework to the batch. Selecting ‘No-End Batch’ here would, since there were no formula steps entered against this option, end the batch.
Selecting ‘Yes – Add Rework’ will then allow us to weigh up any amount of rework, as dictated by the setup we used. As mentioned above, we could have left all the tolerance/target fields blank to allow the operator to specify a weight to use before weighing the rework.
Here the operator will add 13.2lbs of rework.
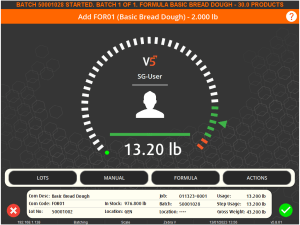
Once again, in Control Center, we can see that a batch of 43.2lbs has been produced.

1.4. Using Production Plan’s Step View
Sometimes it may not be appropriate to edit formula setups in the ways we have seen above, i.e. if formulations are sent down from an external ERP, if rework is rarely added to a formula, or if rework needs to be added as a one-off event.
In these cases, we can use the Step View functionality in the ‘Production Plan’ window of Control Center. Let’s take a look at this now.
For this example, we will schedule 5 batches of our dough at the normal base size (30lbs). This will look like this once scheduled.

With the job line selected in the bottom panel, we can then use the highlighted ‘Step View’ button to bring up the Step View tab, which will show us the formula steps that we are using for all of our 5 batches. We can see here that, as mentioned above, this is our default formula with no rework options currently added.
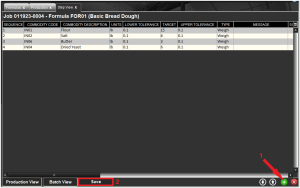
From here we can add another line if desired (1). We could use any of the 3 rework setup options discussed above for this, but for this example we will imagine that there is 9.50lbs of dough rework available and we want our operator to specify the amount and then weigh the rework.
As we saw above, we can set this up as below, leaving tolerances and the target blank. After this we will hit the ‘Save’ (2) button at the bottom of the step view tab. Note that the newly added line will remain the red/pink color that we would usually associate with an invalid line, but we can still add the line by hitting ‘Save’.

After hitting save we can then choose which of the 5 batches we want to apply this step change to. We can select as many as we like here by using Control on the keyboard while clicking. In this instance though we will just apply this to our first batch by selecting it and hitting ‘OK’.
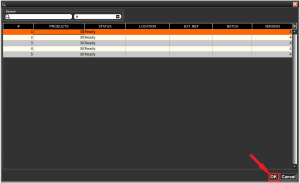
After applying this change and looking again in batch view, we can see that the formula version has now changed, so we are now using version 5 of the formula for 1 batch, and version 4 for the remaining 4.

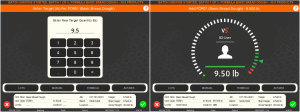
If we head back to our batching Terminal and run these batches, we will see that the first batch will now ask for a rework amount. The operator can enter the 9.5lbs and then proceed to weigh it.
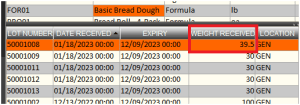
The remaining 4 batches of dough will now proceed as normal, and, once the job is complete, we can see back in our Control Center inventory the weights of the batches produced in that run, confirming that rework was added for just the first batch that we selected.
2. Linked Steps & Optional Routines
As well as sequencing the steps in the desired order, we can also make use of linked steps to link the fulfillment requirements of a particular step to an optional routine.
So for example, if we usually use ‘Flour A’ for a step, but would like the option to occasionally mix this with ‘Flour B’ to make up our weight target, then we can make use of the ‘Linked Step’ column and the ‘Optional’ step type to do this. Let’s see how we can do this.
2.1. Adding a Linked Step
Let’s take a basic formula for bread dough as our example. We can see here that our first step requires 25lbs of ‘Flour A’

To set up an option to mix another amount of flour to make up this 25lb step, we would start by adding another step, setting it as optional (1), and moving it (2) to be before our flour step, so in this case it would be step 1.
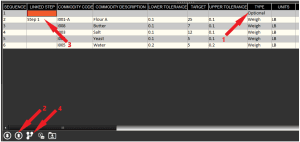
We would then use the drop-down menu in the ‘Linked Step’ column for ‘Flour A’ to link it to this newly created optional step, in this case Step 1 (3).
To remove a linked step association, we would just need to right click anywhere on that formula line and select ‘Remove Linked Step’.

We can also add a message to the ‘Message’ column of this step if desired. In this case we will add a question that asks the operator ‘Would you like to add a different type of flour?’. Remember that questions/messages must be set up in the Q&A section of Control Center before they can be used here.
With the optional line highlighted we can then hit the optional step button (4) to open the optional routine setup.
We would then add two optional routines here, 1 (Yes) to allow the operator to choose to mix a different type of flour (‘Flour B’ in this case), and another (No) with no formula steps set against it.

We can then set this up in 2 different ways depending on how we want the optional flour to be added:
- Specifying an amount of ‘Flour B’ to add.
- Weighing up an amount of ‘Flour B’.
2.2. Specifying An Amount to Add
As we have in the optional routine shown above, we can leave the target weight and tolerances blank here. This will mean that when we start batching this formula, we will be asked the question we set up and be able to pick our answers from the optional routines that we just set up.
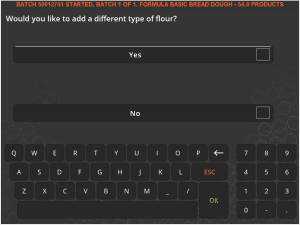
If we select yes here, we will be asked to key in the amount of ‘Flour B’ that we want to add. So let’s add 10lbs here.
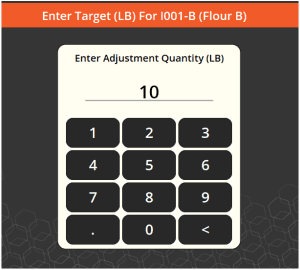
We will then be asked to weigh out this 10lbs of ‘Flour B’:
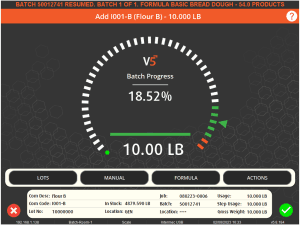
After confirming this weight, we will then move on to the step for ‘Flour A’, where we will be asked to weigh out the remaining 15lbs to make up our 25lb flour mix.
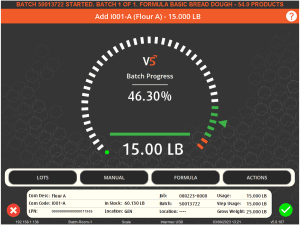
After confirming this then we will then proceed to complete the remainder of the batch as normal.
2.3. Weighing An Amount to Add
We can also set this optional mixing routine up to allow the Terminal operator to weigh an amount of ‘Flour B’ which will then be mixed with the remaining amount of ‘Flour A’. The main difference in the setup here comes in the optional routines.
Above we set up our optional step for ‘Flour B’ with no tolerances or target weight. Here we will change this to a lower tolerance of 1, a target of 1, and an upper tolerance of 25. This will allow the operator to weigh up an amount up to 25lbs of ‘Flour B’. The upper tolerance here should be set to the same as the target weight for our cumulative step, so our ‘Flour A’ step here, which is 25lbs. The lower tolerance and target should be set to the minimum amount of ‘Flour B’ that we will ever use to mix with ‘Flour A’.
This would look like this in Control Center:

Running a batch of this formula, we will get the same message we got above asking if we would like to add a different type of flour. Unlike the previous setup though, the operator will now be asked to weigh out an amount of ‘Flour B’. Here the operator will weigh out 7.80lbs.
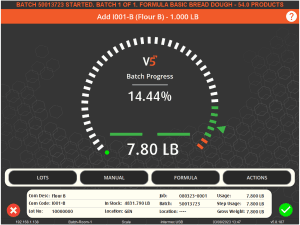
Note the 1.000lb requirement at the top here that is drawn from our combined lower tolerance and target as discussed above.
The operator will then confirm this weight, after which they will then be directed to weigh out the remaining amount for the flour mix using ‘Flour A’:
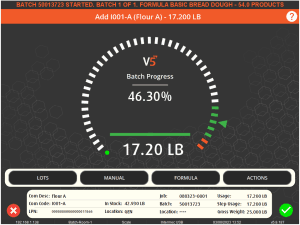
Once this has been completed the rest of the batch will proceed as normal.
3. Formula Version History
In the last method above, we modified our formula in ‘Production Plan’ before proceeding to batching. In all the previous methods however, we used the ‘Formulas’ table for this. Regardless of where we made these changes, we would generate a new formula version number. For the first 3 methods, the formula version would update as we made edits in the ‘Formulas’ table itself and update the version number as we went. For the final version however, the new version will be generated and visible in the batch view as we saw above with version 5. However, as we can see when we return to our formula in Control Center, version 4 is still the active version.

This doesn’t mean that the version 5 that we saw generated in the final methodology isn’t saved in the system though. If we hit the ‘Revert’ button with the formula selected (and provided the operator has the correct permissions and is editing the formulas table), we will be able to see that version 5 was in fact stored and can be recalled as the active version if desired by selecting it and hitting OK.
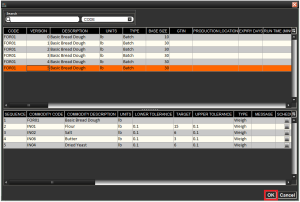
We can also recall our other formulas that we used for the other rework methods as we would usually recall a past formula.
