
Transfers
Your Guide to V5 Integration!

The integration of Transfers between V5 Traceability and a customer’s ERP system allows for transfer details, transfer line items and scheduling information to be sent to V5 Traceability. These transfers can then be sent and received via the V5 WMS software, after which information such as which lots were sent and received, how much was sent, what pallet this was on etc. can be sent back to the ERP.
V5 can also act as the data master in this case, and send transfers created within the system to the ERP.
More information on how the transfers module in V5 Traceability works, please see our module guide here.
Table of Contents
1. Control Center Layout
In terms of how we can relate ‘Transfers’ and ‘Transfer Lines’ to what we see in Control Center, we can see that the top panel here is for the Transfers, where to/from sites, external reference numbers etc., can all be imported.
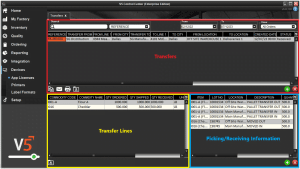
The lower left panel is then where we can add our Transfer Lines, holding data relevant to the commodities and quantities required for the transfer.
Using the V5 Gateway we can easily populate both panels, either separately or together.
The lower right panel holds data pertaining to where the items on the Transfer were picked from in the ‘from’ location, and receiving in the ‘to’ location. This data will form part of the export that we can receive back from the V5 Gateway.
2. API Links
To find out more about the definitions for these database classes please see the following links:
3. Integration Template
The integration template for Transfers can be downloaded here.
4. Transfers Field Guide
4.1. Primary Keys
Primary Keys are the unique identifier for each table within the V5 API. For Transfers, this is:
reference – The unique reference number for the transfer. Essentially the transfer order number.
For TransferLines, the primary key is either:
reference + commodity.code – The transfer reference/number along with the commodity to be transferred.
or
lineID – For advanced purposes where the same commodity may appear on multiple lines, you can specify a line ID as a unique identifier instead of the transfer reference and commodity code. This is required if more than 1 line of the same commodity is on the transfer.
4.2. Required Fields
Other fields that are required by SG to populate a valid entry in Control Center are:
For TransferLines:
quantityOrdered – the quantity of that commodity being ordered.
For Transfers:
fromLocation.code – the location the transfer will be sent from.
toLocation.code – the location the transfer will be sent to.
4.3. Preferred Fields
Preferred fields serve to add more data to the transfer, and while not required, are useful when it comes to functionality within V5 Traceability. These are:
lineID – if not used as a primary key above, this field should be included.
commodity.code – if not used as a primary key above, this field should be included. The code of the commodity to be transferred.
transfer.reference – if not used as a primary key above, this field should be included.
The above applies to ‘transferLines’. We can apply the same fields to ‘transfers’ by adding ‘transferLine’ to the first 2 entries, and removing ‘transfer’ from the last one.
4.4. Additional Fields
Additional fields can also be included, such as, for ‘transfer’:
comment – any additional comments for the transfer.
fromAddress – the address the transfer is sent from. These are populated in ‘Site Addresses‘.
toAddress – the address the transfer is received at.
directTransfer – whether this transfer should be a direct transfer or not.
Similar to above, if creating a ‘transferLine’ file, we can simply traverse to the transfer class by adding ‘transfer’ to the start of the above parameters.
5. Methodology
Given the nature of the ‘Transfer’ and ‘TransferLine’, we can choose to import data in 2 ways:
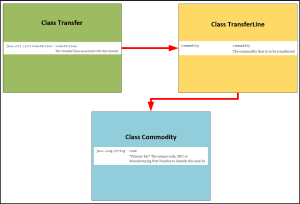
- We can use the ‘Transfer’ endpoint to import transfers, and then, as we will see below, traverse to the ‘TransferLine’ class to then include the component line items all in one file. This is the most logical way of importing whole transfers as it requires only 1 set of header information and then the subsequent line items. Note that this is also the only endpoint that we can use to modify the header information for the transfer.
- We can use the ‘TransferLine’ endpoint to modify or add transfer lines once the transfer has been created. This can still be used to import whole transfers, but is less efficient as each transfer line item would need to contain a nested reference to the transfer header (such as the reference). As indicated above, this endpoint cannot be used for making changes to the transfer header information (reference/to & from locations etc.).
Which of these endpoints we will use will largely depend on whether we use a JSON or CSV import. We can now look at these below.
5.1. JSON – Import
Transfer:
‘Transfer’ import Endpoint/URI –
http://host:port/V5-API/api/integrate/import/transfer
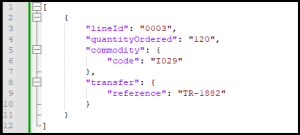
For this sample import, we will be using the ‘Transfer’ endpoint, and structuring a basic import file of a transfer with 2 lines, this could look something like this:
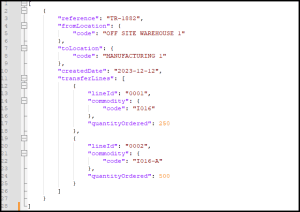
This sample JSON file can be downloaded here.
We can see why we would use the ‘Transfer’ endpoint for this format, given the ability of JSON files to hold nested data, allowing us to include indented ‘TransferLines’ lists, and subsequently ‘Commodity’ datapoints in the import, which can be determined by using the SG API manual. For example, the ‘commodity code’ datapoint can be found by using the following path in the API manual:
We can build up the rest of our required datapoints using a similar pathfinding method.
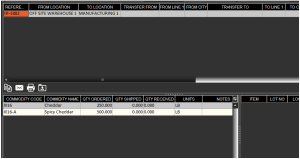
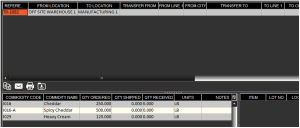
Using the above file, we can see that our new Transfer has been created in Control Center.
Transfer Lines:
‘TransferLine’ import Endpoint/URI –
http://host:port/V5-API/api/integrate/import/transfer_line
As discussed above, we can use the ‘TransferLine’ endpoint to add or edit lines of an existing transfer. We can also add Transfers using this endpoint, but it is important to remember that we can only edit a Transfer header by using the ‘Transfer’ URI above. Also note that the Transfer information would have to be nested here for each Transfer line.
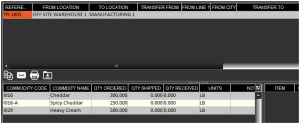
We can see an example of a ‘TransferLine’ JSON file below, where we will add another line to transfer ‘TR-1882’ that we created above:
This sample JSON file can be downloaded here.
Once this request has been posted, we can return to Control Center and see that a third line has been added to this transfer.
5.2. JSON – Export
In terms of receiving files relating to transfers back from the V5 API, if we check the method summaries under the ‘IntegrationExport‘ class, then we have a few different options here:
Transfers:
Export Endpoint/URI –
http://host:port/V5-API/api/integrate/export/transfers
This endpoint will export full transfer JSON files using the transfer database class, and will include every transfer that has not already been marked as exported by the system, or has been changed since it was first exported. This will not include any inventory movement data but rather provide a return for each datapoint in the ‘Transfer’ class.
An example of this type of JSON file can be downloaded here.
Transfer:
Export Endpoint/URI –
http://host:port/V5-API/api/integrate/export/transfer/{referenceNumber}
This endpoint will export full transfer JSON files using the transfer database class, but only for the transfer specified, and only if this transfer has not already been marked as exported by the system. As above, this will not include any inventory movement data, but rather provide a return for each datapoint in the ‘Transfer’ class.
An example of this type of JSON file can be downloaded here.
We can also utilize transactional and log endpoints to retrieve more relevant information about commodities received on Purchase Orders.
For Transfers, we have 1 System Log endpoint that we can use:
System Logs:
Export Endpoint/URI –
http://host:port/V5-API/api/integrate/export/system_logs
The use of this endpoint will return a complete list of system log events that have not been marked as previously exported. More information about this endpoint can be found here. These results can be filtered to look for transfer specific descriptors, such as ‘MOVED OUT/IN’, ‘PALLET MOVED OUT/IN’ and ‘PALLET TRANSFER OUT/IN’.
An example of this type of JSON file can be downloaded here.
5.3. CSV – Import
Note that for CSV imports, we would normally be using just the ‘TransferLine’ endpoint, allowing us to generate Transfers and their line items through the use of a single csv import.
Header/column definition filename: “transferLine.csvh”
Completed header files should be placed in: “<installdir>\SG Control Center\gateway\import\column_defs”
Import CSV filename: “transferLine-datetime.csv”
CSVs for import should be placed in: “<installdir>\SG Control Center\gateway\import”
Header File:
Header files will generally be compiled by SG Systems prior to CSV integrations taking place, but we can see a basic example of one we can use for transfers below:

For further information on how we structure these files, please see the main integration page. This sample header file can be downloaded here.
CSV Import File:
We can then use the defined order of data points in the header to structure our import file. SG Systems can supply a template file for this, listing the data point for each column to make things clearer when populating the list. Note that this first row can be ignored by Control Center and so can be kept in the file when submitting for import.

Here we can see that we are aiming to create a similar transfer to what we created using the JSON methodology. This sample import file can be downloaded here.
With the import complete, we can see that this transfer, along with the required line items, have been added to Control Center. Note that if the ‘Created Date’ data is not included in the import, the date placed will reference today’s date.
5.4. CSV – Export
When looking to export transfer information via this method, this would form part of a ‘SystemLog’ export. We can see the class definitions for this endpoint here.
Header/column definition filename: “SystemLog.csvh”
Completed header files should be placed in: “<installdir>\SG Control Center\gateway\export\order”
Export CSV filename: “SystemLog-datetime.csv”
CSVs for exports will be generated in: “<installdir>\SG Control Center\gateway\export”
This endpoint can be used to extract a wide variety of data by traversing the available datapoints linked out from it.
Header:
We can use datapoints such as ‘user’, ‘timestamp’ and ‘quantity’ on this top ‘System Log’ level, but then we can traverse to the ‘TransferLine’ class to add fields such as the reference number and commodities that were requested on the transfer, as well as to the ‘Stock’ class to retrieve information such as the locations the items were moved out of/in to.
On a very basic level, our part of the system log header that deals with transfers could look something like this:

This sample header file can be downloaded here.
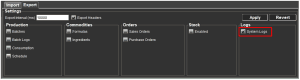
With this header in place we should also ensure that we have selected to export ‘System Logs’ in the export tab of the Gateway in Control Center.
With our header in place and export enabled (don’t forget to restart Control Center to apply any changes made in the Gateway!), we will subsequently get a return file for this transfer (along with any other previously unexported transfers) that looks like this:
