
V5 API
Your Guide to V5 Integration!

Introduction
The V5 Traceability Gateway allows for bidirectional data exchange between V5 Traceability product range and other solutions. The gateway is highly flexible, providing rapid deployment with many different ERP and external systems, allowing customers to efficiently integrate their entire factory. The V5 product range has an extensive API for use in integration.
This guide will provide a detailed overview of how to use the various methods to import and export data. It will also detail each entity that can be imported and the possible fields for these entities.
The gateway can be utilized in 2 main ways:
- Via a web-interface REST API utilizing JSON or XML files.
- Via direct file sharing with CSV or XML documents.
Both of these methods will be looked at in this guide, as well as providing examples for the main areas of data integration.
Table of Contents
1. What Does the V5 Gateway Do?
The V5 Traceability integration service can be deployed to cover a range of data points, which can be completely customized by each individual customer depending on their requirements. These requirements will be discussed during the initial phases of V5 Traceability implementation.
Depending on the customer requirements, V5 Traceability can be set up to integrate any number of areas, such as formulation/BoMs, job scheduling, purchase and sales orders and inventory levels and locations.
2. Example Dataflow Diagram
The dataflow diagram below exemplifies the seamless integration of the host ERP System and V5 Traceability. From receiving and inventory management to batch formulation, product creation, sales order picking, and shipping. V5 Gateway empowers businesses to streamline their operations effectively, improving production visibility and error proofing the traceability process.

3. Integration Guides
In this section you can find specific guides for the integration of specific V5 Traceability modules:
For major modules that commonly feature 2 way integration:
- Commodities
- Formulas
- Inventory/Stock Location
- Jobs/Production Orders
- Purchase Orders
- Sales Orders
- Transfers
- Units of Measure
For minor modules that only feature import options:
For assistance in installing and updating the V5 API please see the following documentation:
For examples of integration deployment, please see our guides for specific ERP solutions below:
4. V5 Integration Reference Documents
Throughout this guide to V5 Traceability’s integration methods, we will make regular use of two pieces of documentation to assist us. These are both useful regardless of the integration method that we are using. These are:
- The V5 Integration worksheet that contains useful information and templates for the most commonly integrated modules.
- The V5 API Manual, which can be used to pinpoint specific import/export URIs as well as providing a comprehensive guide to every data class used by the V5 API.
- Throughout the API guides in this section, references will be made to transactional & log endpoints. A complete list of these can be found by following the link.
5. Methodology – V5 API
If using this method, then the V5 API would be installed as a web service to facilitate the transfer of data. From here transactions are handled by the different available module classes.
To find out more about these classes, the different endpoints/URIs, as well as information on the various database classes we are going to be dealing with when using the V5 API, we can use both the ‘V5 Integration Mapping Worksheet‘ and the V5 API website to assist us. From here we can utilize the package explorer in the top left of this window to navigate the different sections of the API manual.
We will make use of these sections to create examples as we discuss the various aspects of data integration below.
Once installed, the API endpoints can be accessed via a browser or REST client at:
http://{hostname:port}/V5-API/api
The IntegrationImport module has a path of /integrate/import/
The IntegrationExport module has a path of /integrate/export/
The ‘Transactions’ module path is /integrate/export/transactions/
Each method has its own path listed in the V5 API directory as a ‘Target URI’. This can be appended to the end of the above paths in order to execute the method.
Each method description also contains a ‘request type’, which denotes whether it’s a GET or POST request plus the URI for that given method.
Any GET or POST requests will be processed in JSON format. All fields and objects are defined in the database package which you can find through the services package.
5.1. Export/GET Requests
As mentioned above, the V5 API export module has a path of:
http://{hostname:port}/V5-API/api/integrate/export/
So in reality this would look something like (if interacting via a locally installed instance of the V5 API):
http://127.0.0.1:8080/V5-API/api/integrate/export/
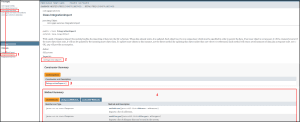
What would come after this is dependent on what data we want to pull from V5. We would then refer to the services package, by using the windows on the left of the main API window to select the services package, followed by ‘IntegrationExport’ below.
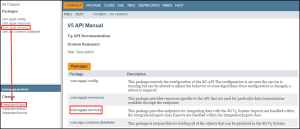
We can also use the services link on the index page, which will then load the class summary for that package, where we can then choose ‘IntegrationExport’ class.
We will then be shown the export target URI (1) along with a list of available endpoints for the export module class. We can view all of these in detail by clicking the ‘IntegrationExport’ constructor (2), or we can use the ‘Method Summary’ table below (3) to quickly find the desired endpoint. We can also see the target URI for this module at the top of the page, so all we would need to do now is to identify the required objects, fields, and values.
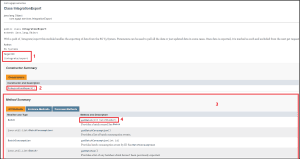
So let’s take the first entry in the method summary table here, ‘Batch’. Clicking the link in the right hand column (4) will take us straight to the endpoint we want to know about.
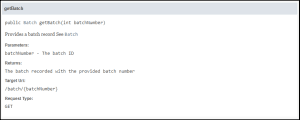
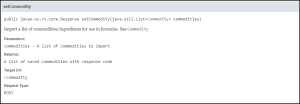
This provides us with the information we need to know, including what data will be recalled, the request type, and most importantly, the target URI for the request.
So we now know that if we want to pull a batch from the V5 API, the endpoint that we would need to hit would be:
http://127.0.0.1:8080/V5-API/api/integrate/export/batch/{batchNumber}
Let’s quickly take a look at how this would work in practice. We can start by finding a batch we want to pull via the API, let’s go for batch ‘50009622’ that we can see here in Control Center.

Using what we have learned above, we can then complete the URI in the REST client as such:

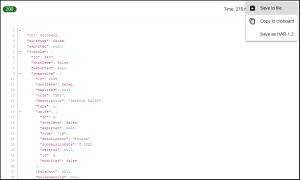
Running this process now will then generate a detailed JSON file for that batch, which can then be consumed and parsed by the client application. A typical return for this request could look like this.
In many instances where pluralism is applicable to the endpoints we are addressing, for instance here batch can become batches, we can use this to call a list of batches with the ‘export/batches’ URI.
5.2. Import/POST Requests
As mentioned above, the V5 API import module has a path of:
http://{hostname:port}/V5-API/api/integrate/import/
What would follow this would depend on what data we are looking to import via the API. We would return to the services package section of the API manual and click the ‘IntegrationImport’ (1) this time.
This is laid out in the same fashion to the exports page, with the import URI (2), link to the top of the summary pages below (3), and the method summary table (4) where we can see all the available endpoints.
As before we would just need to find the endpoint relevant to the data we wish to post to the system via the API.
Note that most import POST endpoints expect an array so that multiple records can be sent in one request. This can be seen by looking at the parameter types for the import endpoints under the ‘Method Summary’.
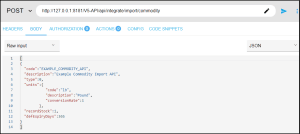
Let’s take commodities as the example here:
What this is telling us here is that we can use this endpoint to import lists of commodities/ingredients which can then be used for formulation. The URI we would use for this would be:
http://127.0.0.1:8080/V5-API/api/integrate/import/commodity
We can see this endpoint in use below, along with a very basic sample import file in JSON format:
To assist us in structuring a JSON import file, we can make use of the link to the relevant database packages section of the API manual present on the service summary:

Or we can navigate manually to the relevant section by selecting the database class summary section from the API homepage.
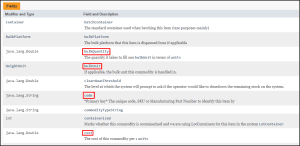
If we navigate to the database class page below for ‘Commodity’, we can how we should structure or JSON file. For example, if we want to define a commodity code when using this URI, this would be ‘code’, and likewise for the commodity’s description, this would be ‘description’.

Note then how these fields are over to the very left of the example JSON file above, along with other fields that we can see on the screenshot such as ‘defExpiryDays’. We could also add the commodity’s default cost our file, and checking below we can see that would simply be ‘cost’ (1). Also note that anything listed here as a ‘primary key’ (2) is a required field for that endpoint, i.e. the file will not import if this is not present.

We can also traverse different levels of the API from this database class, so let’s see how we can do that to include more information about our commodity’s ‘units’.
Towards the bottom of this page we will come across ‘WeightUnit’, which we can use as a nested class within the commodity URI.

This gives us our database class for ‘units’, which can sit at the same level as the other classes we have already defined. To discover what data we can nest here we can click on ‘WeightUnit’ here to browse the definitions of that class.
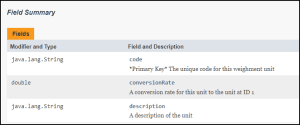
As we can see there are only 3 datapoints within this class, and in our JSON example we are using them all, ‘code’, ‘description’, and ‘conversionRate’. These 3 datapoints would be nested within the ‘units’ field, as shown.

If we run this JSON file as above, we will (depending on the client we are using) see a response from the API, and we will also be able to see this commodity imported to our ‘Commodities’ table in Control Center.

5.3. Insert or Update?
When using the POST function to hit the endpoints for V5 API, this can either update or insert a record. What happens here is defined by the primary key we are attempting to post.
If we take our commodity example above, we saw in the database class definitions that the commodity’s code is its primary key. When we are posting, if this code already exists, then we will update the record of that commodity with the new values included at that class level.
Conversely, if the code currently does not exist in the V5 database, then a new record will be created.
However, if we look at our ‘units’ nested class, note that while we can insert new unit data if this class’s primary key is not already present, we cannot update existing units by using the ‘commodity’ endpoint. Instead we would have to address the ‘import/unit’ URI instead.
5.4. Export Markers
The V5 API makes use of export markers to differentiate between data that has or has not already been exported to a customer’s ERP system. By default, this is enabled to assist in exporting data that the external ERP hasn’t seen yet, and once marked as exported in the V5 database this data will not be included in future exports.
This can however be disabled depending on the customer preference. This can also be disabled if the ERP system in use can return export markers to the V5 API to acknowledge that it has already received the data in question.
In this situation an acknowledgement of receipt is used to inform the V5 API that data has been received, the endpoint which can be used to control this is documented here.
If neither the V5 API nor ERP are set to provide export markers, then depending on the endpoint used this could potentially return a vast amount of data. In these cases, we can use URI parameters to filter the amount of data that is exported.
5.5. URI Parameters
The V5 API also utilizes various URI parameters that can be used to further narrow down our requests from the system.
We can see if these parameters are available for our endpoints by checking the method summaries under our desired service. If we can see ‘int’ followed by a parameter, then we can use this parameter to filter the results that we will receive back from the API.
For example, we saw above that this works for ‘batch’ by allowing us to filter by the batch number.

Other examples could include pulling batch logs by date, where we can use ‘batch_system_logs/filterFrom/{filterDate}’ (using epoch dating conventions).
5.6. Logs, Transactions and System Descriptors
For many of the modules that can be integrated via the V5 API, it is often more convenient to retrieve information from transaction and log endpoints. Some of these can be used for several purposes (such as ‘system logs’), while others are more bespoke for specific modules (such as ‘sales transactions’).
These endpoints use system descriptors to denote certain events happening (receiving a commodity, consuming an ingredient for production etc.) and are particularly useful for maintaining inventory accuracy across the V5 system.
To review these endpoints and what information they return/what modules they are useful for, click here.
6. Methodology – CSV File Sharing
The V5 file sharing method makes use of csv and csvh ‘header’ files to perform data exchanges with V5 Traceability. For these exchanges, we would utilize ‘header’ files to determine the ordering of data for both imports and exports, and then we would either import or receive an exported csv that follows this order. We can take a look at how this would work in practice below.
6.1. Ordering of Data & Header Files
Whether we are importing or exporting data using the csv file sharing method, we will make use of header files to determine the ordering of data. In terms of how we can structure these, here we can make use of both the ‘V5 Integration Mapping Worksheet’ and the online API manual to help us with this. Let’s look at an example here for a ‘Commodities’ import from the worksheet.
As we can see here, SG have already structured a basic header layout here, and if we look in the API manual at this particular database class, we can see that the majority of the fields here exist in this class, allowing us to simply use ‘code’, ‘cost’, ‘bulkUnit’ etc. as they are defined here.
Note that, similarly to when we were looking at structuring our JSON files above, the primary key (code) must be included.
We can also traverse database classes in a similar way that we saw when structuring the JSON import above. We can see this in our example above with ‘units.code’. Within the ‘Commodity’ class we have the ‘WeightUnits’ class (defined as ‘units’).
Following this link to the ‘WeightUnit’ class will show us that to define the code for the weight unit, this is ‘code’ in this class, so to traverse to this from our ‘Commodity’ starting point would be ‘units.code’.
We can traverse as many levels as we like here, they just have to be linked in the API manual.
We would do the same to structure headers that we would use for exports, using the appropriate database class definitions to pinpoint what data we want to receive back from the system, and in what order.
Header files should be constructed as csv files, with 1 value in each cell across the top row until we have defined all the data we want to import or export. This csv file must then be saved and then have its extension edited to be a ‘csvh’ file (file extension viewing in Windows must be enabled to do this).
Any edits to the csvh file should be made after changing it back to a csv file and editing it in this format.
Headers used for imports should be placed in:
<installdir>\SG Control Center\gateway\import\column_defs
Headers used for exports should be placed in:
<installdir>\SG Control Center\gateway\export\order
We can now look at how we would go about performing our imports and exports.
6.2. Imports
Once our relevant header files are in place, we need to complete our csv file for import.
As touched on already, the data in our csv file must adhere to the same structure as its corresponding header file, i.e. the correct data must be in the correct column, for the import to succeed. To stick with our commodity example, we can see that in this example below, we have included the header data to assist us with data entry. This does not need to be included however (see ‘Ignore Headers’ below).

Once we have set this up, we can continue to populate the csv to include all the commodities we want to import.
With the csv complete, imports can then be performed by dropping the appropriately formatted and named csv files into ‘\SG Control Center\gateway\import’. Naming conventions for these files are defined on the V5 Integration Mapping Worksheet, so for commodities we can see that this is:
So for example, our filename could be named ‘commodity-0530231803.csv to tell us that this was imported on the 30th May 2023 @ 18:03. There is no set date/time order preference, so SG would recommend using whatever format works best for each customer here (this may end up being determined by the external ERP in use).
After dropping our files into the correct folder, Control Center will automatically process these, provided imports are enabled in the Gateway. The system will provide a dialogue to inform us of whether the process was successful or not. Further information on this, with logs, can be found within the ‘Gateway’ section of Control Center.
Files can also be imported manually from other locations by right clicking the Control Center icon in the system try and choosing Gateway > Import File.

This will then open a dialogue within Control Center to select the appropriate csv file.
Within the Gateway itself we can then set options against the import process:

The settings here can be defined as follows:
- Import Enabled – enables importing, allowing the Gateway to scan the import folder for csvs as they are dropped in there.
- Insert Child Entities – allows the Gateway to dynamically create inner entities if they are linked within the csv file. A good example of this could be a formula import that lists commodities not already present in the database. The Gateway will create these ‘child’ entities for us in this case, provided the primary key for commodity (code) is supplied.
- Ignore Headers – forces the Gateway to skip the first line (row) of an imported csv. This is useful if the header file is included in the csv import file.
- Validation Level – sets how data is validated as it is imported by the Gateway. There are 2 options here:
- Warn – If an error exists in a file and a line cannot be imported, the system will tell you about it but it will continue to attempt to process the rest of the file.
- Abort – If an error exists in a file and the line cannot be imported, the system will abort the process and inform you of the error.
Changes to settings can then be applied in the top right of this panel. Control Center must be restarted for any changes to take effect.
6.3. Exports
Exporting via the csv file sharing method is largely managed by the header file and what information that is asking from the system. If we structure these correctly using the API manual, then we should receive all the data we want in the correct order.
Within the Gateway itself we can also set options against the export process:

Here we can use the provided checkboxes to select what data we wish to export, depending on the data points we wish to see.
Note that the starting database classes here, such as ‘BatchConsumption’ and ‘SystemLogs’ are different from the ones we would start with for imports, but provided we are able to successfully navigate the API manual for these classes, we can produce a suitable header file.
Once we have selected what we want to export, it is then a simple matter of entering an export interval (in milliseconds) in the top left and applying this value (0 will never export) in the top right. Control Center must be restarted for any changes to take effect.
Exported csv files will be placed in ‘<installdir>\SG Control Center\gateway\export’ by default.
7. Frequency & Sequence
Regardless of the methodology used for integration with V5 Traceability, the frequency and automation level of data imports and exports is an element of the process that can be built to suit each customer’s requirements.
This can be done manually by the customer, or automated to capture the output from an external ERP from a specific location on the customer’s server.
A specific order of imports can also be imposed at this stage, so for instance we might import a Bill of Materials before a work order pertaining to that BOM. We could do this by loading the files in sequence to the import directory or API URI endpoints.
As shown above, we can also set the Gateway to export at specific intervals to send the data back to the ERP system.
Imports and exports can be managed in near real time or performed at set intervals. Using the API route, both imports and exports can be more easily managed in near real time. The import frequency for the csv file sharing method is down to the individual ERP/middleware solution being implemented, with the export frequency is managed via Control Center as described above.
8. Contact Us
Interested in V5 Traceability and the data integration it provides? Contact our sales team here!