Sales Orders
Module Guide - A Deeper Dive!
Introduction
V5 Traceability order picking system is a process used to select and gather items from a warehouse or storage facility in order to fulfill customer orders. This process involves the use of V5 WMS to track inventory levels and customer orders.
This guide is for the manual selection and pick of single sales orders and is best suited to B2B scenarios where relatively few orders are processed with larger inventory amounts. A worker manually selects and gathers items from storage shelves or bins using a hand-held computer/scanner to track their progress.
V5 Traceability can help improve efficiency and accuracy in the order fulfillment process, and can be customized to meet the specific needs of a warehouse or storage facility.
‘Sales Orders’ in V5 Traceability allow users to use existing customers to create and schedule sales orders in Control Center. These orders can then be picked by operators using WMS. This guide will cover this whole process, from creating customers and orders down to how we ship these out of the warehouse.
Table of Contents
1. Customer Setup
Before we get into Sales Order themselves, we can quickly touch on customers and how to set these up in Control Center. Under the ‘Ordering’ header we can hit ‘Customers’ but bring up the ‘Customers’ window. From here we can use the top left panel to add (1) a new customer. Here we can assign a customer code to the customer, as well as their name. The supplier code must be unique. We can also assign a default broker and carrier (populated from ‘Order Info’) to each customer, as well as whether orders for this customer will require a signature on dispatch.
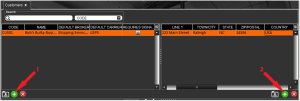
We can also use the top right panel to add (2) any relevant addresses and contact information for the customer’s delivery/billing address(es). Emergency Recall details can also be entered here.
We could finish setting our customer up at this point and we would be able to set up sales orders for any commodity/product to sell to them. However, we can add further details to our customers that can help streamline the ordering and shipping process.
We can first use the bottom left panel to add (1) commodities/products to assign to this supplier. In this case, let’s assign our ‘Bread Roll – 4-Pack’ to the ‘Bob’s Bulky Buying’ customer that we created in the top panels. We can use either the ‘commodity code’ (2) or ‘description’ (3) drop-down menu to select a commodity.
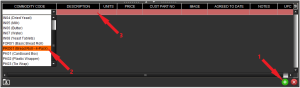
We can then add a customer specific price for any commodities added here, as well as other information such as customer part numbers and price. Other information such as units will automatically populate from the ‘Commodities’ or ‘Formulas’ windows. We will add a couple of commodities to this customer, our bread roll batch mix, and our finished bread roll (4-pack).


If you are unsure of the use or definition of any column on this page, please see our control center guide here.
2. Sales Order Creation
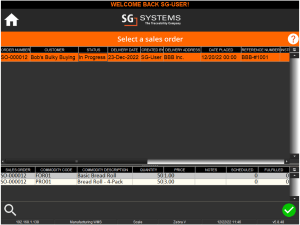
Sales orders can be created on the ‘Sales Orders’ page of Control Center, under the ‘Ordering’ header. We begin by creating the order itself in the top panel (1) after which a new order line will be generated and have its order number automatically filled in sequentially from the last order that was created. This format can be changed to suit your requirements.

From here we can select our customer using the drop-down menu in the ‘Customer’ (2) column. We can also select a delivery date for the order, and enter any reference number that we might have been provided from the customer, or that we would like to enter against it. We can also change the order placed date for future orders.
Other information here such as delivery address and broker/carrier information is largely populated from the information we entered against the customer above. Note how at this point the sales order’s status is ‘Created’, meaning that it won’t yet be visible to receive in WMS.
We can then go to the bottom left panel to add (1) products/commodities to the order.

These can be selected via the drop-down menus in either the ‘Commodity Code’ (2) or ‘Commodity Description’ (3). We can then add the quantity required for the order. The price here is drawn from the price we set against the commodity/product when we assigned it to the customer above. The ‘Scheduled’ and ‘Fulfilled’ columns are related to the ‘Planning’ function of V5 Traceability, and informs us of the progress of any jobs that have been scheduled to fulfil the requirements of the order.
We will add the 2 items assigned to the customer to this particular order.
Once this is done and we’re happy with all the entered information, we can go back to the top panel, right click the purchase order line, and adjust the status of the order to ‘Scheduled’.
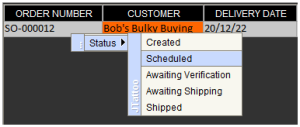
The sales order will now be scheduled, and will now be visible in the WMS app.
You may have noticed that there is a 4th panel in the bottom right of this window. This comes into play once the sales order has been shipped, so we will come back later and cover exactly what this does.
3. Shipping a Sales Order
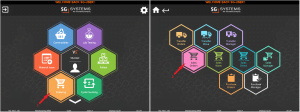
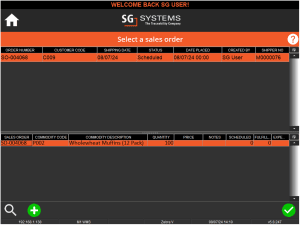
After logging in to our WMS device at the delivery shutter, we can hit the ‘Ordering’ (1) button, followed by the ‘Sales Orders’ (2) button to enter the main sales order window.
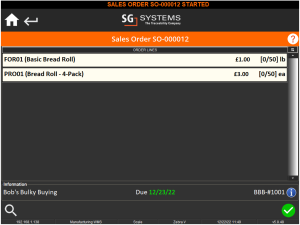
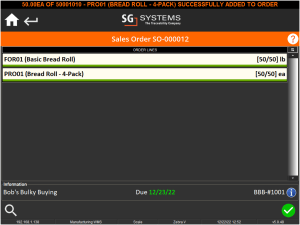
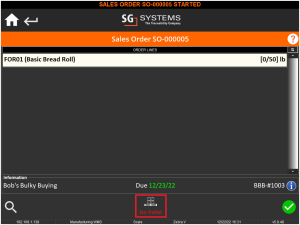
Here we can see the order we have just scheduled in the top panel, while also being able to see the required items that need to be picked for that order.
We can hit the green check mark with our order selected to proceed to the main picking/shipping window. Here we can see our order lines and how much of each line has been picked so far.
It is worth noting that, if desired, we can hide the cost to our operators via a WMS configuration change. Contact SG support for help implementing this.

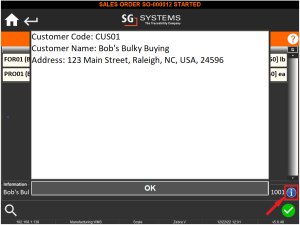
We can also use the info button in the bottom right, above the green check, to view the customer’s details.
From here we can begin to pick the items required for the order. This is done by hitting the relevant order line for each item. So let’s start with our ‘Basic Bread Roll’, which is a non-palletized item. Selecting this order line will bring up a list of lots for us to pick from.
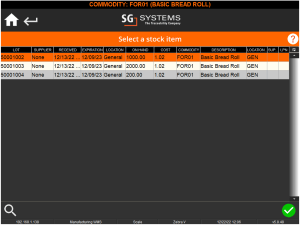
Selecting a lot (in this case 50001004) will bring up WMS’s weigh screen.

Here we can use the highlighted options to either key enter, weigh, or bulk enter the required quantity. Once we have done this we can hit ‘Enter’ to confirm the amount. Here we will key in the required amount to continue. This will return us to the main order screen and, as we can see, our order line has been fulfilled.

This is indicated not only by the ‘50/50 lb’ on the right hand side of the line, but also by the color of the line itself being green. This line will change color based on the status of that particular line. We could also see:
Red – The line is not complete and has a low amount of the required quantity fulfilled.

Yellow – The line is not complete and has a medium amount of the required quantity fulfilled.

Blue – The line is complete but has too much of the commodity assigned to it.

If we have overfilled a line and need to reduce the amount on it (ie we are not looking to over ship an order), we can do this by hitting the same line again, where we can remove that quantity from the order so we can add the correct amount.

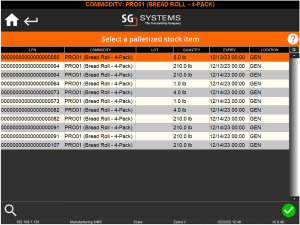
With our ‘Basic Bread Roll’ line fulfilled, let’s look at our ‘Bread Roll – 4-Pack’, which is a palletized item.
This works much the same as it did for non-palletized items, just instead of scanning/selecting a lot, we will instead choose/scan a product or inventory pallet to source the required items from.
As above, WMS will ask us to key in/weigh the required quantity, after which we will be again returned to the main order window, and we can now see that both of our order lines are now complete.
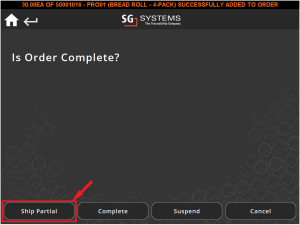
We can hit the green check on this screen to complete the order. We can also suspend the order here if item picking is complete but it might be due to ship at a later time and date. In this case we will complete the order.

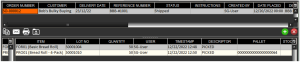
Returning to Control Center, we can now see that the bottom right panel in ‘Sales Orders’ has now been populated for our order. Here we can see the lots and (if palletized) pallets that we drew our order lines from, as well as user and date/time information. We can also see that our order is now marked as ‘Shipped’ in the top panel.
The process outlined above is the default behavior of the Sales Order module, so under normal circumstances an order will be marked as ‘Shipped’ once the operator completes the order.
However, this can be changed depending on a customer’s requirements for a dispatch process. An example could be that when the operator has picked the order and hits ‘Complete’, the order goes to the ‘Awaiting Shipping’ status, which would then require another operator, or more likely a supervisor or manager, to ship the order separately.
In this case this dispatching person would make use of WMS’s ‘Sales Manager’ function, under ‘Ordering’. More on how this works, and other features that it offers can be found here.
4. Under/Overshipping Sales Orders
As we touched on above, we can under fill or over fill our sales order lines in WMS. What we can also do, as long as the user has sufficient privileges, is ship the order with these under/over fulfillments in place. Let’s take a look at how this works.
4.1. Undershipping an Order
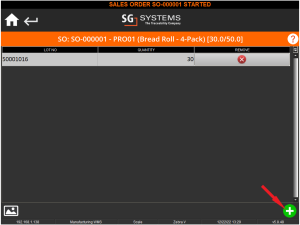
If we create another order, this time just for our ‘Bread Roll – 4-Pack’, we can see how we can under fill an order. Let’s say for instance that we only had 30/50 of our packs in stock, but the customer would need this stock before we can produce the remaining 20.

From here we can try and complete the order as before (by hitting the green check), but instead of the options we had earlier, we now have the ‘Ship Partial’ option.
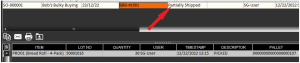
Hitting this will return us to the WMS main screen, but instead of our banner message telling us that the order is complete, we will see that it is now ‘Partially Shipped’.
Returning to Control Center, we can see this reflected in the status of the order here. We can also see the amount of the required commodities that were shipped in the bottom right panel.
This order status means that the order isn’t yet complete, and will remain visible to our shipping WMS until it can be completed. We can then return to this order when we have enough of the required item to finish it, or even partially ship more.
The order will remain as above (i.e. will still show 30/50 fulfilled), but we can then go into this order line and use the green + in the bottom right to add additional stock to the order.
Once we have added the remaining amount of the required commodity, we can complete the order as we did previously, now with the order lines fully complete.
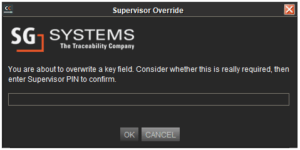
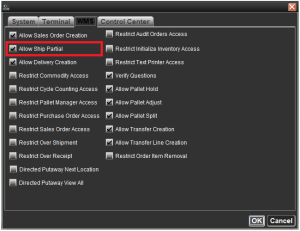
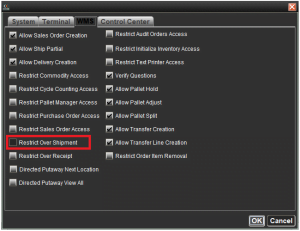
For an operator to be permitted to partially ship an order, they must have the following privilege enabled against their operator profile in Control Center:
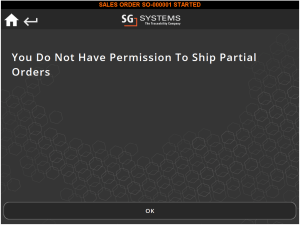
If the operator does not have this enabled, then they will see this message when trying to partially ship and order:
4.2. Overshipping an Order
As we’ve seen we can under fill orders, but we can also over fill orders if desired. If we take create another order as above, we can see how this would work by heading to the main order screen and add more than the desired quantity to the order. As we saw above, this will result in a blue order line.

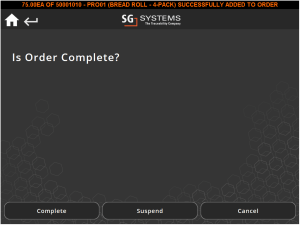
We can then simply hit the green check in the bottom right, after which we will see the same options for completing as we would if the order wasn’t over filled. Hitting ‘Complete’ here will complete the order, and ship out 75 of our products, rather than the originally required 50.
Back in Control Center we can see that the job is marked as complete, but we can see the over fulfillment in the bottom right panel.

As with under filling an order above, the ability for an operator to do this is dependent on what privileges they have. We can check these in Control Center.
If the operator doesn’t have the indicated box checked, then they will be able to perform an over fulfillment/shipment. If this box is checked and they try to do this, they will see the following message when they try to add more than the requirements to the order line itself.

5. QA & Sales Orders
As with many events in V5 Traceability, sales orders can have QA questions assigned to them. This can be done in Control Center and there are 3 specific events that relate to sales orders. These are:
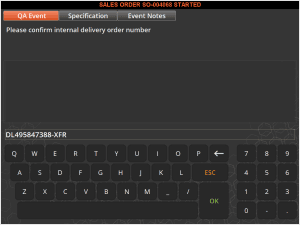
- ‘Shipping Start’ – Triggered at the start of a Sales Order.
- ‘Driver Signature (SO)’ – Triggered at the point where the delivery driver’s signature is recorded by WMS during a Sales Order. Note that the ‘Requires Signature’ box must be checked during customer setup for the signature prompt, and hence QA event, to be present.
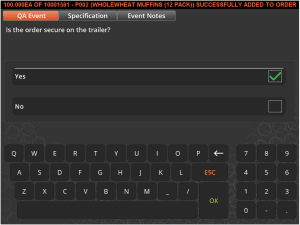
- ‘Dispatch’ – Triggered when a Sales Order is shipped.
We can use the following 3 questions in QA to see how this would work.
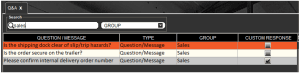
The first question here is set to the ‘Shipping Start’ event in the QA top right panel, the second the ‘Dispatch’ event, and the third the ‘Driver Signature (SO)’ event.
If we head back to WMS and look at another sales order, we can head to the main sales order window to see our new order.
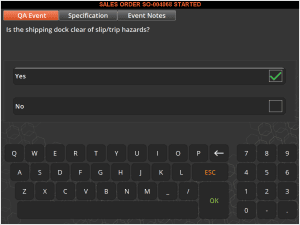
Once we select the order and hit the green check, the ‘Shipping Start’ event will trigger, and we will be asked our first question.
We can then proceed to the order lines screen. At any point here, before or after adding stock to the lines, we can hit the driver signature button:

This will then trigger the ‘Driver Signature (SO) question. Note in this case, we set this question up above to ‘Custom Response’, allowing the driver to enter a freetext answer rather than choosing a prescribed answer.
Once this is done, and the order lines are fulfilled, we can move to complete the order. However, once we hit the green check and confirm that we are completing the order, we will be asked the question assigned to our ‘Dispatch’ event.
As with all other QA events and questions, we can set these answers to terminate the current process (in this case the sales order), and/or notify a manager or supervisor. More information on how to do this, and other features of QA, see our module guide on the topic here.
6. Using Sales Pallets
V5 Traceability also has the option to use sales pallets for sales orders. This option can be enabled in WMS’s configuration. This is useful for adding non-palletized stock to a newly available sales pallet. If we schedule an order for just our ‘Basic Bread Roll’ batch, we can see how this works. After scheduling the order we can head over to WMS and select the order as we have done before.
Here however, on the order lines screen, we can see an additional button at the bottom of the screen to assign a pallet.
We can click on the pallet icon here which will open the pallet manager. From here we can either select an existing sales pallet, or we can create one here using the ‘Add Pallet’ button.
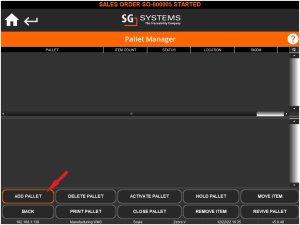
Since we currently don’t have any sales pallets available we will create one.
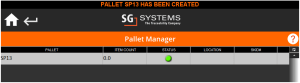
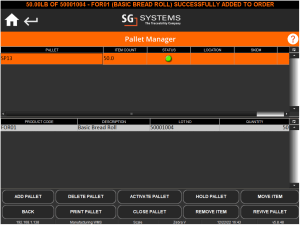
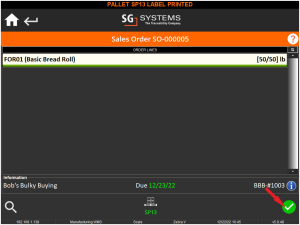
From here we can go back to our order lines screen and add our items to the order as we have done in previous examples. Once this is done, we can head back to the pallet manager and see that our commodities have been added to this newly created sales pallet. We can print a label for this pallet here.
It is worth noting here that if we did not create or assign an existing sales pallet to the order, the system will automatically create one.
Once all our order lines are complete, we can again hit the green check on the main order lines screen to complete the order as we have previously.
7. Auditing Sales Orders
We also have the ability to search through previously shipped orders for auditing purposes. We can access this function in WMS by heading to the ‘Ordering’ (1) section as usual, but here, we will head to the ‘Sales Manager’ (2) section. For uses of the ‘Sales Manager’ other than auditing an order please see our Order Management module guide here.
We can then use a ‘from date’ and ‘to date’ filter to select a range of orders to view.
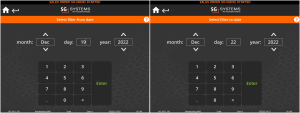
We will then be shown a list of sales orders that fall within the selected dates.

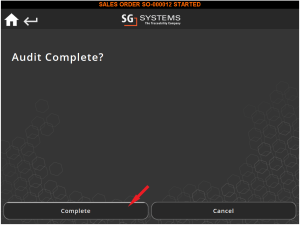
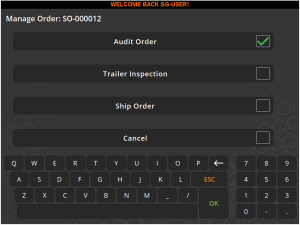
We will then be asked to choose whether we want to audit the order, inspect the trailer used for the order, or ship the order if it hasn’t been already.
Using the audit function, we will see a familiar looking screen, from where we can check the order lines to see how much was shipped and what lots they were picked from.
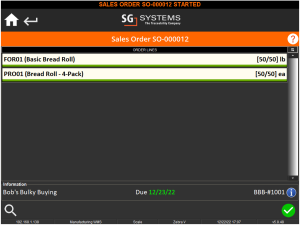
Once we are happy with the order, we can hit the green check in the bottom right, where we will be asked if our audit of this order is complete.