
Material Issue & Initialize Inventory
Module Guide - A Deeper Dive!

Introduction
Material Issue is the process of moving raw materials or WIP from the warehouse storage location to the assembly or manufacturing storage areas. It is considered one of the key concepts within V5 Traceability and an active part of production and planning.
After scheduling production, the Material Issue requirements are available on V5 WMS. Operators can easily view inventory in both locations and understand whether or not there is enough inventory in the manufacturing storage areas to complete production. Green / Red lamps make this process simple.
Initialize Inventory is a process of cleardown and zeroing lots theoretically remaining in the production storage areas. This happens after production is complete and materials are returned to their original locations.
The process of initializing inventory is an excellent way to account for spillage, extraction loss and shrink.
Table of Contents
1. Setup
Before we can properly use these features, there are several pre-requisites that we need to make sure are in place beforehand:
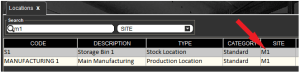
- We need to make sure that our production Terminal is assigned to a production Location, as well as at least 1 storage location. The ‘S1’ storage location is the one we are going to move our required commodities in/out of in this demonstration. ‘BIN1’ is the default storage location for items produced by our Terminal (set in the Terminal configuration).
- For this guide, we will be using the Saffron Kulfi formula that we used to demonstrate formulation and scheduling. Any formulas we want to use for this process must be assigned to the same production location as the Terminal above, so in this case ‘Manufacturing 1’. Note here that a submix is involved in this formula, but we will be weighing this in as another ingredient, assuming that this is made elsewhere in our hypothetical facility.
- Our production and storage locations must have a site assigned to them (in this case ‘M1’). Our WMS instance must also have this assigned as its ‘Site Code’ in its configuration. This only applies to the storage location that we are going to be moving stock in and out of, not the default production location of the Terminal.
- We must finally make sure that our Terminal configuration is set to allow the initialize inventory process at the end of the job.
Please contact SG Support for help with any of these configurations and how to implement these processes at your site.
2. Scheduling a Job
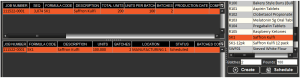
Once we have ensured that our system is correctly configured, we can take a look at how Material Issue works. So let’s get started and schedule 2x 100lb batches of our Saffron Kulfi in the ‘Production Plan’ window of Control Center.
More information on scheduling can be found in our module guide on the topic here.
3. Using Material Issue
From here, we would usually head to our Terminal to undertake production. However, if we were to do this now, we will not be able to see any stock to use at this location, so we will be unable to process the job.
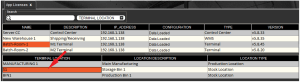
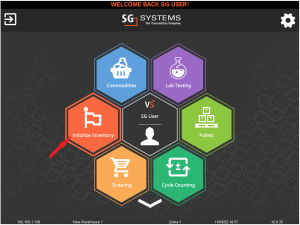
Instead we would head to WMS and hit the ‘Material Issue’ tile (1) to begin picking our commodities. Note that, depending on your WMS configuration, you may have to use the while arrow at the bottom of the WMS main window (2) to expand your view to include more than 6 tiles. The order these appear in can be changed in the WMS configuration (contact SG Support for help with this).
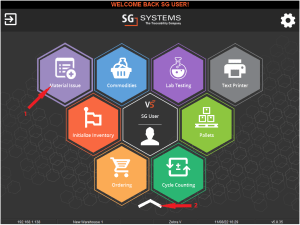
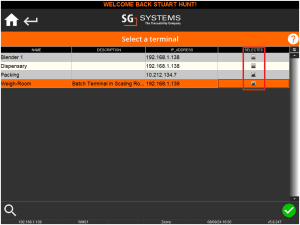
After hitting this tile, we will be presented with a list of production Terminals that are currently active on the system. We will choose the ‘Batch-Room-1’ Terminal that we set up earlier with the correct configuration/location assignments and hit the green check.

Note that in later versions of WMS, there is a selection box present which allows operators to select multiple Terminals to move materials to at once before hitting the green check. This is helpful where we might have more than 1 Terminal in a particular area of the production facility.
From here we will be taken to the next screen where we can start to assign our commodities to our production Terminal.
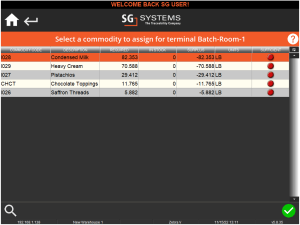
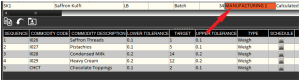
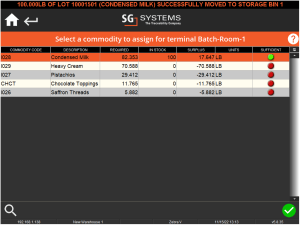
We can see the code and description of the commodities that we require, along with ‘Required’, ‘In Stock’ and ‘Surplus’ amounts of the commodity. These figures refer to what is currently already in the storage location associated with the Terminal in question. We can see how this changes as we go along. We can start moving commodities by highlighting one and hitting the green check. Let’s do this for ‘Condensed Milk’. If we select this, we can see existing stock and where it is located.
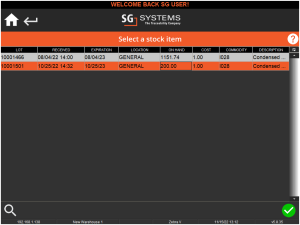
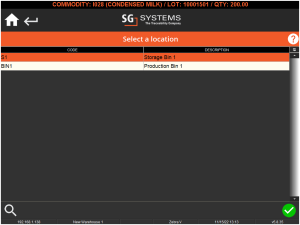
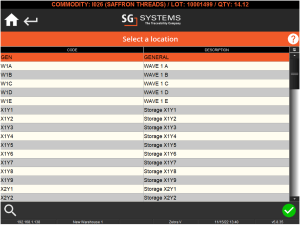
From here we can scan or select an appropriate lot, after which we will be asked which location we want to move this stock to. Here we can see the 2 stock locations we assigned to the Terminal earlier. We will choose ‘S1’ as this is where we previously determined we are going to move our stock in and out of.
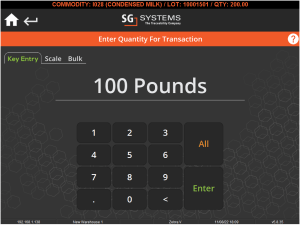
We will then be asked to (depending on our WMS settings) weight out, or specify a weight that we will move to the production location. Let’s imagine in this instance that our condensed milk comes in 50lb tubs, so we will take 2 of these, totalling 100lbs, to our production location.
After we confirm this, a new location label can be printed for the stock we are moving. We will be taken back to the commodity assignment screen, where we can see that our quantity of condensed milk is now sufficient, with a surplus of 17.647lbs, and that we now have a green light next to this commodity, further signalling that we have enough of this here to proceed with the job.
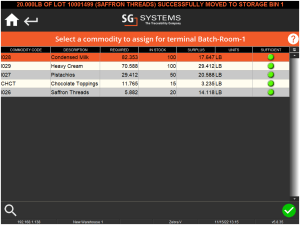
We can then proceed through the list of required commodities, repeating the steps above to move sufficient amounts of the required commodities to our desired stock location.
Once we have finished, we will see our main screen looking something like this:
When we are happy with the amounts that we have brought over to our production location, we can back out of this window using either ‘home’ button in the top left.
The Material Issue section of this process is now complete, and we can return to our Terminal to proceed with batching.
3.1. Picking Palletized Stock
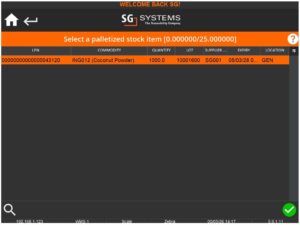
In the example used above we were picking stock that was both non-palletized & non-containerized. If we were to use another example with a palletized commodity – in this case ‘Coconut Powder’ – we can see that this works in almost the same way as the non-palletized picking above.
So we would select the ingredient line to pick for:
Where we would be shown a list of visible pallets to pick from:
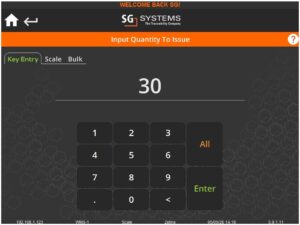
Picking this pallet then allows us to specify an amount to take from that pallet for the job we’re issuing material for.
Note that previously this would add the entire pallet to the material being issues, but this ability to pick an amount from a pallet is available with the latest major release of V5 Traceability.
Once confirmed we will see that, as above, the line has been fulfilled and the operator can continue to pick for the designated job.

So we’ve seen how picking non-palletized/containerized stock, as well as seeing how palletized stock can be picked here. We can also use material issue to pick individual containers from pallets. An example of this, along with further information on how stock can be set up to work like this, can be found below.
4. Processing Our Batch
Back in Terminal, we can start weighing out our batches of Saffron Kulfi.
When we are batching we will only see the lots that we have just moved into our storage location available for selection.
We can then proceed process the 2x 100lb batches of Saffron Kulfi. For more information on batch production, please see our formulation, batching and product creation module guides.
5. Initializing Inventory
With the batches complete, the job will vanish from Terminal. However, if we go back to Control Center, the job will not be complete, despite all our batches having been created. Instead this job will have the status of ‘Awaiting Initialization’.

From here we can return to WMS in order to complete this job by hitting the ‘Initialize Inventory’ tile. As above, you may need to use the white arrow to expand the tile view.
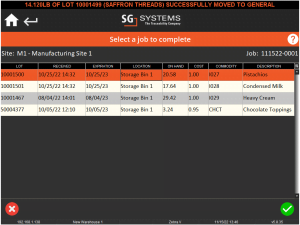
Once we have selected this, we will be presented with a list of jobs that are awaiting completion via inventory initialization

We can now select our job and hit the green check again to view the list of commodities that are available to return from the job we have just completed.

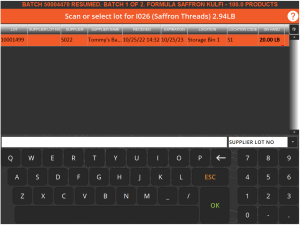
If we select our first commodity to return, we can see that after making our batches, we still have 14.12lbs of saffron threads remaining in our Terminal’s assigned storage location. We can hit the green check to proceed to the next step.

In this case, we will aim to return all of what remains to stock, so if we choose ‘weigh’ here, we can manually enter the weight to return, or weigh it using the ‘Scale’ option. Here we will key in the exact amount.

After this we will be asked to choose the location we wish to move this to. We will choose ‘GENERAL’ since this is where we originally moved the stock from.
Once we have confirmed this we will be returned to the WMS main menu. From here we can return to the main initialization screen and we can see that our saffron threads, having being returned, have been removed from the list. We can then proceed to repeat the steps above for the rest of the commodities, key entering or weighing them as we return them.
In this example, let’s imagine that we spilt 10lbs of pistachios on the floor, and the viscosity of the heavy cream meant that we only returned 28lbs of this to its original location. We would end up with our table looking like this:
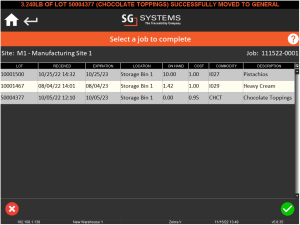
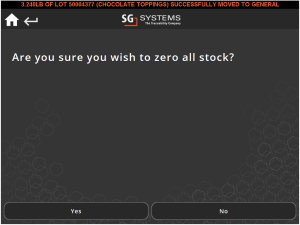
Once we have confirmed that we have returned all we can, we can select any of the remaining commodities and hit the check. This time though we will select the ‘Zero’ option. We will be asked to confirm this, and when we do, all remaining stock items left in this location i.e. our spilt/stuck commodities, will be zeroed.
Once we confirm this, we can see that the job has been completed.
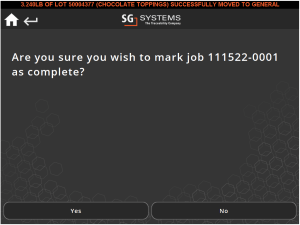
If we then check Control Center, we can now see that the job is marked as ‘Complete’.

6. Exempting From Initialization
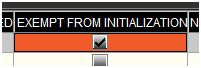
To aid with the implementation of Material Issue and Initialize Inventory, the functionality to exempt commodities from initialization has been added to Control Center. This can be useful if some commodities that we need for a job/batch are held in common areas, or work in a more self-serve way. If we want to apply this setting to a commodity, we can do this in the commodities window in Control Center by checking the ‘Exempt From Initialization’ box against it. This will allow the commodity to be picked by Material Issue, but will exempt it from the initialization process at the end of the job.
7. Material Issue with Palletized Containers
We can also issue material for a specific job in combination with the Serialized Palletized Containerization function for inventory.
To enable this functionality for stock, both the ‘Containerized’ and ‘Palletized’ boxes must be checked against each commodity that is intended to be treated in this manner:
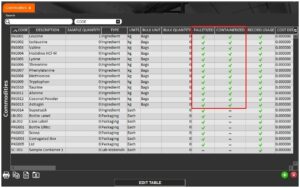
Note that if stock was not previously palletized, any stock for commodities intended to be used in this manner must be zeroed before the ‘Palletized’ checkbox can be used.
In this example we have a job scheduled for a simple weighup formula at our ‘Pharmacy’ Terminal.

Moving to WMS to issue the material for this job, the Material Issue hexagon would be accessed as normal, and we would pick a Terminal, and then a job to issue for (note that the job selection mode for Material Issue must be enabled in the WMS config – contact SG Support for assistance with this).
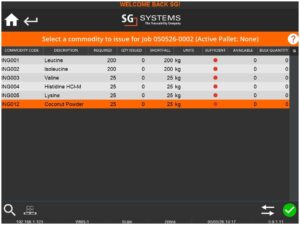
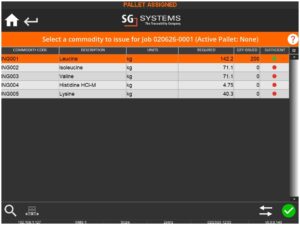
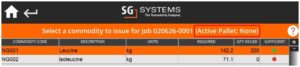
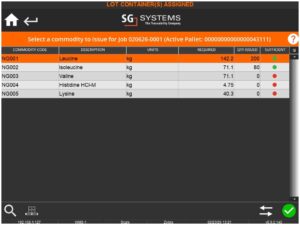
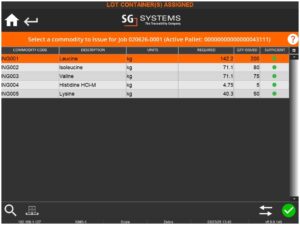
The requirements for the job would then be shown:
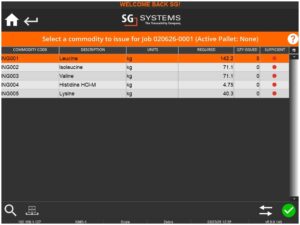
There are now several options available to pick materials for the job, so let’s see how each of these would work:
Scanning the Whole Pallet of Ingredients
The first option here is to simply scan an entire pallet of an ingredient to use for production. So in this example there is a full pallet of 200kg of Leucine available in inventory (that was received here), so if we scan this we will see the following options:
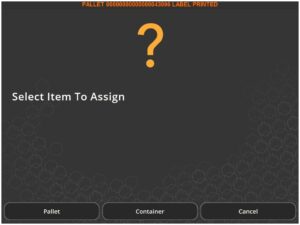
So here we could select ‘Containers’ and then select a number of containers from this pallet to add, but here we will just select the entire ‘Pallet’.
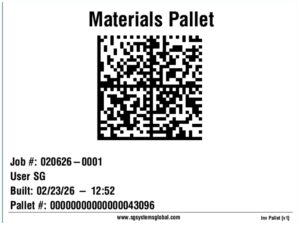
We would then be given the option to reprint the pallet label in a ‘Materials Pallet’ label format (this new format can be customized to feature information such as the job that the pallet is now assigned to etc.).
The system would also prompt for a reprint of container labels, which might be useful if we are moving containers from one pallet to another, but here we won’t do this as the containers are remaining on the same pallet.
The Leucine would then be assigned to the job and the line would show as ‘Sufficient’, indicated by a green lamp against the line.
Note here that when assigning a whole pallet of ingredients at once, this pallet does not become the active pallet onto which more items can be added. This can be seen in the ‘Active Pallet’ dialogue at the top of the screen.
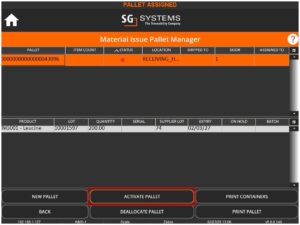
If we wanted to add more items to this pallet of Leucine then we would need to access the pallet manager at the bottom of the screen:

And select the pallet and tapping the ‘Activate Pallet’ button.
Then any newly added containers would be added to this pallet.
If however we need to create a new pallet for other ingredients that we are going to issue, we can either add a ‘New Pallet’ here (this new pallet will then automatically become the active pallet, or we can trigger a new pallet creation by adding single or multiple containers.
Scanning Containers from Existing Pallets
Based on the selection of a 200kg pallet above, we might not want to add any more ingredients to this particular pallet, so when selecting the next item (Isoleucine), we could scan a pallet here, but when we get the option to add the ‘Pallet’ or select a ‘Container’, the ‘Container’ option would be selected.
A list of available containers on the scanned pallet would then be shown, where we can either manually select (by tapping in the ‘Selected’ column) or scan the desired container(s) to assign them.
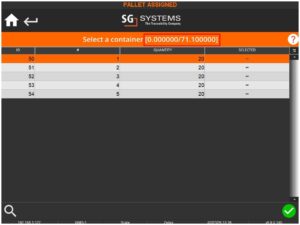
The quantity required will be shown at the top of the screen to guide the operator in how much they should be selecting. So here we can select 4x20kg containers to assign to the job.
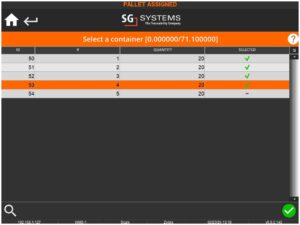
Once we confirm this selection with the green check mark in the lower right corner of the screen we will be returned to the main material issue window and a new pallet will automatically be created (seen at the top of the page under ‘Active Pallet’), and new container labels will also be printed to reflect the new pallet that these containers have been moved to.
This new pallet will then be the ‘Active Pallet’ moving forward.
Alternatively, we do not need to scan the pallet label itself but can instead just scan individual containers to the active pallet (note that, as above, if no active pallet is selected, a new one will be created as we scan containers.
So in this example, if we have 3x 25kg containers of Valine to hand, we can just scan these and they will be added automatically to the active pallet:
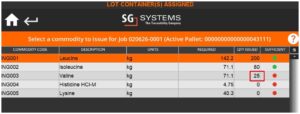
Scanning 2 more of these containers would then complete the material issue for this ingredient:
Manually Selecting Pallets/Containers
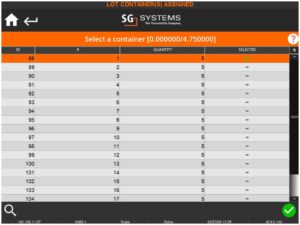
We do not need to scan pallets/containers here, but instead we can manually select them by highlighting the relevant line, in this case the Histidine, hitting the green check, and selecting a pallet manually:
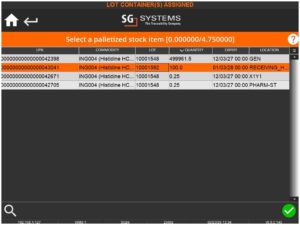
We would then be given the same options as if we’d scanned the pallet, so we can either assign a full pallet, or a container from it. In this case, since we only require 4.75kg and the containers here are 5kg each, we can just select a container here to add to the currently active pallet:
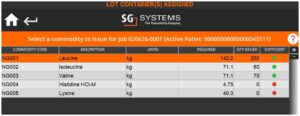
We would then complete the material issue for this job by fulfilling the final line of Lysine via any of the methods described above, remembering that we can create new pallets for items at any time via the pallet manager as needed. In this case though we will just add the required Lysine to the currently active pallet:
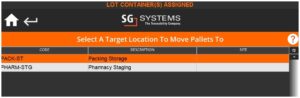
Finalizing Material Issue
Once all materials have been issued here, we can finalize the process by tapping the arrow icon next to the green check in the lower right:

This feature allows all the assigned pallets to be moved immediately to a storage location associated with the Terminal running the job we just issued material for:
This feature is most useful when we are issuing material for a job that’s running on the same/subsequent days, but if the materials aren’t needed immediately and instead the warehouse is building kits of ingredients for future jobs, then the ‘Materials Pallet’ labels that have been issued (or the original ‘Inventory Pallet’ labels if we didn’t reprint) can be scanned and these pallets can be moved to a suitable storage location until they are needed.
Once the materials are required for production, the Material Issue menu can be accessed again and the process finalized in order to move the items to production (the Pharmacy in this case), after which the Material Issue process will be complete.
