Master Class
Essential Product Knowledge

Summary
The ‘Wave Picking’ section of the V5 Control Center works in conjunction with ‘Sales Orders’ and ‘Locations’ to allow for the efficient picking and packing of items for sales orders. It allows multiple order that contain the same or similar products to be grouped together, so instead of picking one order after the other, the WMS operator will be guided around the warehouse in the most efficient manner to pick multiple orders at once. This panel relates to B2C wave picking. if you are using B2B wave picking, see our wave picking module guide.
Control Center Overview
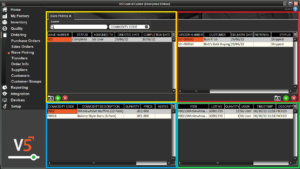
The ‘Wave Picking’ section is found under the ‘Ordering’ header of Control Center.

This section is made up of 4 panels:
- Top Left (yellow) panel: Waves are created and assigned to users here.
- Top Right (red) panel: Where sales orders can be added to the wave highlighted on the left.
- Bottom Left (blue) panel: Displays the sales order line items and their status.
- Bottom Right (green) panel: Shows the lots used to fulfil the line item in the bottom left panel.
Column Help – Top Left Panel
Wave Number
The number assigned to the wave. This is automatically created by the system but can be edited here. Must be unique.
Status
The live status of the wave. This could be:
- Created – The initial status when created, this means wave has not yet been scheduled and as such will not be visible to WMS operators.
- Pending – Once the wave has been created and assigned sales order, the user can right click the wave in this panel to schedule it. This will make it visible to WMS operators.
- Complete – Showed when the WMS operator has finished picking the wave in WMS.
Assigned To
Waves can be assigned to a specific operator here or left blank to allow for any WMS operator to process it.
Created Date
The date the wave was created. This cannot be changed.
Completion Date
Populated once the wave has been processed in WMS, this also cannot be changed.
Column Help – Top Right Panel
All fields here are populated from ‘Sales Orders’ when the order is created and cannot be edited here
Order Number
Sales order number.
Customer
The name of the customer receiving the order.
Delivery Date
The date when the order will be delivered.
Reference Number
Sales order reference number (buyer purchasing reference for example).
Status
The status of the sales order. This is set in the ‘Sales Order’ screen (unless the order is ‘Created’ in which case it will not appear here). These are:
- Scheduled – The order is scheduled, after which it will then be visible here and in the WMS app. Orders that have been partially shipped will also appear as scheduled.
- In Progress – The order is in the process of being picked and packed for shipping. Suspended orders will also show this status.
- Awaiting Verification – The order is picked and packed but requires Supervisor approval before it can be shipped.
- Awaiting Shipping – The order is picked and packed, and is awaiting pickup.
- Shipped – The order has been successfully shipped.
Instructions
Any additional instructions for this order that were entered when the order was created will be visible here. These will be displayed to the WMS operator when beginning the picking process, and can be accessed during via the info button on the main screen.
Created By
The user/operator who created the sales order.
Date Placed
The date and timestamp of when the order was created.
Delivery Address
The address the order will be delivered to.
Invoice Address
The address the order will be invoiced to.
Shipper No
Automatically generated shipper number.
Item
Shows the first item line of the order, showing the commodity code and weight. This makes it easier to differentiate multiple orders to the same customer.
Broker
Shows the broker to be used to help fulfil the order.
Carrier
Shows the carrier to be used to deliver the order. Both of these can be set up in ‘Order Info’.
FOB
FOB if required/entered against the sales order. This can then be printed on a Bill of Landing and other shipping documents.
Freight Terms
Any additional freight terms entered against this order will appear here.
Ship To
A specified delivery address if the user is not fully utilizing the customer addresses table. This can be integrated from ERP or hand inputted when creating the order.
Freight Bills Address
The billing/invoice address of the carrier being used to deliver this order.
Seal #
The seal number assigned to the order during the shipping process.
Trailer #
The trailer number, noted when the order is been shipped in WMS. Both this and ‘Seal #’ will be populated on arrival of the trailer and are not pre-assignable.
Column Help – Bottom Left Panel
Commodity Code
The commodity code of the item selected for picking, populated from ‘Commodities’.
Commodity Description
As above, this is the description of the commodity.
Quantity
Pulled from the sales order, this is the quantity of the commodity set to be sold.
Price
As above, the agreed upon price that the customer will pay for the commodity (per unit).
Notes
Shows any custom notes that were added when the sales order was originally created.
Scheduled
The quantity of the commodity scheduled for picking (i.e. not yet picked).
Fulfilled
The quantity of the commodity that has been picked.
Column Help – Bottom Right Panel
Item
Combined commodity code and description to identify the goods to be sold.
Lot No
The lot number that was used to fulfil the order.
Quantity
The quantity from that lot that has been used.
User
The user/operator who picked that lot.
Timestamp
Time & date when that lot was picked.
Descriptor
Descriptive field to denote the state of the lot. This could be:
- Allocated – The item has been assigned to an order (via Wave Picking for example).
- Picked – The item has been picked for an order and removed from inventory.
- Unallocated – The item has been unassigned from the order.
- Unpicked – The item has been unpicked from the order.
- Backordered – The item was backordered.
- Driver Signature – Denotes a driver signature event.
Stock Supplier Lot
The supplier lot assigned to the finished good, this can often be a custom batch number entry.
Pallet
The LPN of the pallet that was used to pack the item.
