
V5 API Installation & Update Guide
V5 Technical Documentation

Introduction
The V5 API has been developed to facilitate integration between a customer’s ERP system and V5 Traceability. In this guide we will cover how to install the V5 API, as well as how to perform an update.
Table of Contents
1. Prerequisites
1.1. Java
If not present on the system already, then Java Runtime Environment (version 8-15) must be installed. This can be either 32 or 64 bit. If installing the API on a system that any V5 Traceability apps are also installed on, Java will already be installed and this step can be skipped.
OpenJDK (Java Development Kit) is also compatible for use with the V5 API.
1.2. Apache Tomcat/Hosting
The first thing we need to do to install the V5 API is to install Apache Tomcat. The V5 API supports the use of Apache Tomcat up to version 10, and SG Systems recommend installing either version 9 or 10.
Other hosting platforms, such as glassfish, can also be used in the place of Apache Tomcat, but for this example we will be utilizing Tomcat.
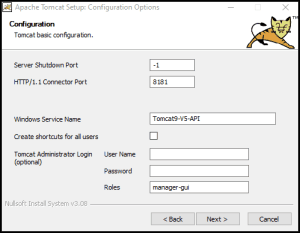
In this example we will be installing Tomcat 9.0.75, performing a ‘Normal’ install of the software. We can set a HTTP port for Tomcat to use, which by default will be port 8080. This can cause conflict issues with SG Reports which also uses port 8080 by default, so we would advise using a different port here (8181 in this example) if SG Reports are installed on the system.
A service name and Tomcat admin username and password can also be set here, which can be at your own discretion. For our demo installation we are proceeding as follows:
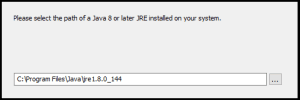
During installation you will be asked to point the installer at the JRE install folder. This should be auto-filled, but if not then you will need to nominate the correct folder.
After the install is complete the option to ‘Run Apache Tomcat’ should be selected.
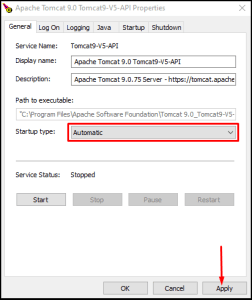
This new windows service should be set to start with Windows in the future to ensure constant running of the API. This can be set in the Windows Services settings, or on the Tomcat properties window, which can be found by performing a Windows search for ‘configure Tomcat’. The startup type can then be set on the ‘General’ tab:
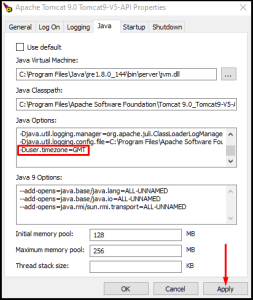
It is also recommended to set the timezone settings for Tomcat in this same properties window. Under the ‘Java’ tab we would need to paste ‘-Duser.timezone=GMT’ into the ‘Java Options’ panel, then apply:
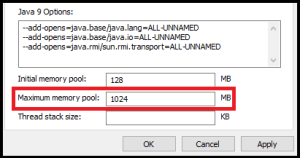
It is also recommended to increase the maximum memory pool of Tomcat to 1024 MB in order to better handle larger data requests:
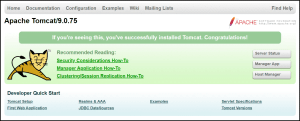
To check correct installation of Tomcat it is recommended at this point to check connectivity to it in a web browser. For this install we would connect to http://127.0.0.1:8181/ (local host and the port number we chose during the install), and would see this:
2. Installing the V5-API
Once we have made sure to have all the prerequisites in place, we can move on to the API itself. The latest version of the V5 API can be downloaded here. This will download ‘V5-API.war’.
This file should then be placed in:
*InstallDir*\Apache Software Foundation\*chosen service name*\webapps
So for our example this is:
C:\Program Files\Apache Software Foundation\Tomcat 9.0_Tomcat9-V5-API\webapps
Once placed here, and with the Tomcat service running, a ‘V5-API’ folder will automatically be created alongside the ‘war’ file.

The V5 API install is now complete. Now we just need to connect it to the V5 database.
3. Configuring the V5-API
In the main Tomcat installation folder (so ‘C:\Program Files\Apache Software Foundation\Tomcat 9.0_Tomcat9-V5-API’ in our case here) we need to create a new folder called ‘config’. Then download the following ‘db_settings.properties’ file here.
Open this file with notepad and delete whichever set of data is not relevant for the type of SQL database that is being used with V5 Traceability. If you are unsure of this method, please contact SG Support.
Contact your database administrator to complete the username and password fields.
Then, put this completed file in the folder stated above and restart the Tomcat service. Connection to the database will now be established!
For guidance in using the V5 API, please see our dedicated API section here.
4. Updating the V5-API
Updating the V5-API is as simple as re-downloading the ‘V5-API.war’ file again using this link. Once downloaded, delete the old .war file, as well as the folder it created when originally installed.

Then simply repeat the steps above from the installation, drop the ‘V5-API.war’ file in this folder again, allow it to extract the folder again, then restart the Tomcat service.
You can now continue to use the API, updated to the latest version!
