
Inventory Management
Module Guide - A Deeper Dive!
Introduction
Inventory Management is the most powerful module within V5 Traceability. Designed to scale from small warehouse operations to multi site storage and fulfilment centers requiring complex picking and distribution processes.
This module guide will focus on the management of inventoried stock within V5 Traceability. Stock is assigned lot/batch numbers when it is received in the system or created as a batch or product.
Inventory Management can be controlled either by the V5 WMS app, or by an external ERP ‘inventory master’ if desired. Stock can subsequently be containerized or palletized, and is held in locations prior to consumption in batching, or being shipped as a finished product.
This guide will focus on the creation of commodities in the system, and will discuss how these can then be managed within V5 Traceability.
Table of Contents
1. Commodity Creation
Commodities can be entered into V5 Traceability in a variety of ways, which will be covered here. We have a couple of options in this regard, from entering them manually within Control Center, or via SG Systems’ various Integration options.
1.1. Creating Commodities Within Control Center
The simplest way to create commodities is to use Control Center itself. We can do this by navigating to Commodities under the ‘My Factory’ header (1) and opening this tab. We can then click ‘Edit Table’ at the bottom of the page (2), and, if the logged in user has the correct permissions, we can then use the green ‘+’ at the bottom right of the window (3) to add a new row/a new commodity. A new row will now be generated that we can populate with the commodity’s vital information.
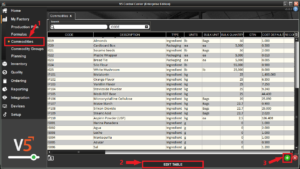
This row will remain salmon colored (i.e. unable to be saved due to inadequate information entered) until the first 4 columns (Code, Description, Type, Units) have been completed. We can then proceed to fill out as much of the rest of the columns as we want. For a detailed breakdown of the function of each column, click here.
Once we are done entering information against this new commodity we can hit ‘Stop Editing’ to lock the table again.

1.2. Importing Commodities Using the Gateway/V5 API
V5 Traceability features robust integration options, which can be used to provide an interface between the system database and clients’ ERP solutions. More information about these options can be found in our dedicated integration guide here.
2. Bulk Units
In production warehouses it is common for stock to be received in bags, boxes or some other container. The use of bulk units allows us to define the content of a container of these goods so that it can be easier used in production. For example, bags of sugar may be received in 50lb bags, so, when adding into a mixer, we don’t need to weigh them, as we already defined the weight of a single ‘bag’ via the use of bulk units.
When we add a commodity, we get the option to enter both ‘Bulk Units’ and ‘Bulk Quantity’ against it. These are used within the system when we are undertaking bulk batching.
Bulk Units can be created like any other Unit of Measure on the ‘Units’ page. Often it is helpful to create a generic unit, such as ‘Bags’ that we can use for this purpose. These bulk units should be assigned a conversion rate of 0.
The Bulk Quantity is then the weight (in the default UoM of the commodity i.e. lbs or kgs) of the commodity that comes in this bulk unit when we receive it into the warehouse. So if our main supplier of sugar (with default UoM of pounds) ships it in 50lb bags, we would set the ‘Bulk Unit’ to ‘Bags’ and the ‘Bulk Quantity’ as 50.
This would then have 2 major impacts within the system:
Batching
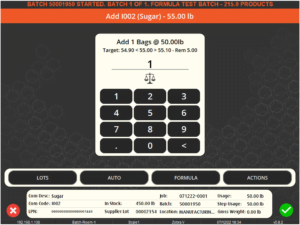
The main area where bulk units come into play is for bulk batching, about which more can be learned here. Our bulk units are used here if we are asking for either the exact weight, or more than the weight, of the bulk unit of a commodity in a formula weigh step.
If we run an example formula that requires 55lbs of sugar, the weighing terminal will first ask for 1 bag of sugar, before asking for the remaining 5lbs to be weighed separately.
We can however, use the ‘Toggle Bulk’ action or hit the scales icon in the center of the screen to switch between bulk weighing and using the scale to weigh the whole step. This is useful if our received bulk units are emptied into larger containers prior to batching.
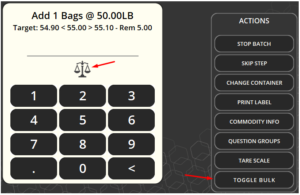
N.B. This is how Terminal will behave under default configuration for bulk batching. Terminals can be configured in this way, or set to be either a ‘bulk’ or ‘remainder’ weigh station. More information on this can be found here. Contact SG Support for assistance in setting this up.
Receiving
The bulk quantity is also referenced when receiving palletized commodities. If, for example, we create a sales order ordering 500lbs of sugar, and then go to receive it in WMS, we will see:
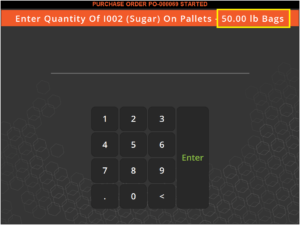
However, with default settings, this is for informational purposes only, so at this stage we would need to specify the number of pallets being received and the weight on each pallet, not the number of bags.
3. Containerization & Palletization
When setting up our commodities we have the option to set them as ‘Containerized’ or ‘Palletized’ (or neither). Setting a commodity as either of these will change how it is managed by the system.
- Containerized: If we check this option, the commodity stock lot will be divided into ‘containers’ upon arrival, each with its own serial number.
- Palletized: If we check this option, the commodity stock lot will be booked onto ‘pallets’ upon arrival. Labels with barcodes can then be printed for these pallets at the end of the PO process in WMS in order to track them.
4. Inventory Management
It is worth noting that, when it comes to inventory management, that produced formulas also count as commodities, and so can be managed in a similar way to our originally created commodities (ingredients or packaging).
We can manage our inventory of commodities in a few different ways:
4.1. Control Center
Within Control Center, we can use the ‘Manage Inventory’ tab (located under ‘My Factory’) to access an overall view of our inventoried commodities.
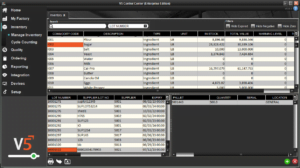
Lots and quantities of commodities can be edited here, provided they are not palletized. If the commodity is palletized then the only change we can make here is to zero the stock level of a particular lot or pallet. More options for managing palletized items are covered below.
4.2. WMS – Commodities
When we first press the ‘Commodities’ hexagon on the main page WMS, we will be asked to choose a commodity to manage.
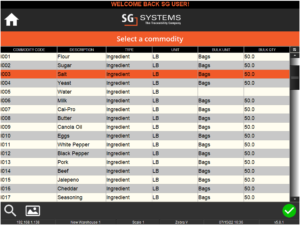
As mentioned above, the functions here can only be performed on commodities that are not palletized. If we try to select a lot of a palletized item we will get the following message in WMS’s messaging banner:
Palletized items can be managed separately in the pallet manager section of WMS.
If we select a lot of a non-palletized item however, we will be presented with the following screen, from which we can perform several actions on that lot.
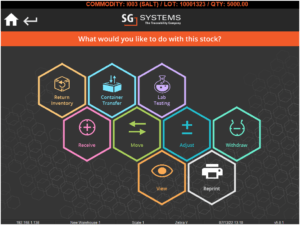
For a detailed breakdown of each of these functions and the flexible traceability options that can be provided for them, please check the inventory functions guide for WMS.
4.3. WMS – Pallets
Again in WMS, if we wish to manage palletized commodities, we can do this In the ‘Pallet Manager’ section. We can search for a pallet here by the commodity it holds, its location, pallet number, or related purchase order number. We can then select a pallet to manage.
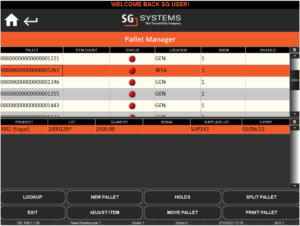
For more information on pallet management and Inventory Management, see our module guide on the subject.
5. Lot and Supplier Lot Numbers
5.1. Lot Number Assignment
Commodity Lot Assignments
Lot numbers are generally automatically assigned to commodities automatically upon receipt in the warehouse. If multiple commodities are booked in at once on a sales order, each different commodity will be given its own lot number. The system can then print barcoded labels that would be attached to these lots, allowing them to be tracked around the warehouse and scanned for batch production as required. Lot numbers can also be inputted manually, generated unique per commodity or generated unique systemwide. The format can be changed upon request. Contact SG Support for assistance with this.
Lots can be further assigned to pallets if they are marked as ‘Palletized’.
Formula Lot Assignments
Batch numbers are automatically assigned to batches/finished goods as they are produced in Terminal. The system can then print labels containing the batch number that can be applied to the batch/product. If a formula is a submix that forms part of another formula or product and is scheduled as part of this, it will still be assigned a number even if it is consumed at the next stage of production.
From an inventory management point of view, these batch numbers are treated in the same was as lot numbers, and will appear as lot numbers throughout the system once they have been produced.
Formulas can be further assigned to pallet is they are marked as ‘Palletized’.
5.2. Supplier Lot Number Assignment
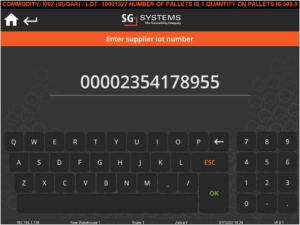
Supplier lot numbers are the lot/batch numbers that suppliers assign to their commodities as they ship them to us. In V5 Traceability these are entered against commodities as they arrive at our warehouse as part of a purchase order. This is to keep track of the original batch number of that good so that, if necessary, the supplier can be contacted to perform a trace recall of their own.
During the receiving process in WMS, the Inventory Management system will ask us to provide this number, and the WMS user will input this, either manually or by scanning via a barcode, usually referencing paperwork/alternate electronic correspondence that accompany the order. Receiving WMS instances can be configured to make this step mandatory or optional.
6. Commodity Consumption
6.1. Record Stock
When creating commodities, one of the options we have is to check the ‘Record Usage’ box.

When checked this will prompt Terminal operators to scan (or manually input) a lot number for the commodity they are about to use in batching. This is essential for keeping track of commodity usage in production, and should be used for the majority of commodities within Inventory Management. An example of a commodity that wouldn’t have its stock usage recorded could be water, which would not be ordered/have its own associated lot number(s).
But how do we decide what lots to use when we come to batch?
When commodities are consumed in production, there are a variety of ways and combinations of settings that we can use to prioritize their lots for use.
6.2. Lot Selection – Terminal Configuration
When commodities are consumed in production, there are a variety of ways in which these lots can be prioritized for use.
Managers and supervisors are able to restrict what lots the Terminal operator can scan when batching. We can:
- Allow operators to choose from a list
- Force operators to scan, either from a list or a specific lot
- Force operators to use specific lots (enforce FEFO/FIFO)
- Automatically assign a FEFO/FIFO lot
The last 3 of these options will be enforced at the Terminal and will require supervisor override to select anything else. Contact SG support to find out more about how these can be set up in your facility.
Individual production Terminals can also be configured to allow operators to hide/allow the use of expired or negative stock. This can be set on the Terminal itself if the user has full supervisor privileges to be able to access Terminal’s settings. This can also be set in Control Center.
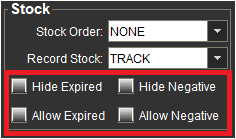
‘Record Stock’ settings can also be changed here. This will override individual commodity settings to record the stock for the commodity.
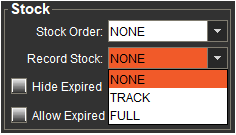
These options work in the following ways:
- None – Lot numbers will not be prompted for
- Track – A lot will be prompted for but not need to exist within the inventory system. Lots will be created automatically.
- Full – A lot will be prompted and must exist in the inventory in order to be scanned (full traceability)
6.3. Lot Selection – Expiry Dates & FEFO/FIFO
Another way to prioritize lot selection within the Inventory Management relates to the expiry dates of the commodities involved and the use of FEFO/FIFO by the system.
Expiry Days, Expiry Methods, and Expiry Mask in V5
When creating new commodities, we have a few options that will determine the expiry status of the item in question:
- Expiry days – This is the expiry time (in days) that it will take for the commodity to expire once it has been received at the warehouse, or produced as a formula batch/product. When receiving, this can be overridden if the particular expiry date of that commodity is known to be different than the stated default. This is done via the use of ‘Expiry Method’.
- Expiry Method – We have 4 options here when creating a commodity:
- Standard – Uses the ‘Expiry Days’ as set above when the commodity is received.
- Manufacture Date – Allows an override to take place at the receiving stage to input a supplier’s manufacture date. This will then use ‘Expiry Days’ to calculate an expiry date from this inputted date.
- Expiration Date – As above, this allows an override when receiving to input a supplier’s expiration date for that particular lot. This will then use ‘Expiry Days’ to calculate an expiry date from this inputted date.
- Expiry Mask – This function allows for a custom ‘mask’ to be used, so that if suppliers of a specific commodity have the expiry date embedded in a barcode, this can be scanned and automatically used by the system against that lot. This can be entered into the ‘Expiry Mask’ column in commodities in a few different ways:
- Standard date format: typical 6-digit MMDDYY format, i.e. August 1st 2022 – 080122 – entered as mmddyy
- Julian date format: 5-digit YYDDD format, i.e. August 1st 2022 – 22213 – entered as jjjjj
- Year index: year value since 1999 i.e. 2022 – 23 – entered as i
- We would then use ‘x’s to represent the other numbers in the supplier’s barcode to tell the system to ignore these numbers, so an example using the Julian date format could look like xxxxjjjjjxxxx
Use of FEFO/FIFO
Each instance of the V5 Terminal software can be configured to order the stock selected for batching based around FEFO, FIFO, or neither. Again, full supervisor privileges would be needed to change this setting.
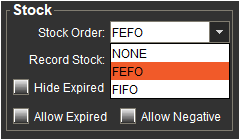
FIFO (First In First Out) works on the principle that the first items booked in to stock should be the first out, or in this case, the first consumed in production.
FEFO (First Expire First Out) works on the principle that the items with the earliest expiry date should be the first out, or again in this case, the first consumed in production.
Depending on which option we select here, the system will then prioritize the order of the lots the operator can choose from, or will be forced to used (depending on the other settings discussed above).
