
Stock Assignment
Your Guide to V5 Integration

The ‘Stock Assignment’ import endpoint can be used to assign existing stock to specific jobs, which can then be processed at the V5 Terminal
Linked Integration Guides:
Table of Contents
1. Control Center Layout
Stock assignment does not have visible front end data to look at, except when we head to the Terminal to see what stock is available for a job, which we will see in the example used in this article.
In this example we will look at assigning stock for a job running a simple formula that we will outline below.
2. API Links
To find out more about the definitions for these database classes please see the following links:
3. Stock Assignment Field Guide
3.1. Primary Keys
Primary Keys are the unique identifier for each table within the V5 API. For StockAssignment, these are:
stock.stock.lotNo – The lot number of the stock being assigned to the job.
stock.stock.commodity.code – The commodity code of the stock to assign.
job.jobNumber – The job number that the stock is being assigned to (job must already exist within V5).
stock.location.code – The location code where the lot of the required stock is located.
3.2. Required Fields
Other fields that are required to create a valid entry for stock assignment in V5:
quantity – The amount of the lot to be assigned for the job.
4. Example Dataset
For this piece we will look assigning existing stock to a newly scheduled job. So we will use the following simple formulation in our system:
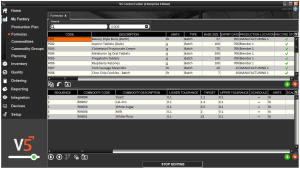
And we will schedule 20 batches of this formula in Control Center’s ‘Production Plan’.

So for this job we will need:
- 24 lbs of Yeast (max of 26lbs with tolerances)
- 26 lbs of Cal-Pro (max of 28lbs with tolerances)
- 10 lbs of White Sugar (max of 12lbs with tolerances)
- 40lbs of Milk (max of 42lbs with tolerances)
- 1040 lbs of Flour (max of 1042lbs with tolerances)
So let’s look at how we can assign this stock to our job.
5. Methodology
We can use either JSON import via the V5 API, or use CSV file exchange via the V5 Control Center’s Gateway. We can look at how we can use both of these below.
Note that exports are not possible for this endpoint via either method.
5.1. JSON – Import
‘StockAssignment’ import Endpoint/URI –
http://host:port/V5-API/api/integrate/import/stock_assignment
Samples:
Looking at the ‘StockAssignment’ endpoint, when coming to structure a basic import file for all 5 inngredient, this could look something like this:
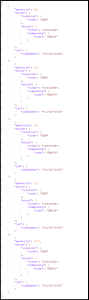
This sample JSON file can be downloaded here.
Once this has been posted to the database we can move to our Terminal to see how this would be processed.
5.2. CSV – Import
For CSV imports, we will be using ‘StockAssignment’ endpoint, allowing us to assign stock to jobs via the use of a CSV file.
Header/column definition filename: “stockAssignment.csvh”
Completed header files should be placed in: “<installdir>\SG Control Center\gateway\import\column_defs”
Import CSV filename: “stockAssignment-datetime.csv”
CSVs for import should be placed in: “<installdir>\SG Control Center\gateway\import”
Samples:
Header File:
Header files will generally be compiled by SG Systems prior to CSV integrations taking place, but we can see a basic example of one we can use for stock assignment below:

For further information on how we structure these files, please see the main integration page. This sample header file can be downloaded here.
CSV Import File:
We can then use the defined order of data points in the header to structure our import file. SG Systems can supply a template file for this, listing the data point for each column to make things clearer when populating the list. Note that this first row can be ignored by Control Center and so can be kept in the file when submitting for import.
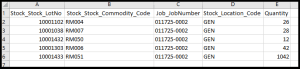
We can then drop this file into our import folder as defined above. This sample import file can be downloaded here.
6. Processing at the Terminal
Once we have imported the stock assignment data via either of the methods outlined above, we can then head to our Terminal to process the job that we have just assigned our stock to.
Logging in to the Terminal we will see the job ready to be processed as usual.
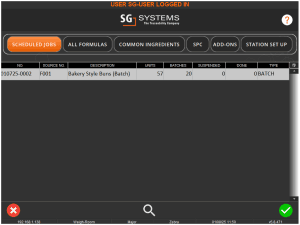
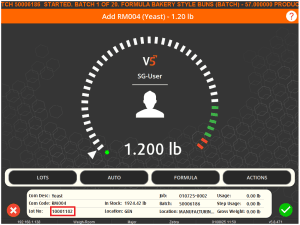
And once we begin the job, we can see that our specified lot (10001102) has been selected for use:
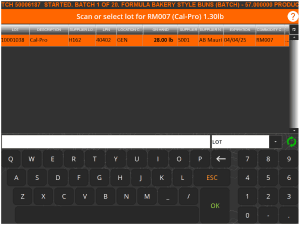
Note that the Terminal’s ‘AUTO’ mode must be enabled for the lot to be automatically selected, otherwise Terminal will just show the assigned stock that we can pick on the regular lot select screen, as we can see here for the next ingredient (Cal-Pro):
The rest of the job will then proceed using just this stock that we have assigned.