
Order Packing
Module Guide - A Deeper Dive!

Introduction
V5 Traceability Order Packing Module streamlines the packing process, improving the efficiency and accuracy of order fulfilment. It features weight checks to ensure products meet weight specifications and labeling of products according to their SKU & Sales Order.
The Order Packing process ensures that customers receive the right products, in the right quantities, and at the right time. It is an essential tool for businesses of all sizes looking to optimize their repack or fulfillment center operations.
V5 Traceability allows packing operators to quickly and efficiently pack product to create new stock, or pack to one or multiple sales orders.
It combines the features of finished-good and sales order processing into a single module which in particular environments can be faster than the conventional approach of producing stock on a terminal and shipping it via V5 WMS.
Table of Contents
1. Packing Terminal Overview
The order packing feature of V5 Traceability makes use of a bespoke Terminal layout that would not normally be seen by operators unless it is specifically enabled. As such, before we take a look at the use of order packing, let’s see how this differs from our normal Terminal layout.
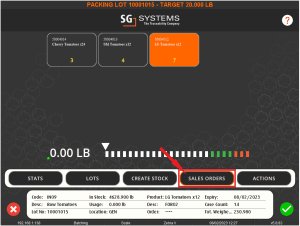
We can start by dividing the screen into 4 sections, each of which we can look at individually:

Red Section: Here is where we can add stock to produce or orders to fill by using the appropriate button in the blue section. Operators can swap between added options here on the fly.
Yellow Section: Scale indicator. This works the same as the ‘speedometer’ style gauge in the standard Terminal view, with appropriate below/acceptable/over tolerance areas to guide the operator to the correct weight.
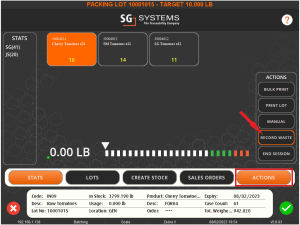
Blue Section: Control panel buttons, which can be used as follows
- Stats – Displays a list of the total products packed by individual operators. We can see how this works below.
- Lots – Allows the operator to scan/enter another lot of the commodity to be used to pack products.
- Create Stock – Allows the operator to choose product formulas associated with the selected commodity under ‘Lots’. This will add products to stock as they are produced.
- Sales Orders – Allows the operator to select scheduled sales orders featuring relevant products for fulfilment. This will automatically add products to the sales orders as they are produced.
- Actions – As in the standard Terminal window, there is an actions button at the bottom right. The options here are slightly different to the standard layout though:
- Bulk Print – Allows the operator to print product labels for the currently selected product formula.
- Print Lot – Prints a stock label for the currently active lot.
- Weighing Automation settings – These can be toggled between by tapping this button:
- Manual – Requires the operator to accept the weigh step once they are within the green zone.
- Semi Auto + Auto – Automatically accepts the weight of the commodity on the scale once the scale is stable within the target tolerance zone.
- Record Waste – Write the amount of the commodity currently on the scale off as waste. A waste containers is required in the system to use this feature. See below for more information on this feature.
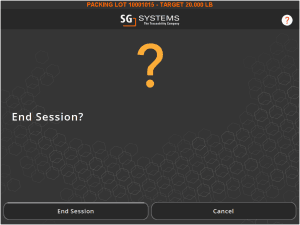
- End Session – Ends the current production session, returning the operator to the main Terminal login screen.

- Green Section: Session statistics, which can be broken down as follows:
- Code – Code of the selected commodity.
- Desc – Description of the selected commodity.
- Lot No – The lot # of the selected commodity
- In Stock – How much stock remains of the selected commodity.
- Usage – How much of the commodity we have used in the current session.
- Location – The physical location of the selected commodity.
- Product – The product we are currently producing
- Desc – Description of the product we are currently producing.
- Order – The order we are currently fulfilling (if relevant).
- Expiry – The expiry of the current product. Doesn’t seem to work correctly? Always seems to use today’s date. Didn’t spot this in the first guide but it doesn’t seem to change even with formulas with different ‘Expiry Days’ set. Yeah looks like this doesn’t get set for this mode currently so just sits at a default of todays date.
- Case Count – How many products have been produced in the current session.
- Tot Weighed – The total weight of the products produced in the current session.
2. Setup
The order packing feature is designed with the production of fresh produce in mind, with a focus on the quick packing of a single commodity into a product ready for shipping. With this being the case, let’s take a look at how this works. In Control Center, we have the following formula for a box of fresh picked tomatoes, using raw tomatoes as the component:

We can now head to our order packing Terminal to see how this feature works. As mentioned above, a specific Terminal configuration is required for this order packing mode to be enabled.
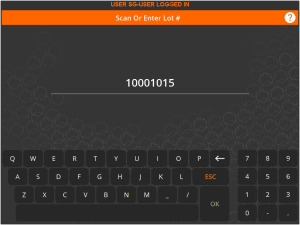
The first thing we will be asked to do upon logging in to the packing terminal is to enter/scan a lot number. In this example we will type in the lot number but in reality this would likely be automatically scanned from the line as new lots of raw tomatoes are loaded onto our production line.
3. Creating Stock
The ‘Create Stock’ function of this packing mode allows us to create finished products that can then be entered into the inventory for use with upcoming sales orders. Using this mode we can produce these in a more streamlines manner to standard product creation.
Once our operator has logged in to the terminal, they will be taken to the main screen for the packing Terminal with our selected lot confirmed in the top banner message. Lots can be changed by hitting the ‘Lots’ button (1).
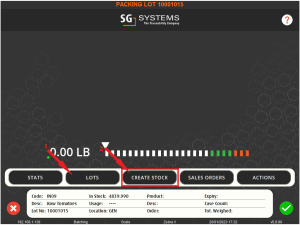
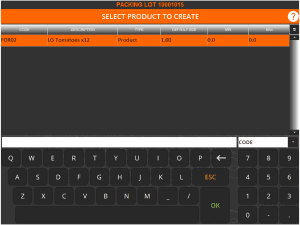
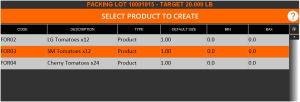
Our operator would then hit ‘Create Stock’ (2) to proceed. After hitting this the operator will be able to choose from a list of product formulas that our scanned commodity (raw tomatoes) can be used in. Here we just have our ‘LG Tomatoes x12’ formula as seen above, so we will select that and hit OK.
After this step, and if the feature is enabled, the operator would then have to enter their Operator ID, or scan it using an in-line hexagonal scanner. This function will then be able to monitor and report on the production managed by that operator while they are working on this production run. More information on this feature can be found below.
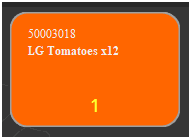
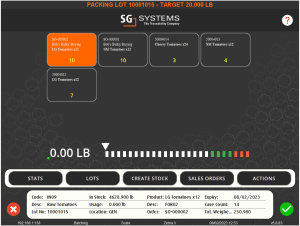
Once this is done the operator will be returned to the main packing window, but now we can see that a tile has appeared above the scale indicator showing the formula we just selected, as well as the associated lot number of the new lot we are about to produce.
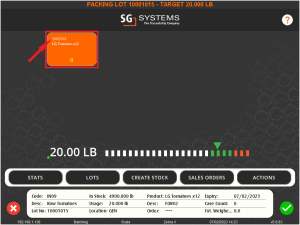
The operator would then proceed to weigh out the required 20lbs of tomatoes required for 1 pack of ‘LG Tomatoes x12’, after which the orange tile would then be updated to show that 1 pack has been produced.
The user can have their ID scanned again and proceed to keep producing packs of the ‘LG Tomatoes x12’. This scanning functionality allows for multiple operators to work on the same packing terminal and to scan their IDs when it is them doing the packing. More information on this can be found below.
4. Adding Multiple Products
Up until this point we’ve just been producing 1 product from our ‘Raw Tomatoes’, the 12 pack of large ones. As this stands, this isn’t that much more effective than the standard mode of order packing available in V5 Traceability. But let’s say that our lot of raw tomatoes contains tomatoes of varying sizes, from cherry sized, through smaller ones and then the larger examples. In this case, the strength of this Terminal mode means that we can simply add more product formulas to the session in order to use these different sizes to create stock out of the different sizes.
So we can use the ‘Create Stock’ button again to add more formulas to produce.
After which we can see that these 2 additional formulas have been added to the current packing session.

As we can see, the system keeps track of how many of each product that have been produced, as well as the total weight of the ingredient involved in the stats panel at the bottom right.
5. Adding Sales Orders
This Terminal mode doesn’t just allow us to create product stock that goes into inventory, but also allows us to pack items directly to scheduled sales orders, without using sales order processing in the WMS module. Let’s take a look at how that works now.
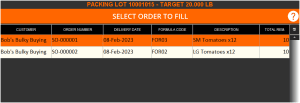
If we imagine that while the Terminal operator is adding products to stock, 2 sales orders are scheduled, 1 for 10 packs of large tomatoes and 10 for small. Once these 2 sales orders are scheduled, the operator can add them to the current session by using the ‘Sales Orders’ button.
The operator will then be able to choose from a list of scheduled sales orders that require products that use the commodity that we are using for this session i.e. our raw tomatoes.
The operator could then add both of these orders to the current session, so on the main packing screen we would now see our original 3 tiles for creating stock, as well as 2 new ones for the selected sales orders.
Notice here the difference between the 2 types of tiles. Our sales orders will feature the SO number, as well as the customer they are being packed for, whereas, as we saw previously, we are just seeing the lot # and product name for our stock items.
So with this setup in place, the operator could then stop creating stock for the large/small tomatoes and instead focus on fulfilling the relevant sales orders, as well as continuing to create stock for any cherry tomatoes that are coming down the line. Let’s say that they would create 2x large and 2x small tomato products for our orders, as well as 2x cherry tomato products for stock. Our screen would then look like this:
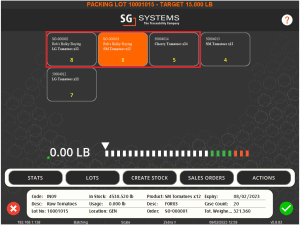
Note how, for our sales orders, the numbers started at 10 (the amount required for the order(s)) and have reduced to 8 as we have produced products to fulfil these orders. Our cherry tomatoes for stock however, will continue to increase in number as above.
Once sales orders have been fulfilled, the relevant tile will disappear from the main Terminal window. So we can see below that the order for small tomatoes has been fulfilled, the operator still has 1 more pack of large tomatoes to make, and in the meantime, they have produced a further 6 packs of cherry tomatoes that can go into stock.

From here, the operator could complete the remaining product for the sales order, then go back to producing more stock, or select more scheduled sales orders for packing.
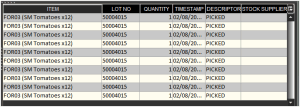
We can then see in the sales order summary for the completed order of small tomatoes that our lots have been successfully picked.
Once all orders have been fulfilled, we have used up the lot of tomatoes, or production of stock is sufficient, then we can either use the red ‘x’ in the bottom left of the main window, or hit ‘End Session’ under the ‘Actions’ menu to conclude the packing session and be returned to the main Terminal login screen.
6. User Stats
As we have touched on above, user statistics can be tracked while in this Terminal mode. This can be done using the stat’s button in the lower left corner of the main window.
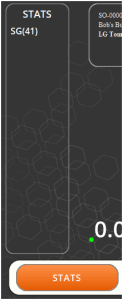
This brings up the user stats panel across the left hand side of the screen. We can see here that since just 1 operator has been working on the line, that there is only one entry, with a total amount of products made contained in brackets. However, this, paired with the user ID scan event can allow multiple operators to work on the line at once, or allow the quick switch of operators at shift’s end etc., to track the production statistics of multiple users. For example, if our ‘SG’ operator ends their shift, and John Smith comes along to replace them in the same session and continues packing, after a short while then the stats screen could look something like this.
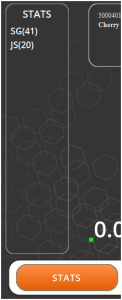
The system will continue to monitor production stats for the different operators that work on the line until the current session is ended.
7. Packing Terminal Waste
As mentioned at the start of this guide, the packing Terminal features a waste function, so let’s take a quick look at how this works.
With a tile selected in the main panel, if we hit the ‘Record Waste’ button under the ‘Actions’ menu, we will enter waste mode.
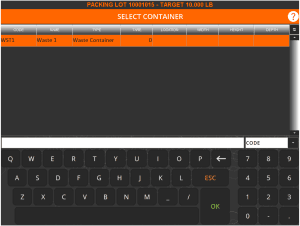
After hitting this button we will be asked to select a ‘waste container’ to use for the wasted commodity. This would need to be set up as this type in the ‘Containers’ section of Control Center.
The Terminal will then enter ‘Waste Mode’. This can be seen in the banner message at the top of the screen, but also by the fact that there are no longer any tiles selected for packing, and the scale can now use its full range to weigh the wasted amount. In this case our operator has gathered 7.65lbs of tomatoes that are damaged and are not suitable for produce packing.
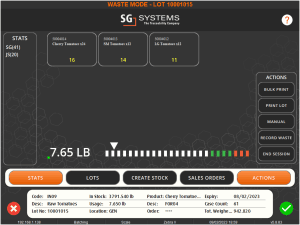
After confirming this weight with the green check, the operator will be asked to remove the waste container, and the weighed amount will be regarded as waste by the system. A confirmation message will also show in the top banner.
This would be reported in the ‘Waste by Supplier’ report. For more information about this report click here.
To learn more about waste please see our module guide here.