
Training
Module Guide - A Deeper Dive!

Introduction
New for v5.9, the Training module is primarily designed to allow customers to train their users of the operation of all aspects of the V5 Traceability system. The module also offers the ability to restrict access to certain areas of the system until training has been conducted successfully.
The module also provides a custom training feature that enables customer to create their own modules for user training.
Table of Contents
1. Setup
1.1. Module Creation
We would start to set up a training module in Control Center by heading to the ‘Modules’ window (under the QMS > Training menu) and using the green ‘+’ in the bottom right of the top panel to add a new module.
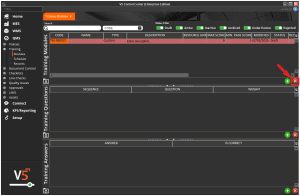
The module’s code here will be pre-populated but this can be edited to suit any desired naming convention. A name can then be given to the module after which the module will be saved.
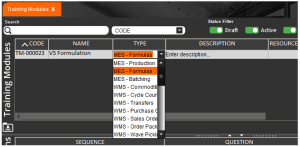
So here let’s create a module to train supervisors in how to create formulas in V5. We can start here by selecting this under the ‘Type’ column. Here there are multiple pre populated types to choose from that reflect different areas of the V5 Traceability system, so we will select ‘MES – Formulas’ here.
Once a SG populated module type has been selected, a pop up will appear to ask if the resource link here should be pre populated from the SG Support website.
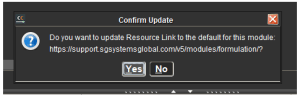
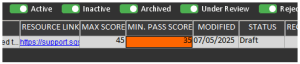
Confirming this here will add the support site link to the ‘Resource Link’ column. This would then be the link that people undertaking the training would read beforehand, as well as where the questions can be sourced from.
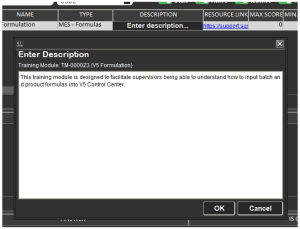
A description can also be added using a pop-out text box if desired.
This completes the basic module setup, so now it’s time to add some questions and answers to our newly created module.
Note that there is a ‘Restrict Access’ checkbox against each created module.
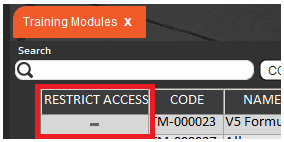
Checkling this will immediately restrict all users from accessing the relevant module/type across the V5 system, so use this with care during setup.
More information on module types and what areas of the system they restrict will be covered below.
1.2. Question & Answer Setup
We have 2 options here, these being:
- AI Generated – We can use a built in AI to use the assigned resource link to compile a list of questions and answers
- Manually – We can create questions and answers ourselves.
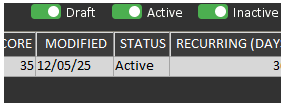
Regardless of the methodology used to add the questions and answers, once this is completed, a ‘Min. Pass Score’ can be added in the top panel. This can be whatever we want here to determine that the user undertaking the training has understood the module. Here we will set a pass mark of 35.
1.2.1. AI Generated
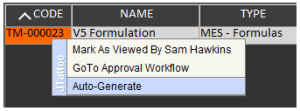
The quickest option here is to use the built-in AI tool to populate the questions and answers. This can be done by right clicking the module in the top panel and clicking ‘Auto Generate’.
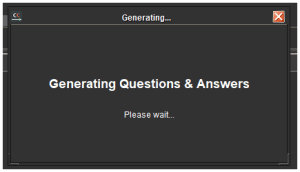
A warning that this will overwrite any existing content will be shown, and we can confirm that we want to auto generate the content by clicking the appropriate button. The system will then generate the content. This may take a few moments depending on internet connection speed.
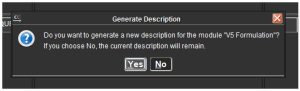
We will then be given an option to overwrite the existing description if desired, but since we entered one already then we will just click ‘No’ here. Note that the description will be generated from the name of the module.
Once this has been done then the AI generated questions and answers will be populated in the lower 2 panels, and the ‘Max Score’ in the module header will also be updated according to the weighting assigned to each question. By default the system will generate 8 questions with 4 answers each, with the correct answer designated by the ‘Is Correct’ checkbox.
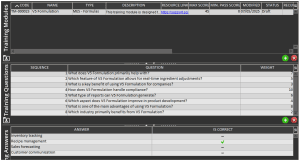
Note that questions/answers can be added/removed and edited freely here to best suit the customer’s focus (i.e. in this case for formulation the module may need to focus more on batch or product formulas depending on the individual system setup). Weightings can also be freely edited according to training priorities.
Note that throughout all edits here, the ‘Max Score’ column in the header will automatically be updated each time
1.2.2. Manually Entered
If preferred the questions and answers can be added manually without AI assistance by using the ‘+’ controls for each of the lower 2 panels, manually entering data and then assigning a correct answer.
As questions (with their weightings) are added, the ‘Max Score’ column in the upper panel will, as above, update automatically.
1.3. Additional Module Parameters
There are several other parameters we can set against a training module here before we make it active and available for use. We can set the following:
- Recurring (Days) – This column serves 2 purposes:
- It determines how long the user will be granted access to that particular part of the system for before retraining is required.
- Tells the system when to schedule the same module for the same user again. Note that the user must pass the module for this scheduling to come into effect.
- Reschedule Offset (Days) – This can be used to offset the above value back by the number set here. So if we were to enter 365 above, and 30 in this column, the system would reschedule the training module for the user 335 days after they last passed it, giving the user 30 days to complete the training again. An email will also be sent to the user to remind them of this.
- Note that if this is set to 0, the system will just reschedule the module for the user based on the ‘Recurring (Days)’ column.
Note that to use both of the above features the SG Data Engine must be installed with the system.
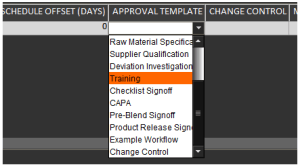
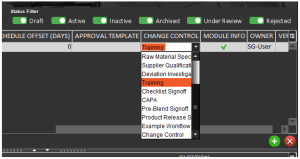
- Approval Template – An approval workflow template can be set here to perform validation of a user’s test results before a pass or fail is confirmed. This will be covered in more detail below.
- Change Control – An approval workflow template can also be set here, however this workflow would be used to approval any changes to the training module in the future (adding/removing questions, changing pass mark etc.). This will also be covered in more detail below.
- Module Info – If this box is checked (we will check it here) then this allows the user undertaking the training in Terminal to view the ‘Description’ that we populated earlier.
- Owner – This allows the setting of an owner against the module. This will be the user that (provided they have an email entered against them in ‘Operators’) will be emailed if changes to a module are approved, or the module is deleted.
- Version – Non-editable, this tracks the current version of the Training module.
2. Activating a Module
Note that here we will cover how to activate a module without a ‘Change Control’ workflow set. How we would do this with a workflow set is covered below.
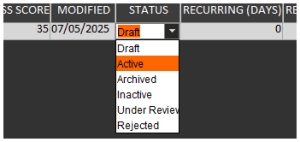
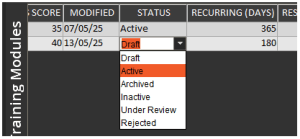
Once we have set the module up now we want, it is simply a case of changing the ‘Status’ of the module in the top panel from ‘Draft’ to ‘Active’.
This will then make the module available for scheduling in the ‘Schedule’ window of the ‘Training’ menu in Control Center.
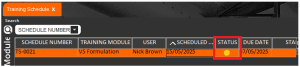
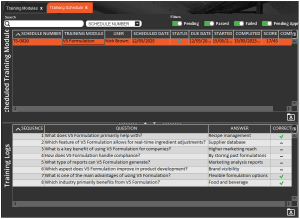
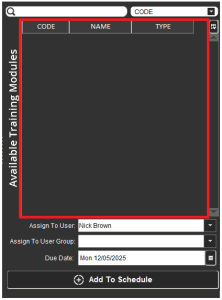
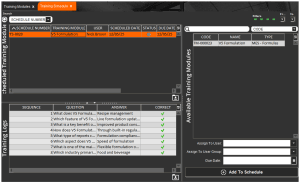
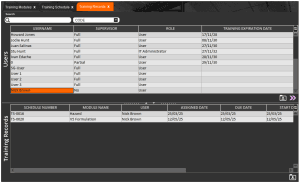
3. Scheduling Training Modules
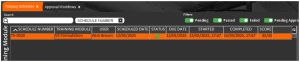
We can then choose this module in the top right section of the scheduling page. Once chose, we can assign the training session to either a single user or a group of users, and allows the assignment of a due date for the session.
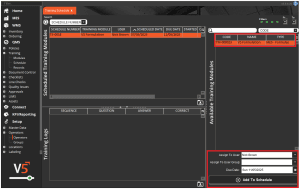
We can see that the bottom panel here is blank, but this will be populated as the user undertakes the training.
When a module is scheduled, the ‘Status’ light against it will be yellow.
Other statuses that can be seen here are:
Grey – Module result pending approval. More on approvals below!
Green – Module passed.
Red – Module failed.
4. Undertaking Training Modules
With this scheduled we can head to the Terminal (any Terminal can be used for this) and log in as our example user to undertake the training. Note that training modules will only appear if they are assigned to the logged in user.
Once logged in the training menu can be found in the QMS section of Terminal and is the very last menu on the right of the window.
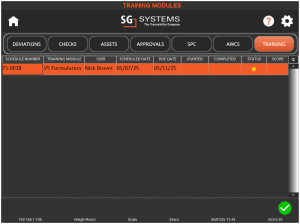
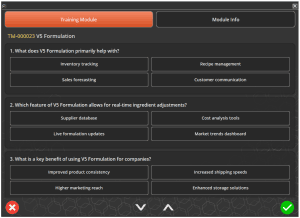
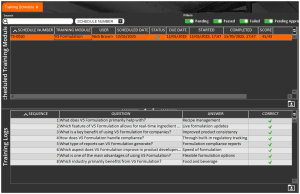
With the module highlighted the user will then use the green check to begin the training. Here they will see the main interface with the questions and answers that we set up previously.
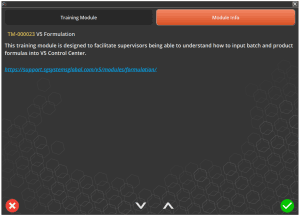
Tapping the ‘Module Info’ button in the top right will (if the checkbox mentioned above is checked) show the user the module description and resource link.
The user would then proceed to answer the questions here to the best of their ability.
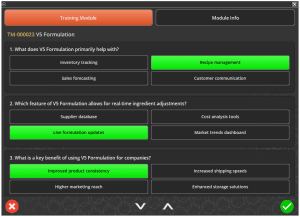
The up/down arrows at the bottom of the screen can be used to scroll through the questions, as well as being able to tap/click and drag depending on the device being used to do the same.
Once they have answered all questions the user would use the green check to complete the training session.
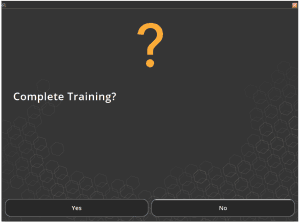
What happens next depends on the outcome.
5. Results
5.1. Pass
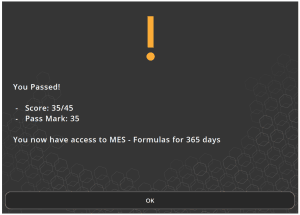
If the user achieves the pass score or higher, than they will pass the module, and therefore will be granted access to the area of the V5 Traceability system that was selected as the ‘Type’ when the module was created, so in this case ‘MES – Formulas, with their access ending according to the ‘Recurring (Days)’ value entered.
5.2. Fail
If a user fails the training at the Terminal then they will be informed of this and will not be granted access to the part of the system covered by the module’s ‘Type’.
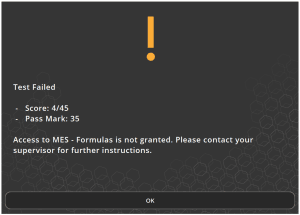
They would then have to undertake the module training again until they pass.
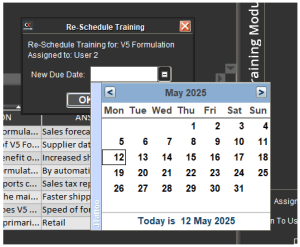
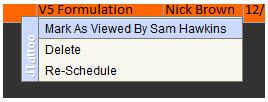
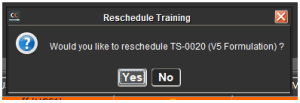
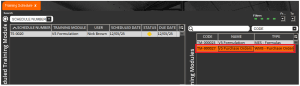
In the event that a user fails a training module, supervisors can easily reschedule additional tests via the training schedule back in Control Center. This can be done by right clicking the appropriate line in the top panel and clicking ‘Re-Schedule’.
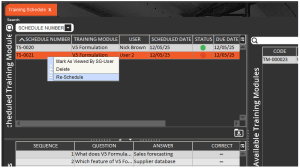
And then choosing a suitable date for the re-scheduled test.
6. Approving Results
The above examples of a pass/fail are done without an ‘Approval Workflow’ set against the training module. We can assign a workflow here to require that each test result, pass or fail, must be reviewed by another user. So if we assign a workflow to the formulation module that we created above we can see how this works.
So if we take the same examples of a pass/fail that we saw above we can see how the process would differ.
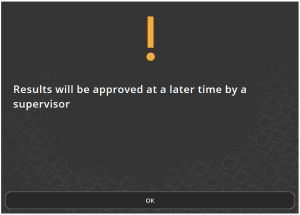
For either outcome on the Terminal, the result will not be shown to the trainee, they will be shown the following screen at the Terminal.
So in this case the trainee failed, as we can see below from the score and training log.
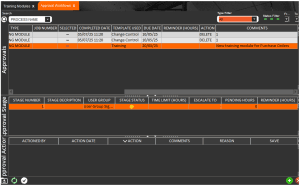
So, with the ‘Training’ approval workflow set, a user from that user group associated with that workflow, who would probably be someone like the trainee’s Group Supervisor, can then log in to review these results. In order to approve the result, the approving user would first need to confirm they have viewed the result be right clicking it and clicking the ‘Mark As Viewed By *user*’ button.
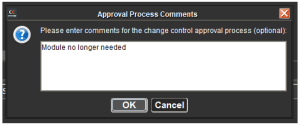
They would then navigate to the ‘Workflows’ window (under the ‘QMS > Approvals’ menu) where the training will be awaiting approval. They would create a new entry in the bottom panel here (1) and use the drop down (2) to approve the result and choose a reason (3 – required). A comment can then be added before hitting ‘Save’ (4).
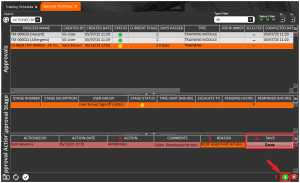
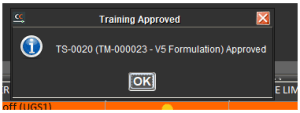
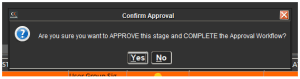
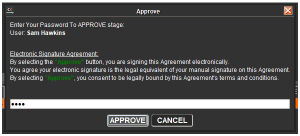
The approving user would then be asked to enter their password, after which the result would be approved.
If the user failed the module, then the approving user can also choose to reschedule the training.
Note that this will reschedule the module immediately, but this can always be changed in training schedule.

Note the pre filled comment that this newly scheduled training was generated from the workflow.
On the other hand, if the user were to pass, as below:
The result would still need to be approved using the same workflow as above, just when it has been there will be a green lamp against the result, confirming the pass, and obviously there wouldn’t be a need to reschedule training at this time.
7. Version/Change Control
7.1. Creating a Module
When we first create a training module we can choose to apply a ‘Change Control’ approval workflow, which will subsequently require the module to be approved before it is available for scheduling. Let’s take a look at this by creating a new module and assigning the ‘Training’ workflow that we’ve used previously.

Then, once we have finished creating the module (adding questions/answers etc.) we can, as above, switch the ‘Status’ from ‘Draft’ to ‘Active’, after which we will confirm that we are creating the initial version of this module.
Once this is done we will see a confirmation message that this action will put the module ‘Under Review’, subject to workflow approval.
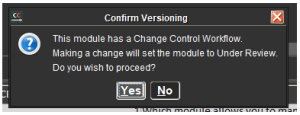
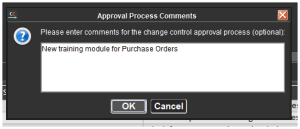
We can also enter comments that the reviewer will see when approving the module for use.
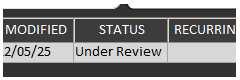
After which the module will be set as ‘Under Review’.
A user who is a member of the assigned approval workflow’s user group would then have to log in to their Control Center and, after reviewing the module, right click the module in the top panel and ‘Mark As Viewed By *user*’.
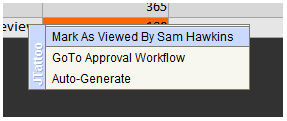
Once this is done, the user can either use the same menu to ‘Go-To Approval Workflow’ or open the ‘Workflows’ menu under the ‘QMS > Workflows’ menu. Here they would find the training module with an outstanding (yellow lamp) status. Note that a ‘Type’ filter is available here to more easily filter approvals and find our training approval.
The approving user would then use the green ’+’ in the bottom panel to enter an approval action
The would then enter an action from the drop-down menu to indicate that they have reviewed the newly created module. Additional comments can also be entered here and a reason must also be chosen (populated as an ‘Approval’ type in ‘Reasons’.

They can then click ‘Save’, and confirm that they are ready to approve.
And then enter their secondary password to complete the process.
After which all changes will be approved, and the module will become available for scheduling in the training schedule.
7.2. Editing a Module
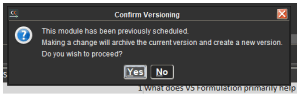
Training module version changes are registered whenever a module version that has been previously scheduled is edited. Users can make as many changes to this new version as they like before it is rescheduled again, after which a new version will be generated if a change is made, and so on. This can work in 2 different ways depending on if an approval workflow is assigned in the ‘Change Control’ column against the module.
7.2.1. Without Change Control
We saw above that we did not set a ‘Change Control’ workflow for our formulation module. This means that, if a module has been scheduled and then edited, all the active user will have to do is confirm a new version creation when they make the first change. Note that if the module has not been scheduled previously then edits can be freely made without triggering any of the below.
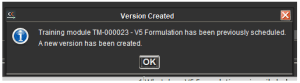
After which they will be shown a confirmation message:
And following this they will be able to proceed to make as many changes as desired before scheduling the module again. The module’s status here will remain ‘Active’ throughout any changes, meaning that it will remain visible/available in the training scheduler.
7.2.2. With Change Control
If we have a change control workflow set against the module, as below:
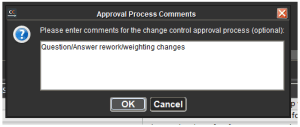
Then when we make the first edit to the module, we will see the following box, allowing the active user to enter comments for why the new version is being generated.
Once this editing process is started, the status of the module will then change to ‘Under Review’.
Meaning that, until the module is approved using the assigned workflow, it will be unavailable for scheduling.
Once all required changes have been made to the module, it would then need to be approved by a user who is part of the user group assigned to the approval workflow.
This would follow the same procedure as we saw when creating a new module with an assigned approval workflow above. Once this is complete the next version of the training module would be available for scheduling.
7.3. Deleting Training Modules
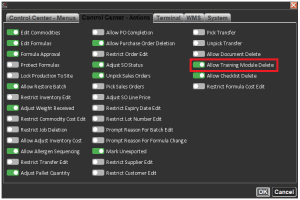
In the event that a module needs removing from the system, it is first essential to ensure that the user who is approved for deleting modules is given the ‘Allow Training Module Delete’ permission in their ‘Operator’ setup.
Once this is done, this user will be able to simply delete modules if there is no change control workflow set against it. The would do this by using the red ‘x’ in the top panel of the module window in Control Center.
If there is a change control workflow set against the module, then attempting to delete the module will show the following message, confirming that this request would need to go through the approval workflow.
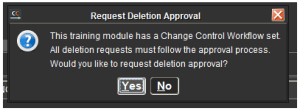
As with creating & making edits to a module that we covered above, a comments box will then show to enter comments/a reason for the deletion request.
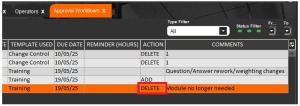
The same process as above for making edits would then apply to this deletion request, so a user who is part of the assigned approval workflow would need to view the module and approve the request in the same way as above. Note here that the ‘Action’ against the workflow would be ‘DELETE’.
8. Training Records
A record of the training will then be held in Control Center. As we have seen above when approving results, individual question and answer results are held within the schedule window.
Additional records/historical data are also held in the ‘Records’ section of the ‘Training’ menu. This has 2 different views which can be toggled using the pink arrow control on the top panel. The first view lists modules and then the users who have undertaken it, when they did this, and their score.
Toggling the view orders the records by users, and then lists the modules that they have undertaken, along with the same data as shown above.
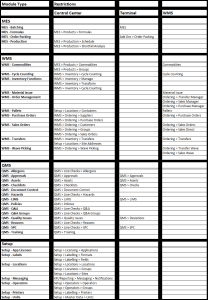
9. Module Types & Restrictions
We saw when creating a training module that there is a ‘Restrict Access’ checkbox available.
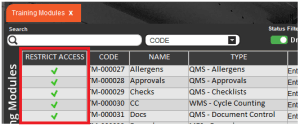
Once activated this option will IMMEDIATELY lock all users out of the individual modules’ relevant areas of the V5 Traceability system. So for example, the ‘QMS –Allergens’ module type will lock all users out of the ‘QMS > Line Checks > Allergens’ menu, ‘QMS – Approvals’ will lock all users out of the entire of the ‘QMS > Approvals’ section of Control Center, etc.
A full list of exactly which areas of the system that the various module types restrict access to can be downloaded here.
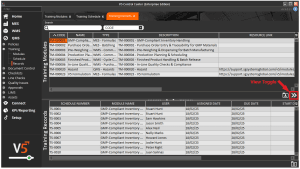
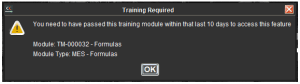
So if an operator has not passed the relevant training module and they try to access a module they haven’t completed training for, they will be shown this message in Control Center, where they will be told exactly which module they need to pass.
Similar messages will also be shown on Terminal, for example here if an unqualified operator logs in to the MES portion of Terminal:
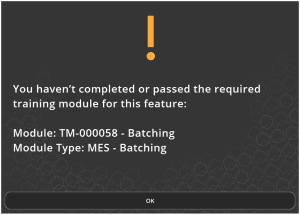
Or if they try to access a portion of the QMS section that they have not completed training for.
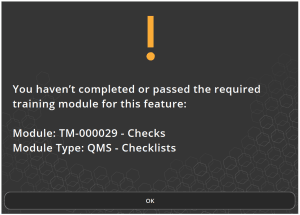
The same would apply for WMS, where we can see the same style of message for an operator trying to access Purchase Orders without the appropriate training.

A full list of exactly which areas of the system that the various module types restrict access to is shown below, and can also be downloaded here.
9.1. Exclude From Training
Users can be excluded from training restrictions if desired. This can be useful for users that have participated in system implementation/Virtual Factory work and are already familiar with the system’s operation.
This can be set against the user in ‘Operators’, under the ‘System’ tab.
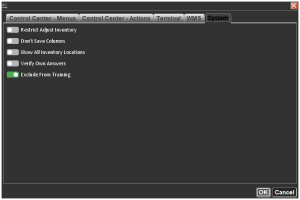
This operator will now be able to access all areas of the system that would be restricted under the training module setup.