
Cycle Counting
Module Guide - A Deeper Dive!

Introduction
The Cycle counting module within V5 Traceability is a method of inventory management in which a company counts a small portion of its inventory items on a regular basis, rather than conducting a complete physical count of all inventory items once per year.
The idea behind cycle counting is that by continuously tracking and verifying the accuracy of a portion of the inventory, it is possible to maintain an accurate record of the entire inventory.
Cycle counting helps to reduce the time and effort required for traditional physical inventory counts, as well as improve the accuracy of inventory records.
Cycle counting can be used in conjunction with other inventory management techniques, such as perpetual inventory systems, to help ensure that inventory levels are accurately recorded and that inventory is managed correctly.
Note that this guide addresses the latest version of the Cycle Counting Module for V5 Traceability version 5.9 onwards. An overview of functionality prior to this can be viewed here.
Table of Contents
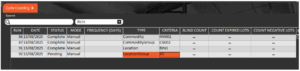
1. Cycle Counting Setup
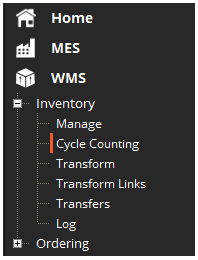
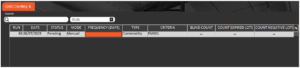
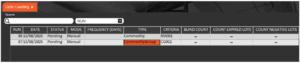
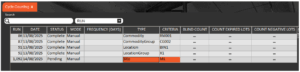
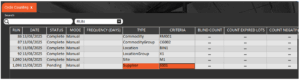
Cycle count runs can be scheduled in the ‘Cycle Counting’ window in Control Center, found under the ‘WMS > Inventory’ menus.
Once here, Cycle Counting runs can be created by using the green + in the bottom right of the screen.
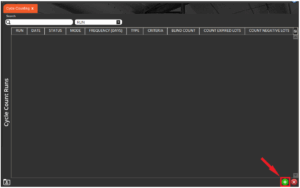
Once a new line has been it will not yet be saved (will be the light red color we can see here):

To create a valid entry here, there are 2 additional pieces of information that we need to enter against the line before it will be saved. These are ‘Type’ and ‘Criteria’:
Type
Here we are selecting what kind of count we want to schedule, the selection of which will determine what we can subsequently select in the ‘Criteria’ cell. There are 6 options for type here:
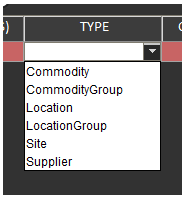
- Commodity – Allows the selection of a specific commodity to count the lots of. This encompasses all raw materials and formulas.
- Commodity Group – Allows the selection of a ‘Commodity Group’, whereby all lots of all commodities in that group will be scheduled for counting.
- Location – Specifies a location in which all items will be scheduled to be counted.
- Location Group – As with commodity groups, this allows for a ‘Location Group’ to be selected, and all lots of commodities in this group of locations will be counted.
- Site – Similar to locations above, but specifies a site where all lots of items in all the locations assigned to this site will be scheduled to be counted.
- Supplier – Allows a supplier to be selected, meaning that all received lots from this supplier will be scheduled to be counted.
We will select a ‘Commodity’ type count for this initial example to demonstrate cycle counting functionality in WMS. Other types will then be deomonstrated.
Criteria
Depending on what we select in the ‘Type’ cell above, we will then be able to select a commodity/commodity group/location etc. to target for counting.
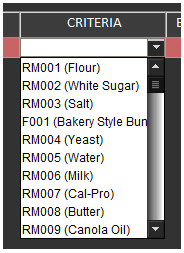
Since we selected ‘Commodity’ above, we can pick an item to count here. For this example we will select ‘RM001 – Flour’.
With these 2 parameters selected, the line will be saved/turn white, and will be automatically assigned a run number, in this case 86.
There are further options here that we can assign before the check is executed in WMS. These are:
- Date – Assigns a date for the run to be scheduled. This will work with the ‘Today’ tab on WMS to filter runs that warehouse operators should be processing on any given day.
- Frequency (Days) – Allows a number to be entered for when this check should recur. This is useful for items that should be counted on a regular basis. The system will use this number to automatically schedule the next cycle count once the run is complete.
- Blind Count – Hides existing lot stock levels from the WMS operator, preventing them from ‘cheating’ while undertaking the count.
- Count Expired Lots – Will include expired lots on the list of lots to count.
- Count Negative Lots – Will include lots with both 0 and negative quantities to count.
Note that for the final two options listed above, checking these boxes will enforce the counting of expired/negative lots. Leaving these unchecked will still allow these types of lots to be counted, but this will be optional for the operator.

With our run created we can now log in to our WMS device to see how this count would be processed.
2. Cycle Count Execution
2.1. Commodity
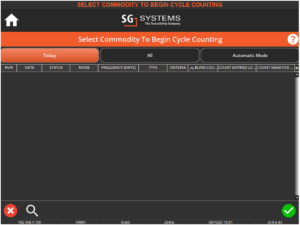
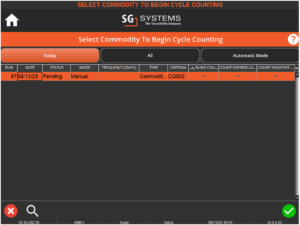
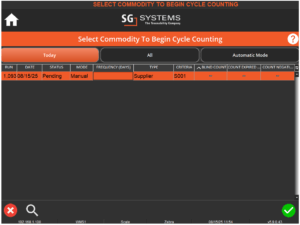
Once we log in to WMS we will see the ‘Cycle Counting’ hex panel, which is what we need to tap to get into the Cycle Counting menu.

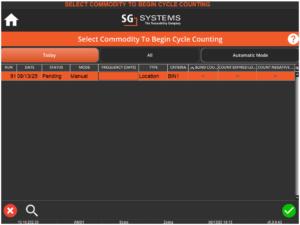
Once here there are 3 tabs at the top of the page that we can use to filter our counts/access additional functionality:
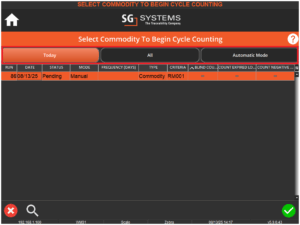
- Today – Shows all counts scheduled for today’s date
- All – Shows all counts regardless of their scheduled date
- Automatic – Launches cycle counting in Automatic Mode – see below for more details on how this mode works.
So let’s run the count that we have just scheduled by highlighting it in the ‘Today’ panel and tapping the green check in the bottom right of the screen.
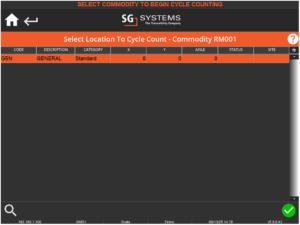
This will then prompt for a location to count. Here we just have our RM001 commodity in a single location, so we will select that location and again tap the green check to proceed.
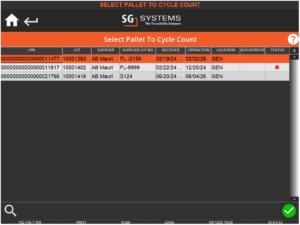
Once we have selected this we will be shown the lots in this location, and we can highlight one and tap the check again to count this. Note that here the lots with the red lamp in the status column are expired.
Since we did not check the ‘Count Expired Lots’ box in the Control Center setup, counting these lots is optional at this time.
So let’s count this first lot. Selecting the lot will open a dialogue to input a value that was counted.
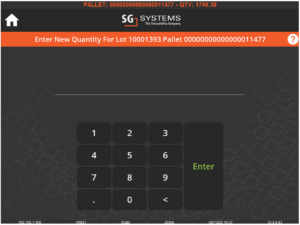
Note that the lot’s current quantity will be shown at the top of the screen in the messaging banner. This can be hidden by selecting ‘Blind Count’ when setting up the count in Control Center.
Here we will enter a value of 1750, so 48.38 less than what the system thinks the lot has.

Since we’re adjusting the quantity here the system will throw a list of ‘Pallet Adjust’ Reasons to choose from. If a non-palletized stock item is chosen then ‘Stock Adjust’ Reasons will be shown instead.
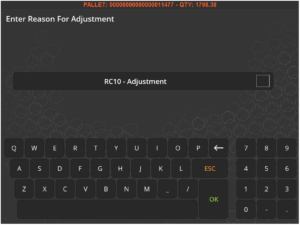
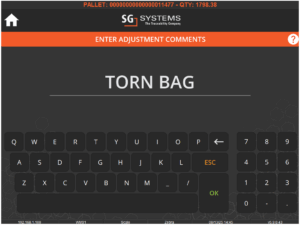
A comments box can also be shown for gathering extra information from the counting operator if the Reason is configured this way.
After which we will be returned to the lot select screen, which will now show a green status lamp against that lot (to show that it has been counted), along with any adjustment values.

The remaining lots can then be counted in the same way as above. Note that the expired lot will still show a red lamp even when counted.
If we do not want to count the expired lots (and are not enforcing this as discussed above), then we can simply ignore it. So if we run a count on the bottom lot that we can see above (pallet 21766), so only the expired lot remains, the system will give us the following options.
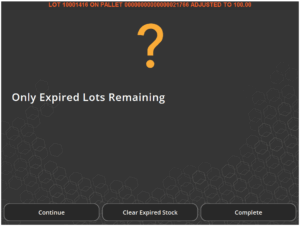
So the options here are:
- Continue – Returns to the lots screen and allows the expired lot(s) to be counted.
- Clear Expired Stock – Clears down ALL uncounted expired lots.
- Complete – Completes the run without counting the expired lot(s).
In this case we will complete the run.
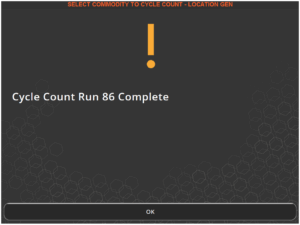
And we will be returned to the main Cycle Counting menu.
Now that we’ve seen how the ‘Commodity’ type count is executed, we can create further counts to demonstrate how the other count types would function.
2.2. Commodity Group
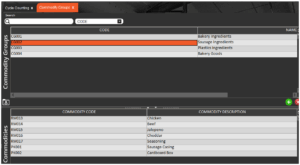
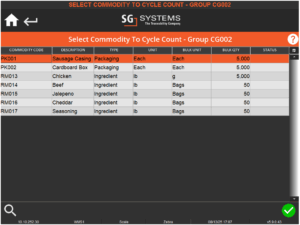
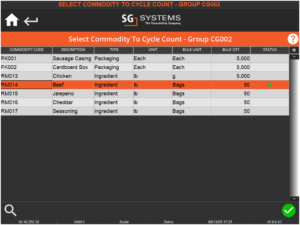
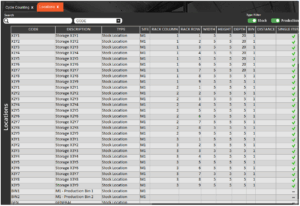
So let’s set another count up, this time for the CG002 Commodity Group:
A group which consists of the following commodities:
So with this set, let’s head back to WMS and take a look at how this would look here. Heading to the same Cycle Counting menu as above, we can see the newly scheduled count.
Entering into this count will then show a complete list of the commodities present in the group.
And selecting one of these (beef in this case) will show the total number of locations that this commodity is stored in:
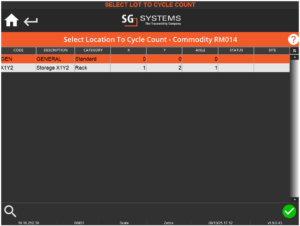
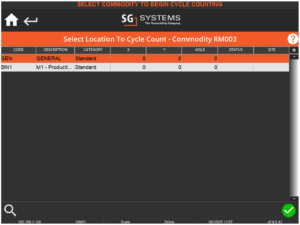
And selecting a location will then show the lots here that are waiting to be counted:
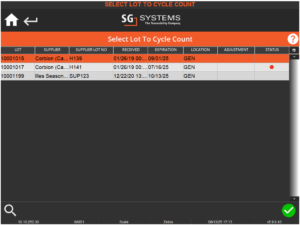
We would then proceed to count each lot (or not in the case of the expired lots since we are still not enforcing this) in each location that the commodity is stored in.
Once all lots have been counted (or ignored/cleared down for expired lots) in one location the system will mark this with a green status lamp once we look at this menu.
And subsequently, once all lots of a commodity have been counted in all locations, the system will similarly mark the commodity itself with a green status lamp.
Once all commodities in this group have been counted in this manner then the run will complete as we saw with the previous ‘Commodity’ type of count.
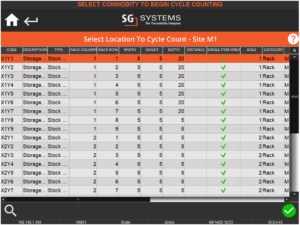
2.3. Location
To set a location type count, we would just select the ‘Location’ type and then select the desired location, in this case ‘BIN1’.
And when we head to WMS we can see this new count ready to be executed.
And once we select this we will see a list of commodities with lots at this location.
And selecting each commodity will show the lots present here that need counting.
And once all lots of all commodities in this specific BIN1 location are counted then the run will complete.
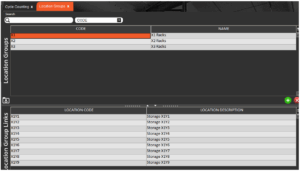
2.4. Location Groups
Similar to commodities and commodity groups, a group of locations can also be chosen to count all lots of any commodity held in all locations assigned to the group.
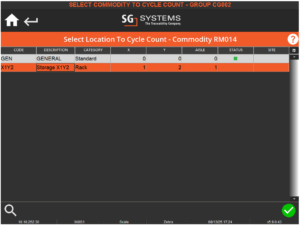
So we will set up another count for the ‘X1’ rack group.
Which includes the following locations.
And once again we can go to WMS to execute the count.
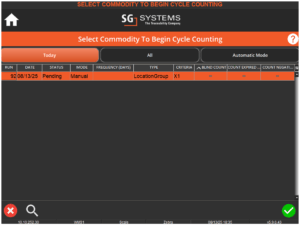
Selecting this run will then show a list of locations within the group.
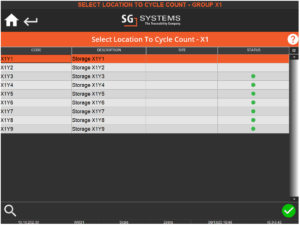
So we can see here that X1Y3 through X1Y9 are empty, as the status is already green, so we can select one of the other locations to count the lots there.
Selecting X1Y1 shows that Chicken is present here.
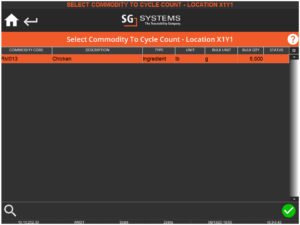
In 1 lot:
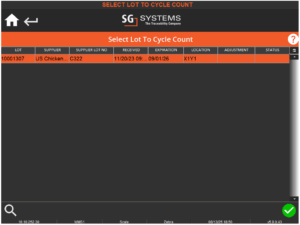
So as before we would count this lot, at which point the location will be marked green as complete:
We would then check the other location(s) until all lots have been counted, after which the count will be complete for this location group.
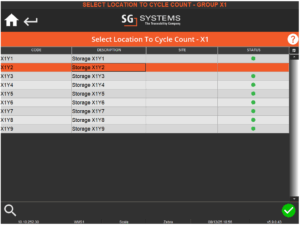
2.5. Site
Site works in a similar way to Location Groups above in that a group of locations can be checked via this type if they are assigned the same Site. So we can set up a new count as below, and assign the ‘M1’ site.
And if we look at our Locations setup we can see that all the X/Y racks and BIN 1 and 2 are assigned to this site.
And heading to WMS to execute this count

And selecting this will show us a list of locations similar to what we saw with the Location Group type above.
As with all the examples above, the operator would need to count all the relevant lots in all locations to complete this check.
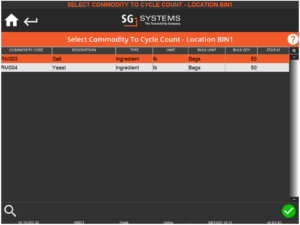
2.6. Supplier
The final type of check here is for all items that come from a specific supplier. So let’s set this up for one of the suppliers here in Control Center.
So with this set up we can head to WMS to execute the count.
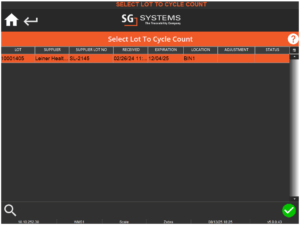
Starting this type of count will first show a list of commodities that the supplier has provided.
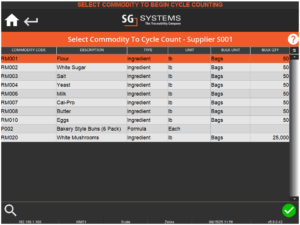
And selecting one of these (salt in this case) will show the locations that lots are present in.
So as with all the previous examples, the operator would need to go through each commodity/location and count the lots, after which the count for the supplier will be complete.
3. Automatic Mode
As we saw above, we can manually schedule individual/recurring cycle counts through Control Center, but by using ‘Automatic Mode’ in WMS this allows operators to undertake runs as directed by the system.
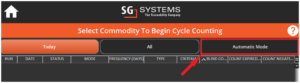
Hitting ‘Automatic Mode’ in WMS’s cycle counting menu will automatically select a commodity to count and display the list of available lots to the operator. In this case, the system has selected the ‘Aspirin Tablets’ product to count.

The parameters the system uses to select a commodity isn’t random, but rather it is dependent on a number of factors, including:
- When the commodity was last counted.
- The quantity used in the last 7 days.
- Current stock levels
- The value of the stock.
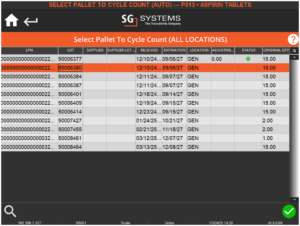
Here we will select lot 50006377 and enter the correct amount once it has been counted.
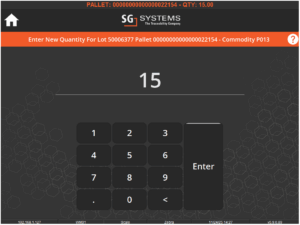
Once again adjustment reasons and manual comment input (if enabled) will be shown here, after which the operator will be returned to the main screen to count the next lot.
As with all previous examples of a cycle count run, the operator would then count all the remaining lots to complete this particular ‘Automatic’ run.
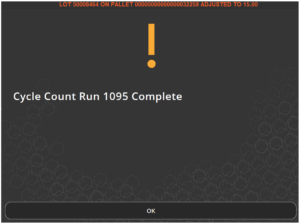
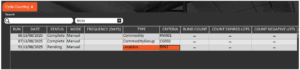
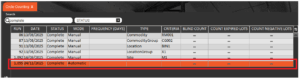
Back in Control Center, we can see, if we filter ‘All’ or ‘Complete’, we can see the run that was created in WMS using automatic mode.
Note that ‘Automatic Mode’ runs do not reschedule.
4. Cycle Count Reports
Reports can be run for Cycle Counts, and can be filtered over a set period of time, and can be set to include commodities, batch or product formulas and packaging. Running a report on the ‘Automatic Mode’ count we just performed would look something like this:

For more information on this particular type of report, please see the reports guide here.