
Checklists
Module Guide - A Deeper Dive!

Introduction
New for v5.9, the Checklists module allows users to create checklists or groups of checklists which can then be triggered at various points throughout the production facility to ensure that processes are compliant with their company SoPs.
Responses to these checks can be set at varying severity levels in order to generate deviations which can then be carried forwards to the new CAPA module (coming soon!) for risk assessment and further action.
Table of Contents
1. Checklist Setup
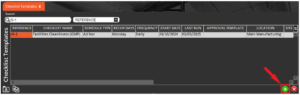
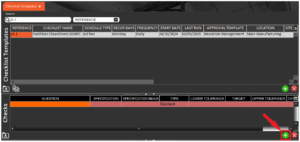
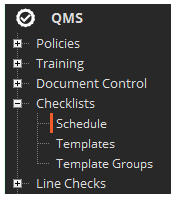
To begin to set up a checklist within Control Center, we first need to head to the checklist ‘Templates’ page, which can be found under the QMS menu > Checklists > Templates.
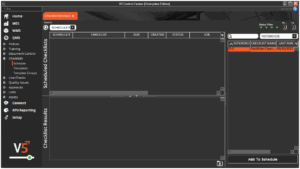
We will now see the checklist template setup window, which is broken up into 3 sections:

Checklist Templates – This is where we can create the checklist template, and assign its name, type etc.
Checks – This is where we can add the checks to the checklist template that we created in the top panel.
Responses – Here we can create responses to the individual check that we have selected in the middle panel.
Column definitions for this Control Center page can be found here.
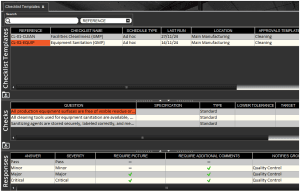
1.1. Checklist Templates
So let’s set up a checklist here for facilities cleanliness. We would start by clicking the green + associated with the top, checklist templates, panel:
The reference code will automatically be created here, but can be renamed to whatever is desired to match any naming conventions within a customers SoP. The checklist can be named via the next freetext box, after which we have a few different options for how we would want the checklist to function within the system:
- Job – Additional functionality coming soon.
- Schedule type – this controls how the checklist can be run within the system:
- Ad hoc – Allows the checklist to be run at any time from Terminal, as well as allowing the checklist to be scheduled via the Checklist schedule (more on this below).
- Formula – Prevents this checklist from being run from the Terminal or from being scheduled in the ‘Schedule’ window. Intended for checklists that can be run via event triggers in the ‘Template Groups’.
- Recur Days – Additional functionality coming soon.
- Frequency – Additional functionality coming soon.
- Start Date – Additional functionality coming soon.
- Last Run – Not used in setup, but this column will automatically update to show when the checklist was last executed.
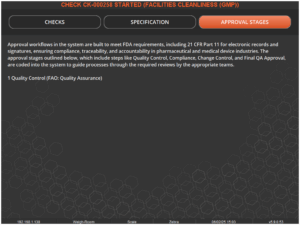
- Approvals Template – Sets the approvals workflow for this checklist. These workflows can feature individual or groups of authorised QA/QC personnel who would be responsible for signing off/approving checklist responses each time the checklist is completed. This is optional.
- Location – Sets the production location where this checklist would take place. If left blank this will apply to all production locations.
- Site – As with locations, this can be used to set the site where the checklist would take place. Again leaving this blank will allow the checklist to be run across all sites present in the system.
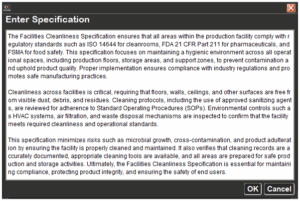
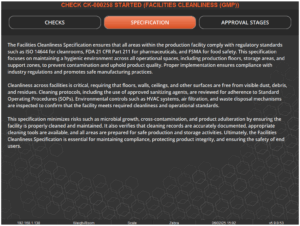
- Specification – Opens a freetext box that can be used to enter a specification/further information about the checklist.
- Specification Image – Allows for an image to be uploaded against the checklist.
- Both of these specification information boxes will appear on the Terminal when the checklist is run.
- Attachments – Allows for the upload of any additional reference documents against the checklist template.
- Owner – This allows the setting of an owner against the checklist. This will be the user that (provided they have an email entered against them in ‘Operators’) will be emailed if changes to a checklist are approved, or the module is deleted. Note that this does not affect the emails that would be sent as part of any assigned approval workflow set against the checklist.
- Version – The current checklist version. A new version of a checklist will be created when a checklist that has been executed at least once is edited. Depending on if a ‘Change Control’ (see below) workflow is set, any edits made will be committed to a new version when the checklist is next run (if no workflow), OR when the changes are approved (with workflow).
- Change Control – Allows for an approval workflow to be set for version/change control. As stated above, with a workflow set here, any changes will require approval. Note that while a change control approval is pending the checklist cannot be scheduled.
- Status – The approval status of the checklist. If no change control workflow is set against the checklist this will always be green (module approved for use). The other statuses are yellow (pending approval) and red (approval rejected).
- Show Category AVG Message – Checkbox that allows for a message to be displayed at the end of a checklist if the average for a set of range check questions is below the stated target. This is hardcoded.
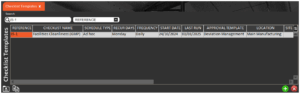
Once we have set up the template for our checklist in this top panel:
We can then start adding ‘Checks’ to it.
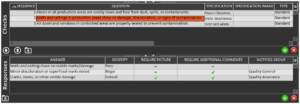
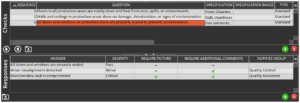
1.2. Checks
With our newly created Checklist Template created in the top panel, and with this selected, we can use the green + in the middle, ‘Checks’, panel to add a Check to our Checklist.

We then have additional options here to add more information/functionality to each individual check.
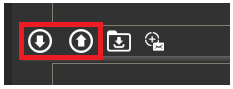
- Sequence – The check’s sequence/order that it will be asked in at the Terminal. This can be changed by highlighting a check and using the up/down arrows at the bottom of the middle panel to reposition it.
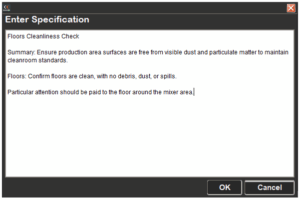
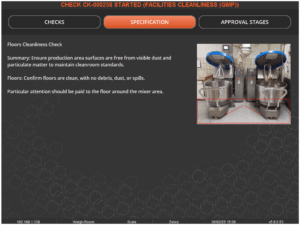
- Specification – Similar to the column of the same name above, this opens a freetext dialogue box to add more detailed information to a Check that can be viewed by the operators undertaking the Check on the Terminal. This can be used to add instructions or guidance for the operator to determine how they should answer the check questions.
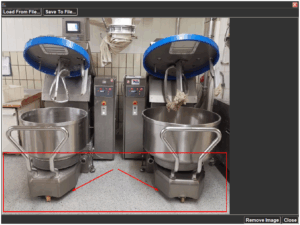
- Specification Image – Allows upload of an image which can then be displayed alongside the text entered in ‘Specification’. This can be used to add visual guidance or examples that the operator can use to guide their responses to the check. So in this example we can upload images with examples to further guide the operator.
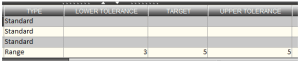
- Type of Check. We have 3 options here:
- Standard – The default option, this provides the standard ‘Question and Answer’ functionality whereby the operator chooses a text based answer to the check.
- Range – Allows the use of the ‘Target’ and ‘Lower/Upper Tolerance’ columns to define a numerical range of answers that can be selected in response to a check.
- Date – Selecting this option changes the check into a date input in order to record the date that the check was performed
- Target – Allows entry of a target figure, if using the ‘Range’ type of check.
- Lower/Upper Tolerance – Allows entry of a lower and upper tolerance in relation to the ‘Target’ entered above. Note that this does not work the same as tolerances do for formula steps, here the tolerances don’t represent a +/- value from the target but rather what the lowest/highest answer can be, so for example:
- Date Offset (Days) – Works together with the ‘Date’ Check type to give a +/- value of acceptable date inputs from today’s date, i.e. if today’s date is the 10th and an offset value of 1 is entered, the date input will accept input of the 9th – 11th. If this check is scheduled against a specific formula then this offset will be overridden by the ‘Expiry Days’ of the formula.
- Units – Allows for a unit of measure to be added to a ‘Range’ type check that will prompt the operator undertaking the check to enter a value in that unit, and then show that on the Terminal once the result is input.
- Asset – Allows for an asset to be added to a check, for example, a scale for a weight ‘Range’ check. This can then be included on production/checklist reports.
- Out of Range Instructions – Prompts a pop up text box to enter instructions that, if an out of range result is entered for a ‘Range’ check then this will be shown to the operator. Can be used for corrective instructions for the operator to aid then getting a within range result.
- Show Out of Range Instructions – Checkbox to allow/block the displaying of the ‘Out of Range Instructions’ discussed above to be shown.
- Category – This drop-down can be used to assign a category to a range check. This function can be used to take averages of various range responses (such as weight) over the course of a checklist. These averages can then be seen in checklist results. Note that categories must be manually added by a SG Systems engineer. Please contact support for assistance with this.
- Show Below Target Message – A checkbox to show a message informing the operator they have entered a below target when a range type question is answered with an under target value. This ignores tolerances and the message is hardcoded.
1.3. Responses
Once we have set up the check in the ‘Checks’ section that we have just looked at, we can then, with this check selected in the middle panel, enter our desired responses to the check in this bottom, ‘Responses’, panel.
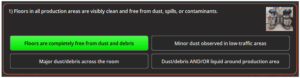
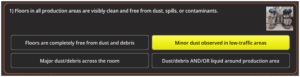
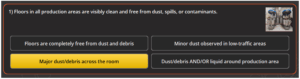
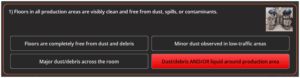
This is where we can set severity levels against each response, which the system will then use to generate deviations if these responses are chosen. So let’s go ahead and add 4 responses with varying levels of severity. We would use the green ‘+’ associated with this lower panel to do this.
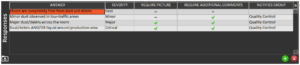
So here we have the following options available when creating ‘Responses’:
- Answer – Freetext box to create the responses that the operator will choose between at the Terminal when undertaking the check. These can be numerical if using the ‘Range’ type of check that we discussed above.
- Severity – Assign a severity level to the response. Here we can assign:
- Pass – The check passes – no further action needed.
- Minor – The lowest level of deviation response.
- Major – A higher level of deviation response.
- Critical – The highest level of deviation response, usually requiring immediate escalation and subsequent corrective action.
These severity levels can be assigned to responses depending on individual companies’ SoPs.
- Require Picture – This box can be checked if it is required for the operator to capture a photo as visual evidence using a camera attached to the Terminal they are undertaking the check on.
- Require Additional Comments – This box can be checked if we require the operator to provide additional details (for example in this case they might enter the room cleaning log date/number etc.)
- Notifies Group – We can select an ‘Operator Group’ that selecting this response will subsequently notify.
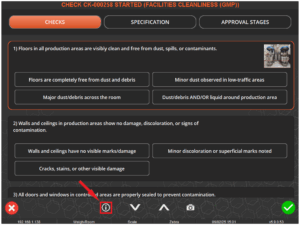
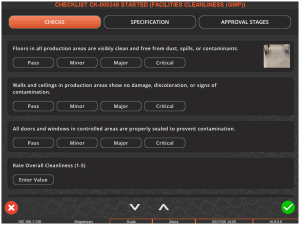
To complete the setup for this checklist, we can add 2 more ‘Standard’ type checks for the remainder of the cleanliness checks, along with similar Responses for each.
So with these 3 ‘Standard’ checks added to our checklist, let’s take a look at the other 2 types of checks that are available, ‘Range’ and ‘Date’.
Range
Range type questions can be used to capture numeric values within a specified range. For the purposes of our checklist here we can use this feature to capture how many cleaning products are present in the production room’s COSHH store. In this instance we want to see that there are at least 5 different cleaning products stored here, so we can set up the question as follows:

So what we are saying with this check is that there must be at least 5 cleaning products present, up to a max of 10, and anything less than 5 needs further action. We can further enable the ‘Out of Range Instructions’ via a checkbox, and add instructions that will be displayed to the operator if they select an out of range response in a pop out text box similar to the specification.
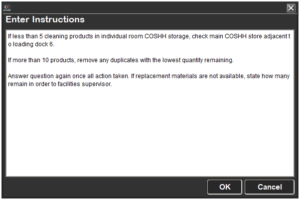
Adding instructions such as these gives the operator an opportunity to correct an issue if they find one before submitting an answer that may warrant a deviation.
We will see how this works when we undertake this checklist below.
Date
The ‘Date’ type of checklist allows the operator undertaking the checklist to enter a date for the check that they are undertaking. So we can set a check for this up like so:

So we’re saying here that the operator must enter a date within 1 day of the current date to pass the check, i.e. to confirm here that the last date in the room’s cleaning log was no more than 1 day ago.
Again we will see how these types of checks are answered below.
With our checklist setup now complete we can look at how we can execute it below.
2. Executing Checks
When it comes to the basic scheduling and executing of the checklist we have just created, since this is an ‘Ad Hoc’ type checklist, we can do this in a couple of different ways:
- We can schedule the checklist. This can be done in the ‘Schedule’ section of the ‘Checklists’ menu in Control Center.
- We can manually run the checklist from the Terminal without scheduling it.
Let’s take a look at both of these options.
2.1. Scheduling in Control Center
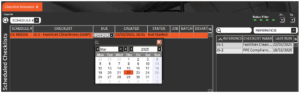
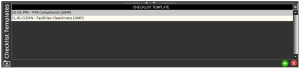
To schedule a checklist in Control Center this is simply a case of navigating to the ‘Schedule’ window shown above. Here we will see our newly created checklist in the list on the right.
Note that any ‘Ad Hoc’ Checklist will appear here once created. Other types of Checklists cannot be scheduled here. Here we can simply highlight our Facilities Cleanliness Checklist and click ‘Add To Schedule’ to add the checklist to the schedule.
Once added to the schedule we can adjust the ‘Due’ date for the Checklist by using the drop-down calendar in that column.
This checklist will now be scheduled for completion at a Terminal associated with the designated production location. More on how the check would be executed below.
2.2. Ad Hoc in Terminal
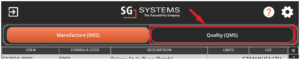
2. If we head to our Terminal (remembering that the Terminal must be in the appropriate Site/Production Location as in the Checklist setup), and head to the ‘Quality (QMS)’ section.
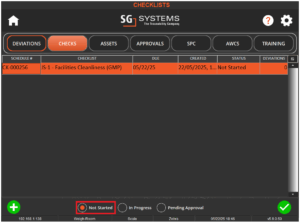
However, if we had not scheduled the checklist previously and wanted to run it from here, this is simply a case of hitting the green + button in the bottom left of the screen:

So let’s run through the checklist via this method and see how it looks within the Terminal software.
2.3. Executing a Check
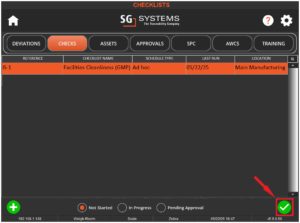
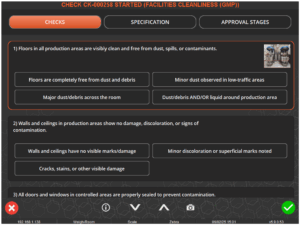
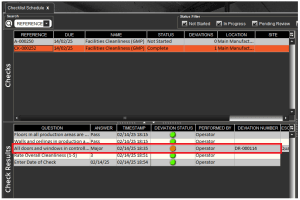
Once the Checklist had been started we will see the checks and responses that we set up in Control Center.
To move up and down the list of checks the operator can either tap/click and drag a non-active area of the screen, or the 2 arrow buttons at the bottom of the screen to move up/down the list.
We can use the ‘Specification’ button at the top here to inform the operator of the additional information that we entered during setup of the checklist template itself.
As well as informing the operator of the checklist approval stages under ‘Approval Stages’. If an approval workflow was not selected here then this information will not display.
Returning to performing the checks, the operator will then begin to carry out the prescribed checks. If we select one of the checks to perform (so that it is surrounded by an orange outline) we will be able to view additional information about each check by hitting the ‘i’ button at the bottom of the screen with a check selected.
This will show the individual check specification/specification image that we added during setup, which can be used to further guide the operator for that individual check.
Note that clicking/tapping the small image against the question will show it full screen on the Terminal, further assisting the operator.

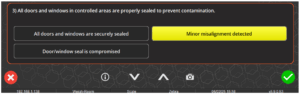
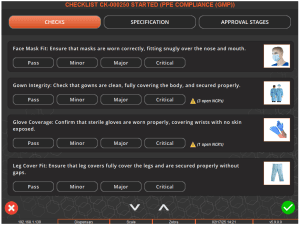
When selecting a response, Terminal indicates the level of severity of that response when it is selected via a simple traffic light system of green/yellow/orange/red to reflect pass/minor/major/critical.
The operator would then move through the various checks that form part of the checklist and provide responses based on their observances. Again this can be done via the arrow controls or by tapping/clicking and dragging in an inactive area of the checklist screen.
So let’s imagine the first 2 checks pass, but there is a major deviation for the 3rd question:
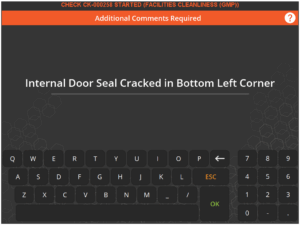
So if we remember the setup that we used for this check, this answer requires both additional comments and a picture. The operator will be prompted for their additional comments once they select this answer (if they selected the answer in error they can back out with the ‘ESC’ key on the virtual keyboard).
And since we also require a picture they will be informed of this.
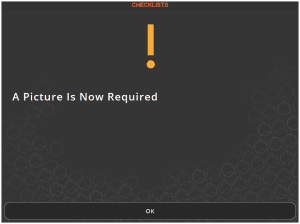
Note that this is not required immediately, but the check (and hence the overall checklist) cannot be completed without performing this action.
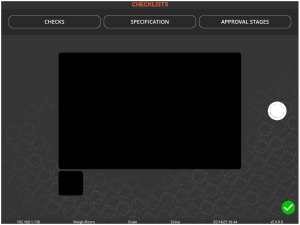
The operator can take a picture using a camera connected to the device by hitting the camera icon in the bottom right with the relevant check highlighted above.

This will open the capture interface where the operator can use the white button to take a photo. The operator can take as many photos as they want here before hitting the green check to confirm.
Next the operator would answer the ‘Range’ type check that we set up above.

The operator would simply tap on the ‘Enter Value’ button here and input their findings.
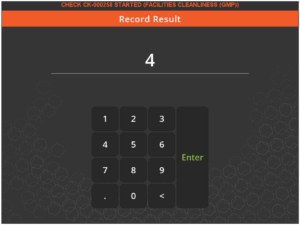
As we saw in the setup for this check above, this is an out of range response, so when the operator enters this value, and since we checked the ‘Show Out of Range Instructions’ box, they will be shown the message we set earlier.
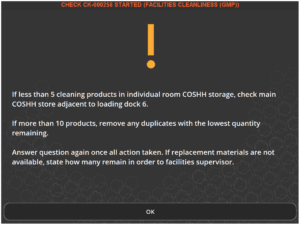
After which the check response is shown in red.

The operator can either then leave the response as it is or act on the corrective action to resolve the issue. In this case the operator will replace the relevant cleaning materials and re answer the question.

Moving on to our last question in the checklist, the date check, the operator would hit the ‘Enter Date’ button here.

After which they would then input a date using the interface here.

And if this date is within the set ‘Date Offset’ then the response will be marked as a pass.

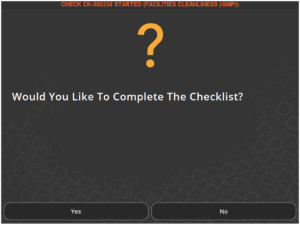
So with all checks now complete, the operator can use the green check in the bottom right of the Terminal window to submit the Checklist results.
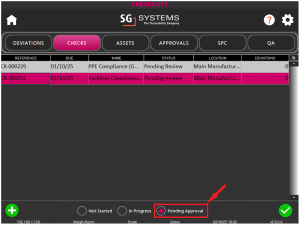
Once the Checklist has been completed, it is then set to the status of ‘Pending Review’ in the ‘Schedule’ in Control Center. Note that if the checklist does not have an approval workflow set against it then it will just complete at this stage.
3. Reviewing Checklists
As we just saw above, once checks have been undertaken by the Terminal operator, and if the checklist has an approval workflow assigned to it, then a further step is required from a user who is part of the approval workflow template that is assigned to the checklist.
So to complete the check we executed above, we can log back in to Terminal as one of these users.
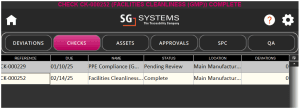
Checks awaiting approval can then be viewed in the ‘Checks’ section by using the ‘Pending Approval’ filter.
The reviewing user can then select the relevant checklist and hit the green check. This will take them to the review screen.
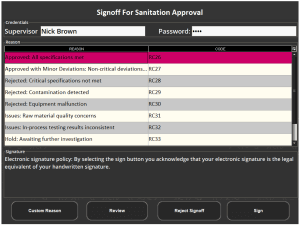
The reviewing user can then use the ‘Review’ button to review the responses from the operator, select a reason (set in ‘Reasons’ under the ‘Approvals’ type), and add additional comments. They would then enter their system credentials and sign off the checklist by using the button in the bottom right.
The checklist will then be marked as complete.
4. Deviation Reporting
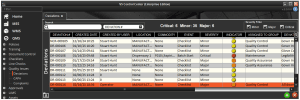
Once checklists are complete, any deviations reported will be assigned a unique number and can be viewed in Control Center.
Deviations will automatically be added to the ‘Deviations’ page in Control Center, which can be found under the ‘Quality Issues’ menu.
This functionality is currently being developed further and more functionality will be released soon.
5. Template Groups and Event Triggers
5.1. Basic Functionality
We have seen above how we can create and run individual checklists on our Terminal. However, we can also group checklists and create event triggers for them, much like we can with the existing ‘Q&A’ line checks. Let’s see how we can do this with our checklists.
So if we take the checklist we created above for our ‘Facilities Cleanliness’, we might want to run this check at the start of every batch of a specific formula within our dispensing production area. But we might also want to run another checklist at the same time, in this case one that checks PPE compliance for dispensing operators. So we can create a new checklist for this purpose.
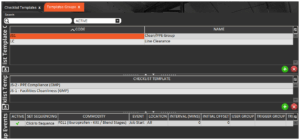
So with these 2 checklists created, we can proceed to the ‘Template Groups’ area of the ‘Checklists’ section of Control Center to create our groups and event triggers.
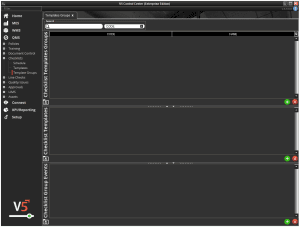
Here we can use the 3 available windows to facilitate our new setup for these 2 checklists:
- Top Panel – We can create template groups here, giving them a unique code and a description to more clearly label the purpose of the group.

- Middle Panel – With the newly created group selected in the top panel, we can then add/remove checklists from our created templates in the middle panel. So here we can add our 2 desired checklists here.
- Bottom Panel – With our group created and checklist(s) assigned, we can then use the bottom panel here to add appropriate event triggers. These event triggers are largely the same as the event triggers used for Q&A, but includes advanced functionality unique to checklists.In terms of basic functionality that we will look at first, we can assign:
- Commodity – This could be set up for the handling/use of a certain ingredient, but in this case, we will assign a formula.
- Event – Here we will assign ‘Batch Start’, meaning that we are telling the system that whenever a batch of the selected formula starts, the group will be triggered.
- Location – We will leave this as ‘All’ for this example, so wherever this formula is run in the production facility, the group will be triggered. Individual locations can be selected here if needed.
So our setup would look like this:

Once we start the highlighted job, the 2 assigned checklists will be run before the batch can proceed.
5.2. Advanced Functionality
We saw above the basic use of the event triggering, using the ‘Batch Start’ event. But what if we need to trigger checklists throughout the production process, not just at the start or end of a batch or job? This is where we can use advanced event triggers to ensure compliance from start to end, and everything in between.
The event triggers of note here are:
- Periodic Job – This event trigger is designed to be used with a formula assigned as the commodity, so once this is done the system will recognise when a job starts for this particular formula and will trigger the group on the production Terminal that is running the job. Usually the location selected here would match the job/formula’s production location.
- Auto Schedule – This trigger largely functions the same as the ‘Periodic Job’ above, but is designed to trigger checklists at a production location other than where the job is being run. This is particularly useful if, for example, some checks need to be undertaken by QA personnel who might be using a tablet to cover several production lines, and who are required to answer different questions than production line workers. NOTE that this function requires the use of the SG Data Engine to function.
Aside from these additional events, further advanced functionality can be used here, including:
- Initial Offset – This field can be used to set the time interval (in minutes) between the job starting and the group first being triggered. If left blank the group will trigger after any groups assigned to the job/batch start events.
- Interval (Mins) – This field can be used to set the time interval (in minutes) between when the group is first triggered (set by ‘Initial Offset’) and when it reoccurs. The group will continue to trigger on this interval until the job ends. If left blank the group will not trigger again after the first time.
- User Group – The user group that this group will be triggered for. If left blank the group will trigger for all user groups.
- Trigger Group – This drop-down can be used to select another checklist template group that the completion of this group will trigger.
- Trigger Group Location – Tied to ‘Trigger Group’, this drop-down will allow a location to be specified where this triggered group will be shown.
- Trigger Group Users – Similar to ‘Trigger Group Location’, this drop-down specifies the user group that the ‘Trigger Group’ will appear for on Terminal.
The last 3 items here can be used in a similar way as the ‘Auto Schedule’ event, in that they can be used to trigger checklists elsewhere in the production facility, for example, a production startup group could subsequently trigger a QA startup group, both of which would require completion before production can start.
Finally, we can set the sequence of how groups can trigger. To use this functionality, we need 2 template groups that are assigned to the same commodity, event, and location (can work with ‘All’ locations set).
So for example, if we have this group:
And this group:
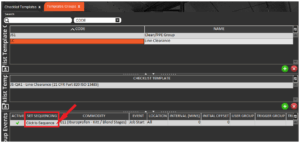
By default, the system will trigger these groups in the order that they were added to the system, but we may want to change this. We can do this by clicking in the ‘Set Sequencing’ field in the bottom panel on either of these groups.
This will then display the current order that these groups will trigger in, so we can see here:
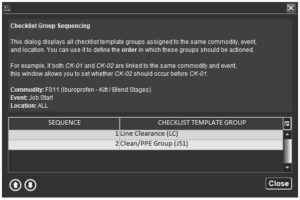
That line clearance comes before the Cleaning/PPE checklists. However, if we wanted these to be the other way around, we can highlight either of these, then use the up/down arrow controls to set the new order.
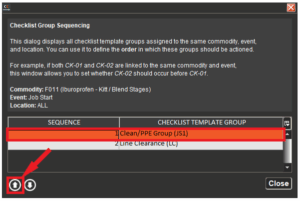
This will then be the new order in which these 2 groups will trigger at ‘Batch Start’ for our Ibuprofen formula.