Assets
Module Guide - A Deeper Dive!

Introduction
The Assets section of the V5 Traceability System allows for the entry of various pieces of equipment that can be used for production, in-line checks and laboratory analysis.
From scales to spectrometers, the Assets section will keep track of these, as well as having the built in ability to schedule tasks to recertify equipment as needed.
Table of Contents
1. Asset Setup
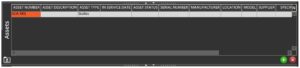
The first step when dealing with Assets within V5 would be to create them for use in the system. This can be done in the ‘Assets’ section, found under the ‘QMS’ > ‘Assets’ menus.
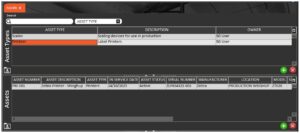
With this window opened, we can see that there are 3 panels to work with here:
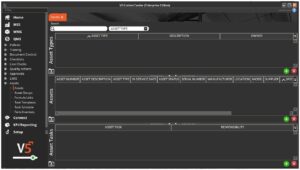
These are used as follows:
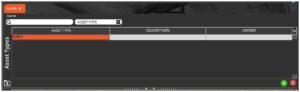
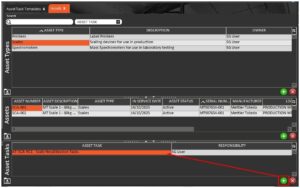
- Asset Types – Allows the creation of ‘Types’ of Assets, or ‘groups’, such as ‘Scales’, ‘Printers’, ‘Spectrometers’ etc. How granular this can become is up to each customer and their operations and SOPs.
- Assets – With an ‘Asset Type’ selected in the top panel, the ‘Assets’ panel here allows for individual pieces of equipment to be added to each type/group of assets.
- Asset Tasks – With an ‘Asset’ selected in the middle panel, the ‘Asset Tasks’ panel here allows for tasks, such as maintenance/calibration events to be assigned to each individual asset, depending on each item’s individual functional requirements. These tasks can be created and scheduled using the ‘Tasks Templates’ and ‘Task Schedule’ screens, which are also available under the ‘Assets’ menu on the left of the screen. We will take a more thorough look at this later in this document.
With the functionality of the various sections of this page established, let’s go ahead and create a new asset entry for a scale that would be used in production
To start with we will create a ‘Scales’ asset type in the top panel by using the green check in this panel. Once a unique ‘Asset Type’ name has been assigned, the entry will be confirmed (turn from red to grey to indicate that more information can then be added).
A suitable description can then be added, along with an ‘Owner’ for the particular group. This owner will be the user who will typically manage the setup and calibration of the assets within this type, e.g. a technical manager who might oversee the calibration of said assets.

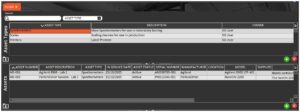
Once this type has been created, we can proceed to add the assets (in this case the scales) to the type by using the same green check controls available for the middle (‘Assets’) panel. As with the process above for types, once a unique ‘Asset Number’ has been entered, the line will be confirmed.
Note here that the ‘Asset Type’ will be automatically filled here from the type that this asset is being added to. The drop-down menu in this cell allows assets to the quickly and easily transferred between groups (e.g. if there were different groups of scales depending on location, a scale might be transferred from one area to another).
Once the asset number has been added, more information can then be added against the asset:
- Asset Description – Freetext field for describing the asset. This would depend on what type of asset we are adding here, but in this case, since the asset is a scale, the capacity and decimal places of the scale can be specified here.
- In Service Date – Uses a drop-down calendar menu to specify a date when this asset comes into service (i.e. can be used to weigh items for production in this case). If this date is in the future then this asset will be unavailable for use until the specified date.
- Asset Status – Allows selection from a hard coded list of statuses that can be assigned to the asset.
- Serial Number – Allows the entry of the asset’s unique serial number.
- Manufacturer – Freetext field to add the asset’s manufacturer, i.e. Mettler Toledo
- Location – Allows for the selection from a drop-down menu of the location that this asset would be used in. Leaving this blank allows for the asset to be used across different locations.
- Supplier – If the asset was sourced from a Supplier that is already entered in V5 (‘WMS’ > ‘Ordering’ > ‘Suppliers’ menu in Control Center) then this supplier can be selected from the drop-down list here.
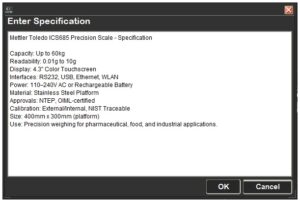
- Specification – Clicking in this field opens a text entry box to add the asset’s specification. This can be something akin to the manufacturer specs.
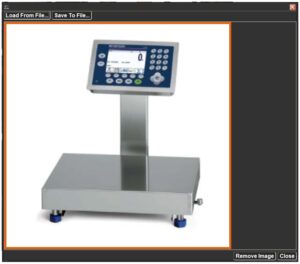
- Specification Image – Clicking in this field opens an image upload dialogue, where clicking ‘Load From File…’ will open a file browser to be able to select an image for the relevant asset to be uploaded.
- Calibration Due – Uses a drop-down calendar menu to select a date when recalibration for the asset is due. This will send out a notification to the type ‘Owner’, whereby they will then be able to schedule ‘Asset Tasks’ to perform any necessary recalibration tasks.
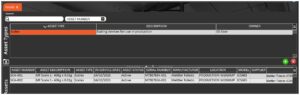
So once completely set up, this scale asset would look like this:

2. Asset Use in Production
2.1. Setup
Once our assets are created, they can then be assigned to different formulas and used in production. Assigning and using assets in this way allows for these assets to be included on production reports.
For this example another scale will be added to the same type/group that was created above, so our asset setup would look like this.
We will also add a label printer here within a new ‘Printers’ asset type.
Note here that the production location for both scales and the printer is set as the ‘PRODUCTION WEIGHUP’ location, and the formula that we are going to look to assign these created assets to contains weighup steps that are to be processed at this location.
From here there are 2 steps that need to be achieved in order to use assets with a formula:
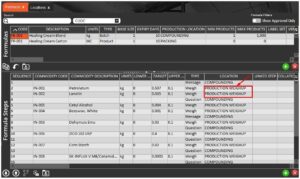
- The ‘Assets Required’ checkbox must be checked against the formula. Note that this box is positioned over to the far right in the formula header column order (this can be changed by hiding unused columns and/or clicking & dragging and dropping the column closer to the left so it is more easily accessible).

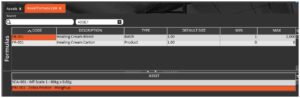
- The asset(s) need to be assigned to the formula in the ‘Formula Links’ section of the ‘Assets’ menu. Once here the desired formula must be selected in the top panel (this will auto populate from the ‘Formulas’ table), and then the green ‘+’ would be used in the bottom panel to add a new line here, after which the drop-down menu would be used to assign the relevant asset(s).
Note that each line added here adds a new asset selection line when processing a formula at Terminal, so only 1 asset per asset type needs to be added to the formula links section here and the Terminal will be able to select from all of the assets within that type.
Location assignments for each asset can be used to filter this list of available assets at the Terminal if needed, i.e. if we had 4 scales in the ‘Scales’ asset type and 2 were assigned to a different production location than where this particular formula is processed, the system will only give the option to select between the 2 that are assigned to the correct production location once we start the job on the Terminal.
So we will just add SCA-001 from the scale list, as well as the Zebra printer that we created under a different asset type.
Once these steps are complete, the ‘FB-001’ formula can be scheduled and we can see how the asset assignment would work in Terminal.
2.2. Confirming Assets in Production
At the Terminal we would select and start the relevant job for the formula that we’ve assigned the assets to as usual.
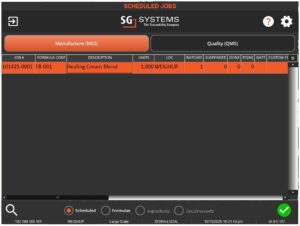
But now instead of going straight to the weigh screen, we will be asked to confirm what assets are to be used for the job.
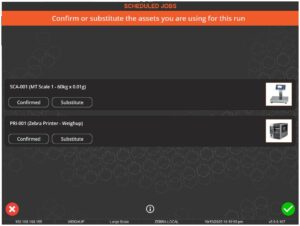
So we can see that the system has automatically selected SCA-001 for use here as this was the scale that we added under ‘Formula Links’, but if we highlight the scale in question and hit the ‘Substitute’ button, we will then have the option to select another scale within that type/group, provided the asset(s) are assigned to the relevant production location.
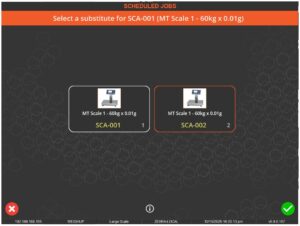
So here we can substitute SCA-002 for SCA-001 by selecting it and hitting the green check.
This will return us to the previous screen where we can then confirm the selection of SCA-002.

Note that if we then try and proceed by using the green check in the bottom right, the system will remind us that all assets have not been confirmed yet.
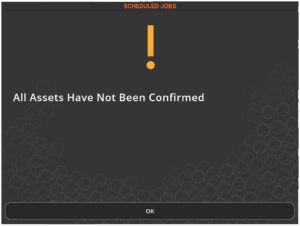
So we would need to confirm the use of the printer PRI-001 before continuing.
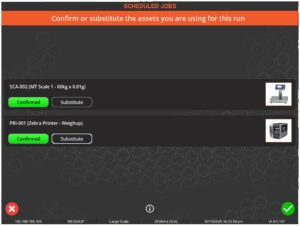
Once all assets are selected the green check can then be used to proceed to weighup.
3. Asset Use in LIMS
This section discusses the use of assets for LIMS testing, and touches upon already created Tests and AWCs. A module guide on this topic is coming soon!
3.1. Setup
Assets can also be assigned to AWC tests in a similar way to the production example above. To achieve this, we would set up the assets in the same way as above. For this particular example we will create a new asset type for ‘Spectrometers’ and add 2 mass spectrometer assets to this type.
Note that the ‘Location’ here is less critical to the filtering and functioning of assets for LIMS testing, and as such this field has been left blank for both of these entries.
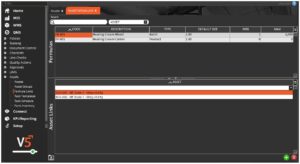
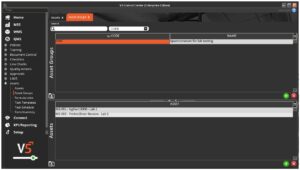
Once this is achieved we then need to create an ‘Asset Group’ for these newly created spectrometers. This can be done in the ‘Asset Groups’ section under the same ‘Assets’ submenu, and once here we can use the green + in each panel to first create an asset group (SPEC here) and then add the 2 spectrometers to this group.
With the asset group created we can then assign it to specific tests within the LIMS module.
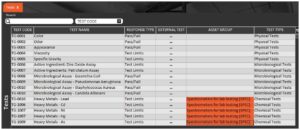
This is done within the ‘Tests’ section of LIMS (‘LIMS’ > ’Tests’ menus), and is simply a case of using the drop-down menu in the ‘Asset Group’ column to add the newly created group to the relevant tests.
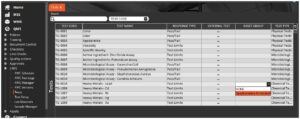
So we can add this group to all the ‘Heavy Metals’ tests here.
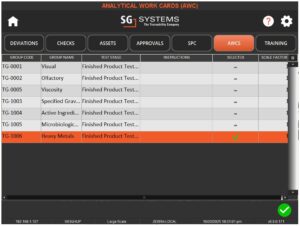
And the AWC that we will be using for this example features these 5 ‘Heavy Metals’ tests as part of one of its test groups:
From here, if we schedule an AWC that contains this test, we can go back to Terminal to undertake them.
3.2. Confirming Assets in LIMS
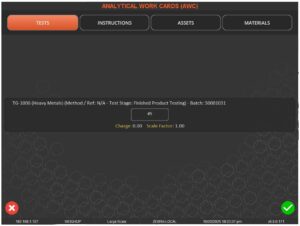
Once we start the AWC on Terminal and we then select the relevant test group and proceed.
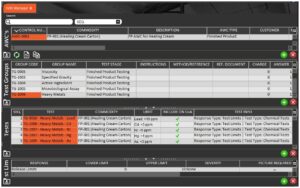
We will then proceed to the testing screen where we can see the assigned sample awaiting results input.
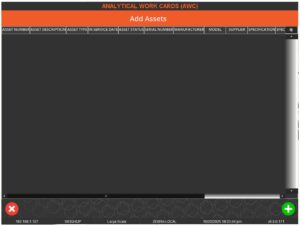
From here if we tap the ‘Assets’ button at the top of the screen we will be presented with another screen where we can use the green + to add available assets, i.e. the ones that we just assigned to these tests as part of our newly created Asset Group.
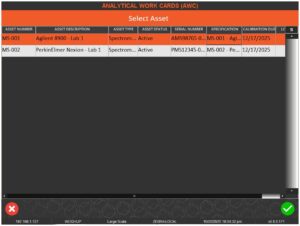
We would then select an asset to add here and hit the green check.
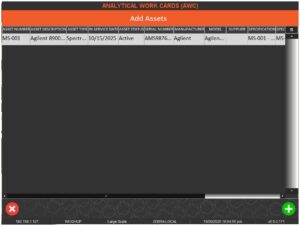
After which we will be returned to the last screen where we will see the assets assigned to the test.
We can now use the red x to then return to our AWC and perform the relevant tests using the assigned asset.
In the above example we created an Asset Group featuring just spectrometers, but we could add additional items to this group as needed. We can also assign ‘Lab Materials’ to our AWCs, which can be consumables such as test tubes/pipettes etc. Creation and use of these items is covered in our AWC module guide (coming soon!).
4. Asset Use in Checklists
Assets can also be assigned to checklists, with the designated asset being able to be recalled against production reports. An example of this could be for a product filling weight check that might occur periodically throughout a production run.
Let’s take an example of this by looking at the example checklist below. This might be a checklist that is triggered throughout a product run that is intended to check the weight of produced product against a manufacturing specification.
We can see here that these are 10 weight checks intended to weigh 10 produced bottles and ensure that they are within the correct range. Consult our guide on Checklists to discover more about the various parameters set here, but for now we will add one of our scale assets to this checklist.
This can be done by simply selecting the asset in the ‘Asset’ column using the drop-down selector against each check:
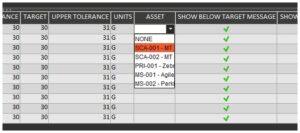
We would do this for every question here, with the ability to select different scale assets as required by the line setup.

So once this checklist is run and the weight checks are entered and confirmed, the assigned asset will be shown on reports associated with the product run the checklist was run against, such as an eBMR.
5. Asset Tasks
5.1. Creating a Task Template
Above we discussed setting ‘Calibration Due’ dates for each asset as they are added to the system. So what happens then once that date is reached?
Once the ‘Calibration Due’ is reached, a notification will be sent to the asset type owner that an ‘Asset Task’ needs to be scheduled to recertify the asset for use.
First we will look at how we create an asset task.
This is done in the ‘Task Templates’ window under the ‘Assets’ menu, and the first thing that we will notice here is that the layout here is almost exactly the same as the ‘Checklists’ menu, and the functionality is essentially the same here.
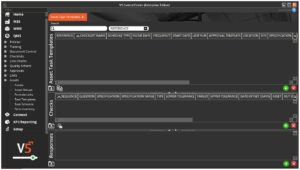
There are 3 panels to work with here:
- Asset Task Templates – Where task templates are created. These would likely be asset or asset type specific, i.e. Scale Recalibration Tasks.
- Checks – With a task template created and selected in the top panel, this middle panel allows us to add checks, or tasks, to the template, outlining the steps involved in completing it.
- Responses – With a check/task selected in the middle panel, responses can be added here for the operator undertaking the tasks to choose from. Responses here can be configured to mandate photos and additional comments, send notifications to other users, or even to raise deviations.
As an example here we will set up a simple task template that might be used to recalibrate a scale once its ‘Calibration Due’ date has arrived.
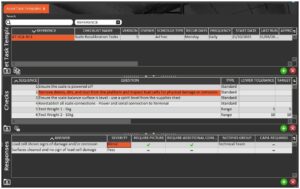
Once a task template has been created, we need to assign it to the relevant assets in the ‘Assets’ window. This can be done in the lower panel here by adding a line with the green ‘+’ and using the provided drop-down menu. We can also assign a responsible user here if desired. Leaving this blank will allow any user to undertake the task.
5.2. Scheduling a Task
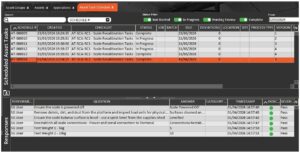
Currently the only kind of scheduling available for asset tasks is manual. This can be done in the ‘Task Schedule’ section of the ‘Assets’ menu in Control Center, and all we would need to do is select the asset, select the task to run, and ‘Add To Schedule’.
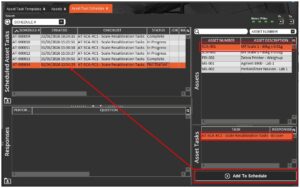
This will schedule the task for today’s date.
5.3. Running a Scheduled Task
Once a task has been scheduled, we can proceed to our Terminal to undertake it.
Once logged in the scheduled task can be found under the ‘Quality > Assets’ menu:
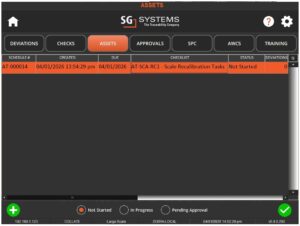
Similar to checklists, we can filter these asset tasks using the radio buttons at the bottom of the screen to filter by the task’s status.
Selecting the scheduled task and hitting the green check will then initiate the asset tasks, displaying the checks and responses that we entered in to Control Center:

We would then answer all the questions/provide weight measurements in this case where appropriate, and, if all tasks are completed successfully, the task template will complete.
Results of this can then be viewed in Control Center. We can also employ a similar approval workflow system as Checklists to the asset tasks here.