Approval Workflows
Module Guide - A Deeper Dive!

Introduction
New for the 5.9 release of V5 Traceability, the Approval Workflows module is designed to work in combination with other modules such as ‘Document Control’ and ‘Checklists’ in order to provide flexible signoff hierarchies across the V5 environment.
In this guide we will take a look at how to create approval workflow templates and how these can be used throughout the system.
Table of Contents
1. Workflow Setup
1.1. Operators and Operator Groups
Before we can look at setting up approval workflows it is useful to first discuss setting up operator groups that we can then assign to any workflows that we want to create.
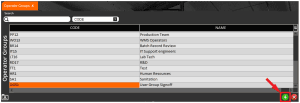
Operator groups are, as the name suggests, groups of operators that can be created in the ‘Operator Groups’ window, found under the ‘Setup > Operators > Operator Groups’ menu.

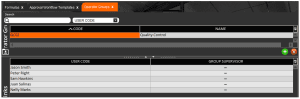
We can see some examples already populated here, but for the purposes of this guide let’s create a new group. This can be done by using the green ‘+’ in the bottom right corner of the top ‘Operator Groups’ panel. A unique code must be provided for a new group, and will call this new group ‘User Group Signoff’ but this can be whatever the user would require to define their groups.
With this new group created we can then use the same ‘+’ in the bottom panel to add users to this group. For this guide we will add 3 users.
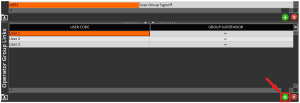
Note that the ‘Group Supervisor’ role checkbox does not have any additional functionality within approval workflows, but is used elsewhere in the system.
With this example group created we can now look at the approval workflows themselves.
1.2. Creating a Workflow Template
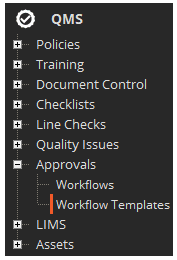
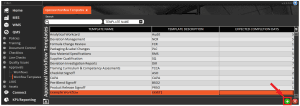
Once a suitable user group is in place we can then head to the ‘Workflow Templates’ page, which can be found under the ‘QMS’ > ‘Approvals’ menu.
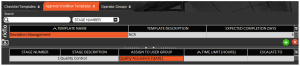
Once there the green ‘+’ in the top panel can be used to create a new apprvoal workflow. In this case we will name this ‘Example Workflow’. Note that the ‘Template Name’ will be the name shown in the various drop-down menus that we can use later to assign the workflow to various tasks.
We can give the workflow template a description if desired, as well as set a value for ‘Expected Completion Days’, which sets the time limit for the workflow whenever it is triggered.
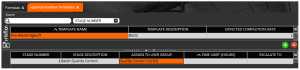
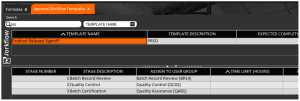
With the workflow header created we can then use the green ‘+’ in the bottom panel to add stages to the workflow. So let’s add a stage and then assign the operator group that we just created to it. Note that the ‘Stage Number’ will populate automatically as we add more stages.
What we are saying here is that, for this workflow stage, 1 user from the assigned group will be required to perform signoff before that stage will be completed.
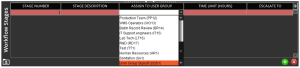
Once a user group is assigned we can then add a description for the stage. This will be the name that is specified when the group’s signoff is required. We can also set a ‘Time Limit (Hours)’ here, which determines now long this approval stage should take the user to address. Finally we can set an user for the stage to ‘Escalate To’ if this assigned time limit is exceeded. Email of SMS notifications can be sent to this user, helping supervisors and managers keep on top of any outstanding process signoffs.

We can keep adding more stages here if desired. Adding more stages simply means that the workflow will require additional signoffs from a member of the operator groups that are assigned to any subsequently added stages.
For now, let’s keep things simple and leave this workflow with just 1 stage.
2. Assigning Workflow Templates
There are many different places throughout the system where approval workflows can be used. We can look at these below.
2.1. Checklists
Approval workflow templates can be assigned when creating checklist templates.
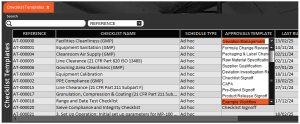
This is optional for the ‘Checklist’ functionality, but assigning an approval template here will make the system require a review and signoff any time this checklist is executed. This review and signoff can take place either on the Terminal or within Control Center, which we will look at in the examples below.
More information on checklist setup can be found in our module guide on the topic here.
2.2. Documents
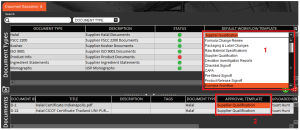
Approval workflow templates can be assigned to documents in 2 different ways:
- To the ‘Document Type’ – Assigning a workflow here will mean that any document uploaded within this type/group will automatically use this workflow for document approval.
- To the individual document – This functionality allows for a different approval workflow to be assigned to an individual document if this is required to be different from the default template assigned to that document type.
Once set, document approval takes place within Control Center itself after the document is uploaded. Again we will look at this in an example below.
Note that, similarly to ‘Checklists’ above, approval workflow templates do not need to be assigned to document types or individual documents. If this is the case then any documents that are uploaded will not require approval and will be automatically approved with a green status when added to the system. Further information on document control can be found in our module guide here.
2.3. Formulas
Approval workflow templates can be assigned to formulas for 2 different purposes:
- Batch Signoff Workflow – Assigning a workflow template here will prompt for the workflow’s signoff stages whenever a batch/product run (depending on formula type) is completed. This expands the standard ‘Single’ and ‘Dual’ signoff modes with the new ‘Workflow’ setting which should be used in conjuntion with approval workflow templates.
- Change Approval Workflow – Expands the formula approval methodology to use approval workflow templates to provide oversight and traceability for any formula changes.
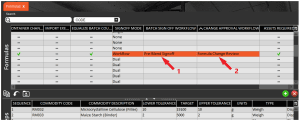
The former of these approval workflows would take place at the Terminal producing the formula, whereas formula change approvals would be undertaken in Control Center.
2.4. Asset Tasks
Approval workflow templates can be assigned when creating asset task templates. Approval workflow templates can be assigned when creating asset task templates.
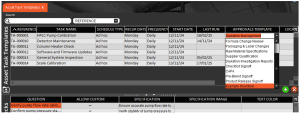
As with checklists, this is optional, but assigning an approval template here will make the system require a review and signoff any time the asset task template is executed. This review and signoff can take place either on the Terminal or within Control Center.
3. Approval Workflows
3.1. Approval Workflow Window
We have seen above how we can assign our approval workflow templates to various processes across the production facility.
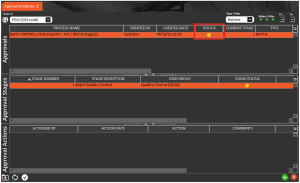
Whenever an approval workflow is triggered, it will automatically be added to the ‘Approval Workflows’ window, found under ‘QMS > Approvals’ menu.
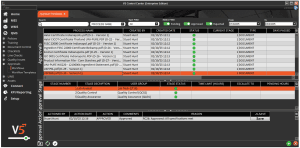
Here we will be able to see all completed and outstanding approval workflows. Given the potentially large amount of information here, additional filtering is available at the top of the page to sort results by type, status, and date (looking at the ‘Date Created’ field). The ‘type’ here refers to the process that the workflow was triggered during, so this could be ‘DOCUMENT’, ‘FORMULA’, ‘CHECKLIST’ etc.
3.2. Example – Checklist Approval
Checklist approval can take place on either a production Terminal, or within Control Center itself. An example of approving on Terminal can be found in our ‘Checklist’ module guide here. We can now however take a look at how we would approve a checklist in Control Center.
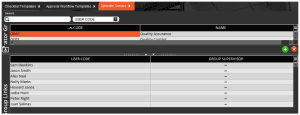
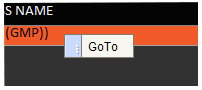
So let’s run a checklist on our Terminal. This would be the ‘Facilities Cleanliness (GMP)’ checklist here, which uses the ‘Deviation Management’ approval workflow.

Which in turn uses the ‘Quality Assurance’ user group for signoff.
Which in turn is comprised of the following users.
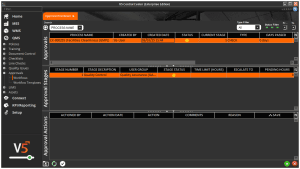
After running the checklist in ad hoc mode on the Terminal, one of the users featured in the above group would need to log in to Control Center. Let’s have Sam Hawkins do this now and head to the ‘Approval Workflows’ window, where they will be able to see the newly generated approval workflow. Note the yellow status lights here to indicate that there is an approval outstanding for this workflow.
Before the system will allow the user to approve this workflow however, they must confirm that they have viewed the results of the check. On the Terminal this can be done using the ‘Review’ button at the signoff screen, but in Control Center this needs to be done in the checklist ‘Schedule’. This can be done by right clicking the approval itself and clicking the ‘GoTo’ button.
Or this window can be found under the ‘QMS > Checklists’ menu.
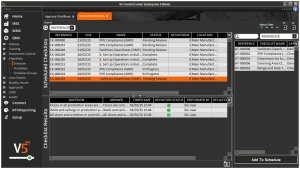
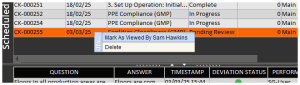
Here we can see our checklist with the status of ‘Pending Review’. The user can then review the checks and responses assosciated with the checklist in the lower panel of this window.
Once they are satisfied with the provided results they can right click the check itself in the top panel and ‘Mark As Viewed’.
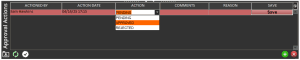
Once this is done, the user can then return to the ‘Approval Workflows’ window, and then use the green ‘+’ in the bottom panel to add an approval action.
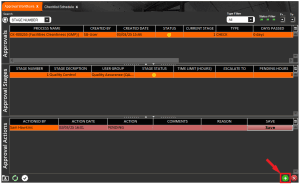
The user can then select an action, from ‘PENDING’, ‘APPROVED’ or ‘REJECTED’.
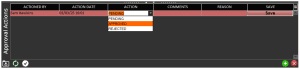
As well as select a reason from the drop-down menu. These reasons can be created in the ‘Reasons’ page in Control Center, and must be set up as ‘Approval’ types to show here. Additional comments can also be entered in the relevant box.
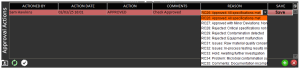
Once this is done, the ‘Save’ box can be clicked, after which the user will be asked if they want to approve the check.
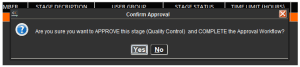
Confirming this step will then prompt the user for their password.
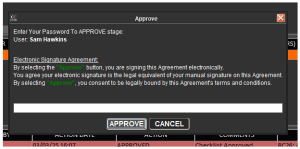
After which the check will be confirmed as approved.

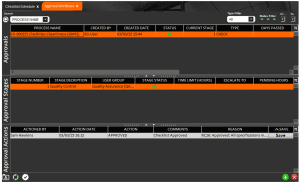
And we will be able to see the newly approved check, indicated by the green status lights, in the ‘Approval Workflows’ window.
3.3. Example – Document Control
Document approval can be done in a similar way to the example we have just seen with Checklists above. For a full example of this process please see our ‘Document Control’ module guide here.
3.4. Example – Formula Batch Signoff – Terminal
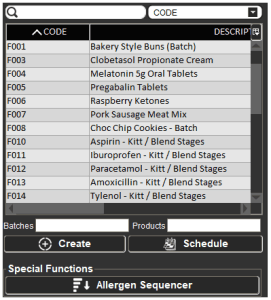
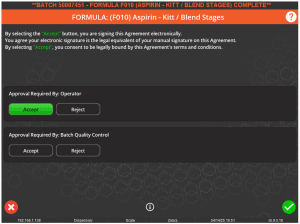
In this example we will be looking at a kitting and blending aspirin formula with the following approval workflow set for batch signoff.
This ‘Pre-Blend Signoff’ workflow is assigned to the following user group.
Which in turn contains the following users.
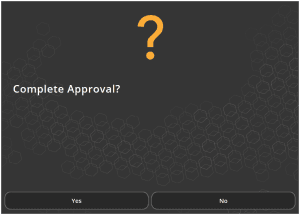
So if we proceed to run a batch of this aspirin through on our Terminal, once we reach the end of the batch we will see the following.
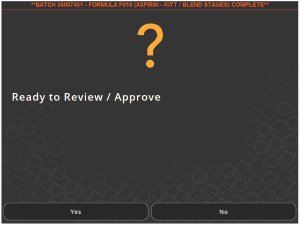
Selecting yes here will then show the signoff screen, where we have a performer (we are using a generic ‘Operator’ account to perform the batching) as well as the signoffs required for the assigned approval workflow. Note that the ‘Batch Quality Control’ is drawn from the ‘Stage Description’ that we saw above in the workflow setup.
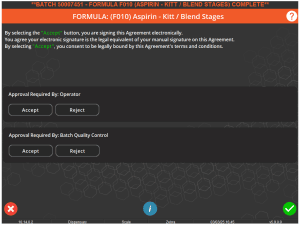
If we had added additional approval stages, then they would appear underneath the ones that we see here.
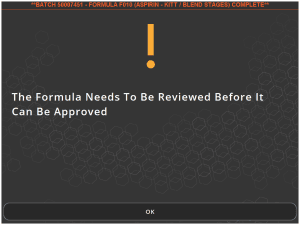
So first the operator would sign off their work. If they try to do this without reviewing the formula they will not be allowed.
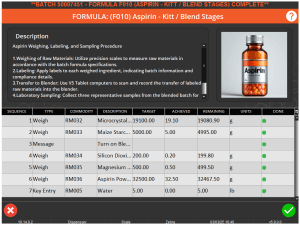
And will have to use the blue ‘i’ button at the bottom of the screen to review the batch they had just completed, showing a screen similar to below.
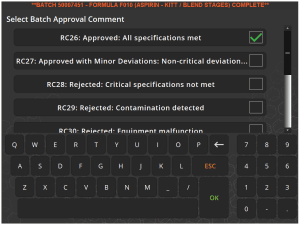
Once they have reviewed the formula they can ‘Accept’ or ‘Reject’ the signoff on the previous screen. Approving will prompt for the user’s username and password, after which the operator will be asked to select a reason (populated in ‘Reasons’ as discussed above) for the signoff.
And once they have done this then their signoff will be complete.
A user from the relevant user group that is assigned to relevant stage of the ‘Pre-Blend Signoff’ workflow must then review and accept the signoff. Again they will be asked to provide their username and password, after which that stage of the approval workflow will be complete.

Following which the batch can be completed.
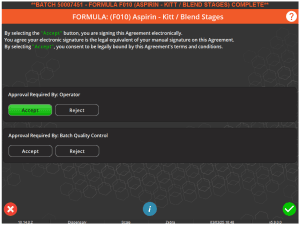
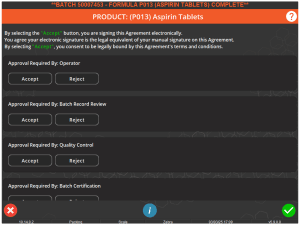
If we take one further example here, we saw above the process for the batch of aspirin, but when we come to creating the aspirin tablets themselves we have a different approval workflow being used here, ‘Product Release Signoff’.

Which features the following 3 approval stages.
So we can see here that we have 3 workflow stages here, which are reflected on the Terminal when we complete a product run of the aspirin tablets.
So here the performing operator would perform their sigoff as above, after which someone from each of the user groups assigned to each stage would enter their credentials to complete all the required approval stages.
3.5. Example – Formula Batch Signoff – Control Center
We saw above how we can approve batches in Terminal, but we can also approve these within Control Center itself, potentially saving managers and supervisors time in that they would not need to be present for every batch approval signoff on the production floor.
Let’s take a look at an example of this using the same formula signoff that we saw above, so using the ‘Pre-Blend Signoff/Quality Control’ approval workflow and operator group respectively.
So if we head back to the Terminal and produce another batch of our aspirin blend, the performing operator would sign off with their details as before.
But rather than the workflow signoff happening here, the Terminal operator can hit the green check and complete the Terminal approval here.
The approving user would then log in to Control Center and head to the ‘Workflows’ section of the QMS menu, where, as we have seen with checklists and document approvals, the batch approval will be pending approval, indicated by the yellow light.
They would then either right-click the ‘Approvals’ line in the top panel here and use the ‘GoTo’ shortcut to open the ‘Batch Log’. The batch log can also be found under the ‘MES > Logs’ menu.
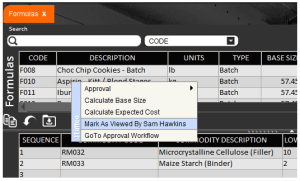
Here they would then find the relevant batch of the formula that they need to sign off. They can then check the batch logs to verify that the batch was completed within spec, and if they are happy with this they can then right click the batch itself in the top right panel and ‘Mark As Viewed’.
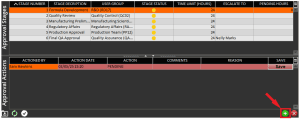
Once they have done this they can then head back to the ‘Approvals’ window, where they will then be able to create a new approval entry in the bottom panel.

As with the other processes we have seen above, the approving user would then choose an ‘Action’ (i.e. whether to approve or reject the batch).
As well as choosing a reason (populated from ‘Reasons’) for the approval action.
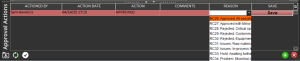
Additional comments can also be added here if desired, and once the approving user is satisfied with their responses they can hit the ‘Save’ button. They would then be asked for confirmation.
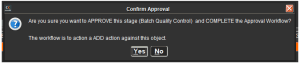
Before being asked to enter their password.
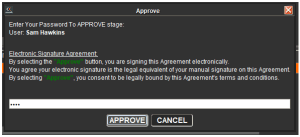
After which the approval will be complete.
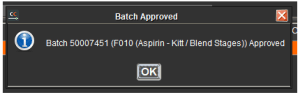
And the batch approval in the ‘Approvals’ window will now have a green light to indicate that all stages have been approved.

3.5. Example – Formula Change Approval
The final place where approval workflows are used for formulas is for formula approval. With formula approval enabled we can see how this would work in Control Center.
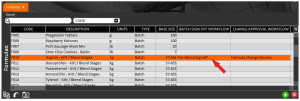
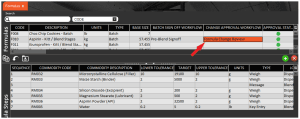
If we take the ‘Aspirin – Kitt/Blend Stages’ formula that we looked at for signoff approvals above then we can see that this has a different workflow assigned for the ‘Change Approval Workflow’, which in this case is ‘Formula Change Review.
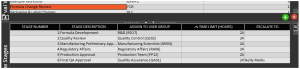
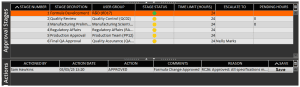
And we can see that this approval workflow features 6 approval stages.
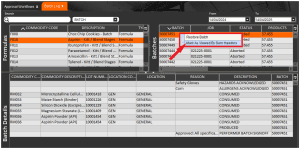
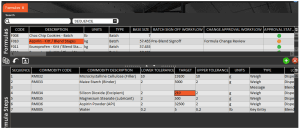
So let’s go ahead and make a change to the formulation here (note that the relevant user permission must be enabled for the logged in user). So let’s adjust the target quantity for RM034.
Note that once this change has been made the ‘Approval Status’ light in the top panel turns yellow, indicating that the formula has an approval outstanding. This also prevents the formula from being scheduled for production until it is approved.
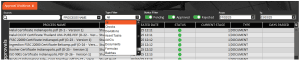
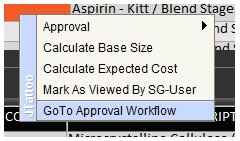
From here we can head to the ‘Approval Workflows’. This can be done by either right clicking the formula and selecting ‘GoTo Approval Workflow’:
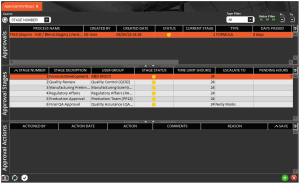
Or navigating to that window under ‘QMS’ > Approvals’ to see the pending approval, along with the 6 required approval stages and their status.
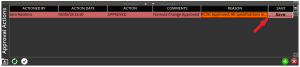
So from here, a user from the first ‘Formula Development’ group would then need to log in to Control Center and proceed back to the ‘Formulas’ window, where they can right click the formula in question and ‘Mark As Viewed’.
Once this has been done then the user can return to the ‘Approval Workflows’ page and add an action in the bottom panel by using ther green ‘+’ in the bottom panel.
They would then choose an action (either ‘PENDING’, ‘APPROVED’, or ‘REJECTED’), and then choose a reason (populated from ‘Reasons’) and enter additional comments if they wish. After this they can then click the ‘Save’ button to save the response.
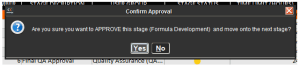
This then prompts for a confirmation:
Followed by a password prompt:
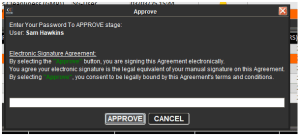
And once the user enters their password then this approval stage will be complete and the approval workflow will move on to the next stage.
The above steps would then repeat, requiring a member of each user group associated with each stage to log in to Control Center, mark the formula as viewed, and then to add an approval action in this window.
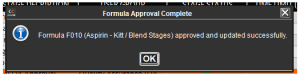
Once all stage signoffs have been completed, then the formula change will be marked as approved.
Meaning that the ‘Approval Staus’ light next to the formula will now be green.

And it will be available for production scheduling once again.