
Product Creation
Module Guide - A Deeper Dive!
Introduction
Product Creation is a module within V5 Traceability that allows users to trace manufactured batches and associated packaging items into finished goods, prior to shipment.
Cases of finished products can be labeled using industry-standard barcoding (GS128, Datamatrix etc) which in turn can be palletized, stored, and shipped.
V5 Traceability supports catch weighing and serialization of individual cases (for variable weight products) or bulk printing (for fixed weight products).
Highly configurable, the product creation features within V5 Traceability support discrete and continuous batch-making processes, automated labeling, inkjet coding, and multi-line setups.
For a look at how batching functions within V5 Traceability, please see our separate module guide here.
Table of Contents
1. Product Terminal
1.1. Product Screen Overview
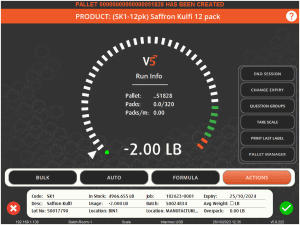
Before we take a look at the different options for making products on the V5 Terminal it is important to remember that the Product Terminal screen works in different ways to the Batching Terminal and has different options available to the Terminal operator. Let’s take a look at the standard Terminal layout when processing a product formula.
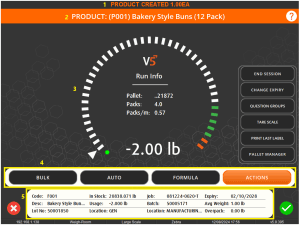
- Marquee Messaging Screen – This will display any notifications to the operator while they are undertaking the production run.
- Product Name – This area will display the name & code of the product formula being made.
- Weighing Interface – By default this will appear as the ‘speedometer’ style weighing dial that guides the operator towards the acceptable weight for the product (if weighing each product separately). This can also appear as a key entry screen.
- Button Panel – Contains 4 buttons:
- Bulk – Allows the bulk production of products & printing of labels in bulk (these functions can be separated).
- Manual/Semi-Auto/Auto mode select – Depending on the setting here, the Terminal can select lots automatically as well as accept product weights automatically. More information on this can be found here (note that these work the same was as on the Batching Terminal).
- Formula – Allows the operator to view the formula’s steps (if they have sufficient permissions). Lots can also be reselected here depending on the ‘Op Mode‘ set.
- Actions Menu – This differs from the options available on the Batching Terminal:
- ‘End Session’ – ends the production session. This is useful if the operator is creating product from the ‘All Formulas’ panel of Terminal. If a set number of products are scheduled to be produced, then an operator permission is required to complete a job if all scheduled products have not been created.
- ‘Change Expiry’ – Allows the operator to input a custom expiry date for the product being made. Otherwise the Terminal will fall back on it’s default expiry calculation.
- ‘Question Groups’ – Allows the operator to trigger question groups manually.
- ‘Tare Scale’ – Allows the operator to manually tare the attached scale.
- ‘Print Last Label’ – Allows the operator to print the last label that the Terminal produced again if needed.
- ‘Pallet Manager’ – Opens the pallet manager (only appears if the product formula is set to be palletized.
1.2. Product Formulas
As discussed in our formulation module guide, product formulas will behave differently from batch formulas, and as such have different options available for setup and executin. If we take our Saffron Kulfi 12 pack as an example, we can start to look at how these work.

As we can see here, the formula steps of a product formula are quite different to what we could have for batch formula steps. For a more detailed breakdown on how to set up products differently to batches, please see our scheduling module guide. We will schedule 10 of these packs for production.
Before starting, and depending on the Terminal’s manual/auto (as well as FEFO/FIFO) settings, we will either be asked to select lots for all the ‘components’ and ‘packaging’ in the formula, or just the ‘component’ elements.
We can now produce these 10 products in 2 different ways.
1.3. Individual Box Packing
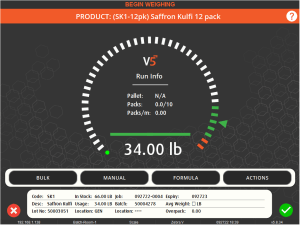
This behaves in a similar way to batch production, in that we will individually weigh and pack each box using our selected lots. This is done via the familiar looking weighing screen to begin to weigh out the components for the finished products. After each box has been packed a product label can be printed we will be prompted for a container swap to weigh out the next product.
As we continue to create products, we can see the statistics for the current session in the center of the screen under ‘Run Info’. This includes the LPN of the pallet we are moving the product onto once complete (if the product is marked as ‘Palletized’), how many packs of product we have made out of our total, as well as a packs/m calculation.
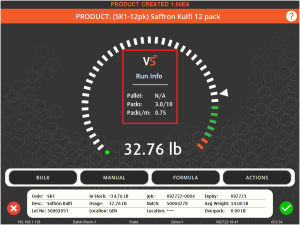
Once we have completed all the packs, the job will be complete.
1.4. Bulk Production
The other option here is the bulk produce option. Instead of weighing up each product, we can simply tell the system how many products have been made and require packaging. We can do this by hitting the ‘bulk’ button on the bottom left of the screen (where the lot select button would usually be when batching).
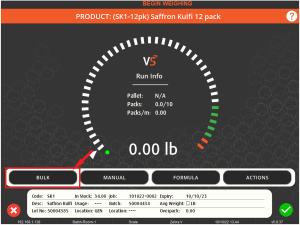
On this next screen we can then enter how many products have been produced.
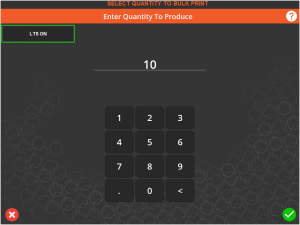
Hitting the green check here and meeting the product requirements using this bulk function (i.e. 10 products), will complete the job and print out 10 product labels. The ‘LTS’ (label tear sensor) button can be used to allow the printer to pause after printing each label and wait for the operator to tear it off, after which it will continue to print in this fashion until all labels have been printed. Having this setting off will print all labels at once. A separate label prompt can also be implemented, or no product labels can print at all and just a LPN pallet label for shipping will be produced.
All components and packaging quantities will automatically be deducted from the previously selected lots. Components will be deducted at their exact weight, i.e. with no tolerances taken into account.
2. Additional Product Functions – Operational Modes
So far, the products we have created have been made using the ‘Standard’ Operational Mode (or ‘Op Mode’) that can be set against the product formulas in Control Center. However, we also have other modes that we can set against a product formula: Multi-Lot and Multi-Lot (Key Entry). Let’s take a look at these now.
2.1. Multi-Lot
Multi-lot operation allows for the assignment of multiple lots or pallets to each formula step. The stock is deducted in the order in which the items are added. This is useful for running a long production run where you wish to assign stock in advance and not have to change lot numbers as inventory is diminished.
We can set a product formula to this mode by using the drop-down menu in the appropriate column in Control Center.

Let’s see how this works by scheduling 5x Saffron Kulfi 12-packs, each of which required 34lbs of Saffron Kulfi.

Once scheduled we can go to our Terminal and select the job as normal. From here though we will be taken straight to the ‘Product Information’ screen that we would normally see by hitting the ‘Formula’ button on the main weighing screen.
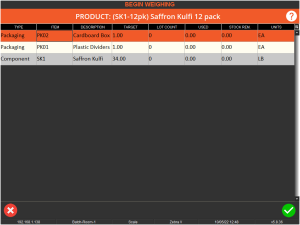
But here, rather than being taken to the weigh screen to weigh/add this commodity, we can select each commodity and hit the green check to proceed to the next screen. Let’s see how this works for our ‘component’ in this formula, Saffron Kulfi.
At first we will see a blank screen:
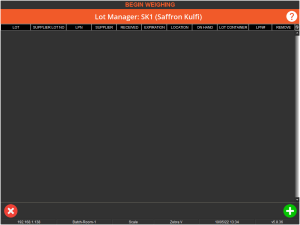
But, if we hit the green plus in the bottom right, we will see a list of available lots that can be used for this production run.
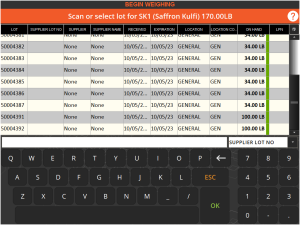
These can be selected by highlighting them and hitting ‘OK’ on the on-screen keyboard (or physical version if attached), after which they will be assigned to this job. We can add as many lots as we want to complete the production. Let’s imagine in this instance that our Saffron Kulfi is produced in 100lb lots. We can select the 2 of these at the bottom of the screen and add them to the job. This would be sufficient quantity to cover this job, the requirement for which is shown in the user-colored (orange in this case) panel at the top of the screen.
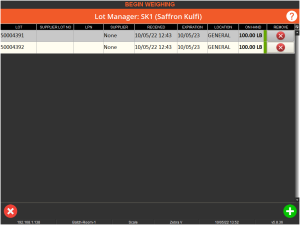
Lots can be removed from this menu by using the X in the ‘Remove’ column on the right. We can then use the X in the bottom left to return to our formula information screen, where our ‘lot counts’ are now populated.
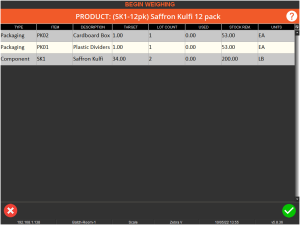
With lots selected for the job we can again hit the red X to begin production. After adding our packaging elements from the scale, we can then weigh out 34lbs of Saffron Kulfi per product. Upon completion of each product, a product label can be printed.
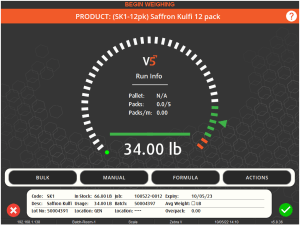
Here our lots of saffron kulfi will be consumed as they are used, and the lots will automatically change as we use what was in 1 lot and move to the next.

This method of production is useful if we create batches required for production in large quantities. So here we used 2x 100lb lots of Saffron Kulfi to make our 5 products that required 34lbs of it.
2.2. Multi-Lot (Key Entry)
Multi-Lot (Key Entry) mode operates in the same manner as multi-lot however it provides a keypad for key entering individual pack weights rather than using a scale. Bulk production remains unaffected.
In a similar way to what we saw above, we can select this Op Mode in Control Center by using the drop-down menu in the appropriate cell to select ‘Multi-Lot (Key Entry).

As with the above example we will schedule 5 batches of our ‘Saffron Kulfi 12-pack’ for production and head over to our Terminal.
The process for selecting the lots for the carious required commodities is exactly the same as we saw above, but the difference here is that instead of selecting the 100lb lots, we will select 5 of the lots that are the required weight for the product. These could have been made at a different Terminal as part of a scheduled formula when the products are also scheduled, or produced in a large batch and pre-weighed for this job elsewhere.
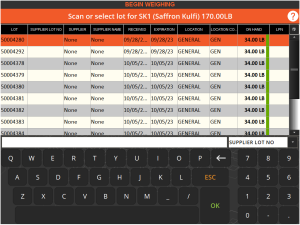
We will select 5 lots of this to use for this run.
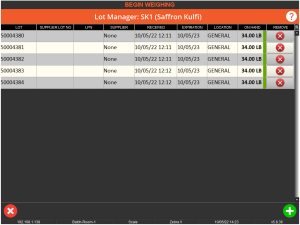
We can then proceed to production as before. However, unlike before, where we were adding weight to the scale from a larger container of the required commodity, now we are being asked to key in the weight we are adding. Since we are dealing with individually weighed 34lb lots, we know the weight is correct, so can just key in this value and add the appropriate lot to the product.
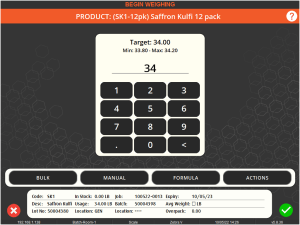
We can then proceed to produce all our required products, using the smaller lots that can be easily keyed in.
2.3. Mixed Component
Mixed component mode is the final option for Op Modes that we can use for a product formula. This is useful in industries such as produce packing where not all components might be used every time for a particular product. Let’s take a look at an example using a mixed pack of mushrooms.

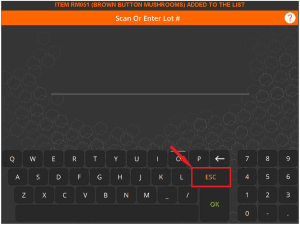
So if we go to run this product formula in ‘Mixed Component’ mode, instead of the usual lot select that we would see with either the standard or multi lot modes discussed above, we would be asked to scan (or manually enter) a lot number for one of the components. Here we will scan a lot of ‘White Mushrooms’:
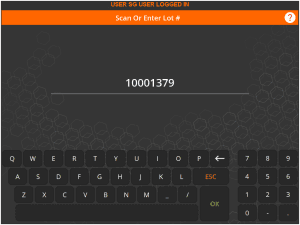
Upon sucessfully scanning a lot of one of the components we will see a confirmation message in the mssage banner at the top of the screen.

We can continue to scan lots of the other components onto the job here, but note that only 1 lot for each component can be scanned onto the job. So in this example we will also scan a lot of ‘Brown Button Mushrooms’ onto the job, meaning that we have 2/4 of the components listed in the formula steps.
Once we have added all the components that we are going to use we can hit the ‘ESC’ button on the lot entry screen.
Which will then take us to the usual product creation screen. Note here that the weight requirement will be based upon how many components have been scanned onto the job, so in this case 4lbs.
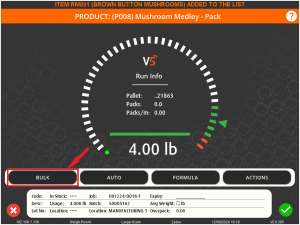
Of course we can also use the ‘Bulk’ functionality here as we would be able to with any other product.
3. Additional Product Functions – Tare Modes
When it comes to product formulas, V5 Traceability offers a variety of different tare modes depending on how products are to be packaged/produced. These can be set against the formula when it is created in Control Center.

3.1. Calculated
This mode takes into account the total weight of the packaging used for the formula and tares the scale accordingly. So for our previous examples of producing the Saffron Kulfi 12-pack, the scale would start off like this:
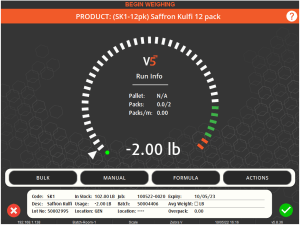
Taking into account the 2lbs weight of the cardboard box and plastic inserts that are specified in the formula step. After adding these we would then add the 34lbs of Saffron Kulfi to complete the product. It will then tare to the same amount for the next product.
3.2. Prompt
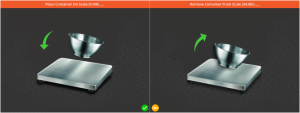
This mode (as you might expect) will prompt the operator to place the packaging on the scale before adding the 34lbs of Saffron Kulfi, and then further prompt them to remove the container/box from the scale before asking for the next load of packaging for the next product.
3.3. Preset
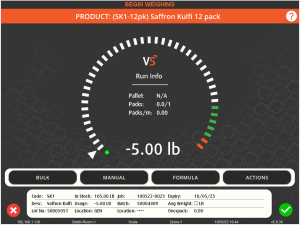
This mode makes use of an additional column on the formulas page in Control Center, the ‘Tare’ column.
The value entered here will then be reflected when we come to make our product.
3.4. Key Entered
The final mode, as the name implies, gives the operator a chance to input their own tare value for any packaging before weighing out the components of the product. This can be entered using the on-screen keyboard.
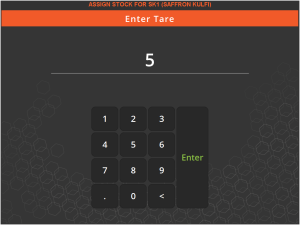
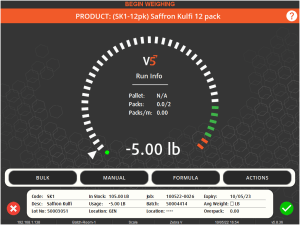
Once entered, this will be presented as the tare for all the products produced in that job.
4. Product Expiry
When a product is produced at the Terminal the system will automatically assign an expiry date to it. Unlike a batch formula, this is determined by the configuration of the Terminal itself, and is not affected by the ‘Expiry Mode’ column in Control Center’s formula header window.
Product expiry can be calculated in 3 different ways.
From ‘Expiry Days’
This is the default expiry value that the system will assign to formulas, and works off the ‘Expiry Days’ column in the ‘Formulas’ section of Control Center. So this will simply add the inputted amount of days to today’s date to calculate the expiry.
Aside from this default ‘Expiry Days’ method, there are 2 different expiry modes that can be set via the Terminal’s configuration settings. Contact SG support for help setting these up. These are:
Component based – Date Received
The first of these modes is based on the date that the products ‘Component’ steps were received. In this case the system will look at the earliest date received value for each component, and then add the default ‘Expiry Days’ value (so in this case the earliest date received + 365 days).
Component based – Expiry Date
The second of these modes works in a similar way, but instead looks at the expiry date of each component rather than the date received. In this case the system will find the earliest expiry date and then add the default ‘Expiry Days’ value (so the earliest expiry out of all the components used +365 days).
5. Product Serialization
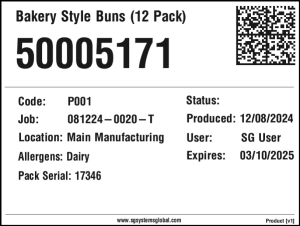
Products are able to be serialized within V5 Traceability. All this requires is a Terminal configuration which SG Support can assist in activating if desired. This generates a unique, sequential serial number which can then be recalled to subsequent product labels to provide a unique pack serial number.
An example of a product label with the serial recalled can be seen below.
6. Overproduction
Sometimes it may occur that the amount of component available for a job allows for the production of more products than was originally scheduled. In these instances there are 2 options available to allow this to happen. Both of these are controlled via a Terminal config that SG Support can apply on request.
Under default circumstances, if an operator (regardless of whether they are a supervisor or not) tries to produce more product than scheduled, the Terminal will simply not allow this and show a message to that effect in the messaging banner at the top of the screen.

If we want to allow overproduction then we have 2 options here.
We can simply allow this for all operators, which will allow the operator to produce as many packs as they like over the scheduled amount.
Alternatively, the second option here will first make a check by stating the amount of products left on the job. Here we are trying to produce 52 packs with 50 remaining on the job.
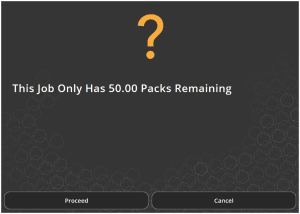
Once the operator hits ‘Proceed’ here then there will be a prompt for a supervisor overrride PIN entry.
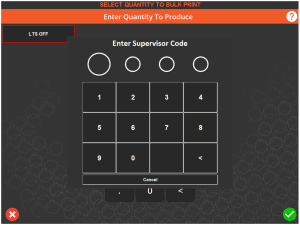
Note that even if a supervisor is logged in and is processing the job, a second supervisor input will be required.
Also note that depending on the Terminal’s setting for auto completing production runs, the system can be set to close the job immediately after all packs over the scheduled amount have been produced, or the Terminal will require the job to be manually completed if more packs need to be produced in another bulk transaction.
7. Automatic Product Fulfillment
V5 Traceability also allows for the implementation of an XML file interchange with end of line palletization systems. This allows for automatic finished product creation with minimal operator interaction.
If we take a look at an example product formula, we can see how this would work.

So if we want to produce 320 packs of this and our ‘Max on Pallet’ value for this particular product is 40, we can schedule the job in ‘Production’ like so.

Once we head to Terminal to process the product run, and since we have set this product formula’s Op Mode has been set to multi-lot, stock can then be automatically assigned (depending on any FEFO/FIFO rules in place), and when new stock becomes available it will again be automatically assigned to this job. We can see here that we have plenty of the required components and packaging to process this job. This can also be set up to require the operator to select a mix and/or packaging materials manually.
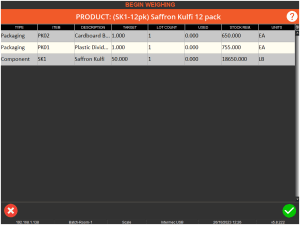
Once all production stock is assigned, the job will start in Terminal as normal. Pallets can either be created manually, or a pallet will automatically be created when the packs begin to be processed.
Once this is done, the inline system or palletizer will start to send bag weights in an XML format to the SG Data Engine. If we take a look at an example file we can see the formatting that would be used. Note that these files can be sent at any time, but in this case we are seeing them being processed at the same time as we are running the job.

So we can see here that this file contains information for:
- The job number
- The formula being produced
- The bag count and individual bag weights for 40 bags.
- The number of labels required. Label printing can be handled from the Data Engine, Terminal or a file passed off to the palletizer to print on an in-line printer.
So in this file we are sending a full pallet load of 40 bag weights to be processed. Once this is dropped into Data Engine’s import folder, Terminal will automatically process these 40 bags without operator interaction.
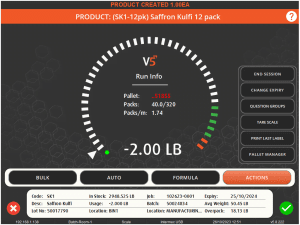
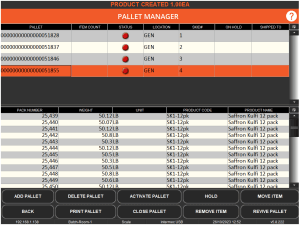
At this point (and if requested by the XML file) a label can be automatically applied inline to the pallet to identify it with its new unique SSCC number. We can inspect the contents of any pallet at any time using the pallet manager function of the finished product terminal.
The bulk dispense system will then continue to feed consumption data into Terminal to produce another 40 packs for the next pallet. New pallets will automatically be created by the system as we go.
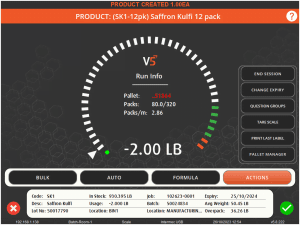
Stock is deducted in real time as each pack is processed. The terminal can be set to automatically close out the job once all packs have been created or it can be left to the operator to decide when the job is complete.
This can then further be linked with SPC and reported on.
