
Document Control
Module Guide - A Deeper Dive!

Introduction
New for the release of v5.9, the Document Control module enables users to upload and manage a wide variety of documents associated with their production facility. This module also provides version control and approval hierarchies to ensure that all documents stay up to date and compliant with company policies.
Table of Contents
1. Document Creation
Documents can be added to the system in the ‘Document Repository’ page. This can be found under the QMS menu > Document Control > Repository in Control Center.
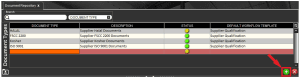
Once here users have 3 panels to work with to add their documents:
Document Types: Users can create types/categories of documents here.
Documents: With a ‘Document Type’ selected above, users can upload new documents here.
Document Versions: With a document selected above, users can view previous and add new versions of that document to the system.
1.1. Document Type Setup
So let’s start by adding a ‘Document Type’. These types can be seen as categories for documents to be added into, and as such can be set up in any way that the user deems fit to best reflect their internal documentation structure.
These types can be added by using the green ‘+’ in the bottom right of the top panel to add a new type:
Both the ‘Document Type’ and ‘Description’ fields are freetext here, so let’s call this new type ‘Product Info’ as a place to upload supplier product documents. We can then choose a ‘Default Workflow Template’ for any documents that will be uploaded into this type/category. Since we will be dealing with a supplier document here we will assign the ‘Supplier Qualification’ workflow here.
These workflows can be set up in the ‘Approvals’ section of Control Center and controls which user/group of users will be responsible for signing off any new document uploads/version changes etc.
1.2. Adding Documents
Once users have created a Document Type then they can start adding documents to it. This can be done by using the green ‘+’ button in the lower right corner of the second, ‘Documents’ panel.

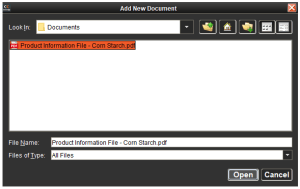
This will then open an upload dialogue box showing the current user’s PC’s file system, where the user can navigate to the document that they want to upload and select it and click ‘Open’.
Once a document has been chosen then another box will appear to ask for additional details for the document:
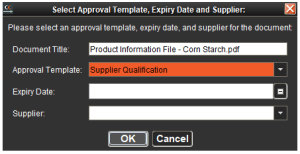
Here the user can can rename the document if desired, select a different approval workflow template from the Document Type default if needed, as well as enter an expiry date for the document (or new version of the document) if applicable. A final drop-down to select an associated supplier is also available if required to assign the document to a specific supplier (populated from the list of suppliers entered in the system). So in this example we will set this up like so:
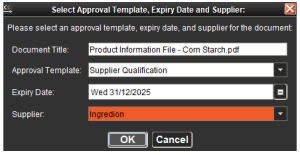
Once the user clicks ‘OK’ here then the new document will be added to the system, creating an entry in the ‘Documents’ panel. Here each document will be assigned a unique ‘Document ID’ and we can see our entered information for the supplier and Document Type pulled into this panel, as well as indicating who uploaded the document and when.

There are also additional inputs here to enter a ‘Description’ for the uploaded document as well as comma separated ‘Tags’ if desired. Tags are user created in this panel.

The status of the document is also show here with the following traffic light system:
Green – Approved
Yellow – Pending approval
Red – Approval Rejected
So here we can see that this new document is pending approval, indicated by the yellow light here.

The document version will also be created in the bottom panel, but as we saw above this has not been approved yet, so the ‘Approved At’ field remains empty.
We will now look at how documents would be approved in the system.
1.3 Approving Documents
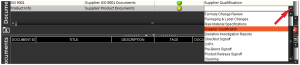
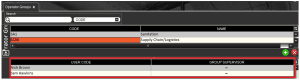
So earlier we applied the ‘Supplier Qualification workflow’ to this document type. So if we look at this workflow we can see that it is assigned to the ‘Supply Chain/Logistics’ user group.
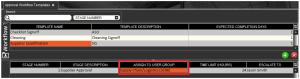
Which in turn has the following 2 users assigned to it.
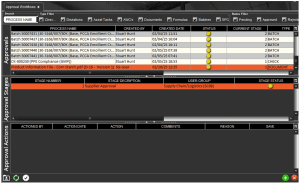
So if we head to ‘Approval Workflows’ (under QMS>Approvals) we can see this outstanding workflow, currently with no actions against it.
So what would need to happen next would be for either of the 2 users highlighted above to log into Control Center and view the document. This is done in the repository in the ‘versions’ panel. The approving user can then right click the appropriate version (in this case we will only have version 1).
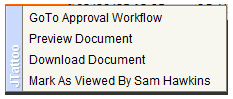
Here the user can preview (opens in the system’s default PDF viewer) or download the document to review, after which they can click ‘Mark As Viewed By *User*’ button to mark this as read.
They would then return to the ‘Approval Workflows’ page (the ‘Go To Approval Workflow’ link above can be used for this), where they can now add an action against the approval in the bottom panel of this window using the green ‘+’.
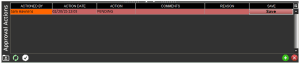
The user can then update the Action to ‘Approved’ using the drop-down in this cell, add any comments, and then select a reason (populated in ‘Reasons’ as an ‘Approvals’ type) from another drop-down.
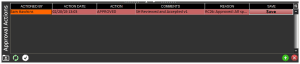
They would then hit the ‘Save’ button on the right. This will ask the user to confirm that they want to approve this version of the document.

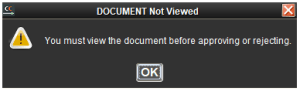
Note that if the user tries to approve the document before marking it as viewed then they will not be allowed to proceed before performing this step.
They will then be asked to re-enter their password.
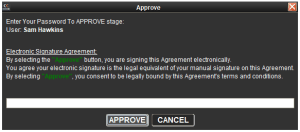
After which the document will be approved.
1.4. Document Versions
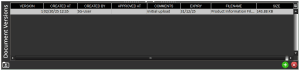
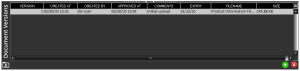
So using the example we have been working with so far, we can see in the bottom panel that version 1 of this document has been created and approved, along with information such as who created it and when, file name and size, expiry etc.
Once this document version expires, or a new version is required for whatever reason, a new version can be uploaded simply by clicking the green ‘+’ in this panel.
An upload dialogue box will then open to allow the selection of a new version.
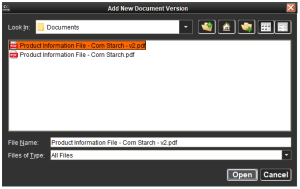
And once chosen the new version will appear in this panel.
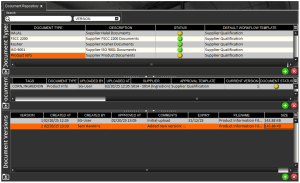
Note the yellow lights now present against the document and document type.
This new version would then need approving using the same workflow discussed above.
2. Supplier Documents
The ‘Supplier Documents’ window, also found under the ‘Document Control’ menu in Control Center, is a read-only area to view all documents that are associated with a particular supplier.
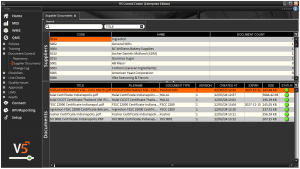
The top panel here (‘Suppliers’) lists all suppliers that are currently active in the system, and the number of documents stored against them. Documents can be associated with suppliers when imported as discussed above.
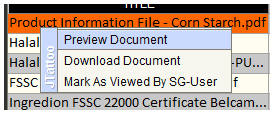
With a supplier selected, all the documents associated with that supplier will be displayed in the lower (‘Documents’) panel. No edits can be made here, but right-clicking any document will show similar options as in the versions panel in the repository.
These work the same as above:
- Preview Document – Opens the document in the system’s default viewer for that type of document.
- Download Document – Opens a dialogue box to select a folder to download the document. Once a destination is selected the document will be downloaded to the local PC.
- Mark As Viewed By ‘Username’ – marks the document as viewed by the current user. This only has an effect if that user is part of an active approval workflow and acts as a safeguard to ensure that the relevant user has actually read the document.
3. Document Change Log
The final window associated with Document Control is the ‘Change Log’. This is a purely read-only window that shows logs all changes made to documents in the repository.
So for example, if we were to change the ‘Default Workflow Template’ of the document type that we created in this guide from ‘Supplier Qualification’ to ‘Checklist Signoff’, the following entry will be created.
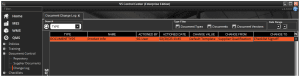
So we can here that we will see the ‘Type’ of change (essentially what panel (document type, documents, document version) that this change took place within, what the ‘Name’ was (which document type etc.), and then information about which user performed this change and when, as well as the old and new values for the change.