
V5 Integration with Sage X3
Your Guide to V5 Integration!
SG Systems is pleased to be able to offer our customers full integration services with Sage X3, including customizable features and functions to suit a wide variety of requirements.
Integrating Sage X3 with V5 Traceability offers several benefits that we will explore throughout this piece, including:
- Real-Time Data Exchange: Enhances accuracy and efficiency in managing manufacturing and supply chain processes.
- Batch Consistency and Audit Compliance: Ensures consistency in food manufacturing and upholds strict compliance standards.
- Paperless Operations: Facilitates warehouse management and reduces paperwork.
- Error Prevention: Reduces manual traceability errors, enhancing data accuracy.
- End-to-End Traceability: Provides comprehensive traceability across the entire production cycle.
- Operational Flexibility: Customizable to various business needs and scalable for growing businesses.
Table of Contents
1. Overview of Sage X3 Integration with V5
An overview of how the V5 Traceability integrates with Sage X3 can be seen below:
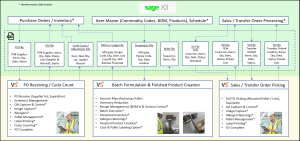
In this discussion we will be taking a look at all major aspects of integrating Sage X3 with V5 Traceability. First we will discuss system setup and data integration methodology, before looking at case studies on production, purchase and sales orders, as well as internal transfers.
1.1. Purpose & Scope of the Integration
The purpose of the V5 integration with Sage X3 is to allow customers who are accustomed to working within Sage X3’s workflow to be able to easily create purchase, sales and transfer orders, as well as making use of BoMs held within Sage X3 to schedule production from V5 Traceability.
The scope of this integration covers all major aspects of a customer’s production facility, including:
- Ingredient Codes
- Formulation/BoMs
- Production Orders
- Inventory Management
- Sales and Purchase Orders
- Transfer Orders for intra-business goods movements
As we can see in the overview above, this allows Sage X3 to continue to act as a customer’s master location for BoM templates/raw material codes/inventory levels/ordering etc., with any updates to orders to be sent instantaneously to V5. In this instance, V5 would be passing back shipped/received/production consumption data back to Sage X3, updating inventory levels and order statuses in real time.
2. System Configuration
2.1 Hardware Setup
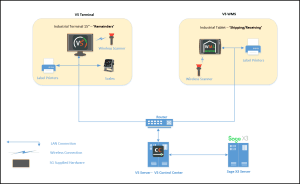
For an on-site deployment of the V5 Traceability system, SG Systems require access to a validated server (hardware or virtual) to install the V5 database and required middleware (V5 Connect) to enable the integration with Sage X3.
Production Terminals and Warehouse Management System (WMS) tablets can then be installed as needed throughout the production facility. In this document we will take a look at both production and shipping/receiving, which features V5 software applications installed on the following:
- Industrial Terminals (15” Touchscreen)
- V5 Terminal – processes work orders sent from Sage X3
- Industrial Tablets
- V5 WMS – receives/picks items for orders sent from Sage X3.
Each V5 device here can then be connected to:
- Scales – either networked (for Terminal and WMS) or by direct serial connection (for Terminal)
- Label Printers – Intermec or Zebra label printers to print labels at any stage of the production/shipping/receiving process. Labels can be fully customized to a customer’s needs.
- Barcode Scanners – to facilitate the scanning of labels.
More details on how this hardware is used in conjunction with the V5 Traceability system can be seen below.
A simplified hardware overview can be seen below:
2.2. Software Requirements
The requirements to install required software to facilitate the running of the V5 Traceability system can be viewed here.
Sage X3 is then installed/hosted locally on the customer’s servers and communication between Sage and V5 Traceability is facilitated by the additional installation of V5 Connect.
3. Data Exchange Using SOAP XML
3.1. Basics of SOAP XML Protocol
SG Systems utilizes Sage X3 SOAP web services to import and export data between both systems.
SOAP, which stands for Simple Object Access Protocol, is a protocol specification for exchanging structured information in the implementation of web services. It uses XML to encode its messages and relies primarily on application layer protocols, most notably HTTP or SMTP, for message negotiation and transmission. Here are the basic elements and concepts associated with SOAP:
- Envelope: The core element that defines the contents and structure of the message.
- Header: An optional section to define operational parameters like authentication credentials.
- Body: Contains the XML data of the message, including call and response information.
Fault: Provides error details if issues occur during processing.
3.2. Advantage of Using SOAP XML for Data Exchange
There are several advantages to using SOAP:
- Standardization: Ensures interoperability across different platforms and languages through a well-defined protocol.
- Formal Contracts: Utilizes WSDL to clearly define service methods and operations, aiding in development and maintenance.
- Security: Supports comprehensive security features such as encryption and message signing through WS-Security.
- Extensibility: Allows for extensions to add functionalities like transactions and enhanced security without altering core operations.
- Stateful Operations: Capable of maintaining session state over multiple requests, useful in complex transaction scenarios.
- ACID Compliance: Ideal for critical, transactional systems requiring robustness and reliability.
- Transport Independence: Works over multiple transport protocols (HTTP, SMTP, TCP), offering deployment flexibility.
- Error Handling: Provides detailed error reporting with structured information, aiding in troubleshooting and correction.
4. Integration Process
4.1. Step-by-Step
- The V5 API will be installed – this provides the initial link to and from the V5 database.
- V5 Connect will then be installed – this acts as the middleware between the V5 API and Sage X3.
- V5 Connect with then be configured to connect to the X3 Web Service using the URL and credentials provided by the customer.
- The customer would need to create any custom fields that will be implemented as part of the integration.
- The customer would need to create the import and export templates in Sage X3.
4.2. Configuration Settings
From the customer’s point of view, to enable connectivity with V5, they would need to:
- Enable SOAP web services for Sage X3.
- Provide URL and credentials for authentication for the Sage X3 Web Services
- Create import and export templates in Sage X3
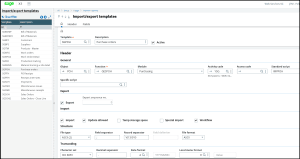
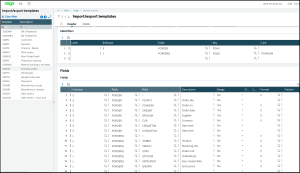
4.3. Templates in Sage X3
Templates within Sage X3 help facilitate the data flow between Sage X3 and V5 Traceability by allowing data fields to be correctly synchronized and populated when sending to and from V5. An example of these can be seen below where we can see the template setup for purchase orders.
5. Benefits of Integration
So what are the major benefits of choosing V5 Traceability integration with Sage X3 for your business?
- Familiar Working Environment – Integration with V5 Traceability allows Sage X3 users to interact with V5 from the familiar Sage X3 environment, reducing the need for additional training for employees that often comes with the incorporation of new software to a business.
- Real-Time Data Exchange – Ensure seamless and instantaneous data sharing between Sage X3 and V5 Traceability. This integration keeps your manufacturing and supply chain operations synchronized, enhancing overall efficiency and accuracy.
- Batch Consistency and Compliance – Maintain impeccable batch consistency and meet stringent audit standards effortlessly. This integration is crucial for food manufacturing industries, where regulatory compliance is non-negotiable. The system provides precise control over production batches, ensuring every product meets the required standards.
- Paperless Operations – Transform your warehouse management with a paperless approach. This feature drastically reduces administrative tasks and paperwork, leading to a more streamlined, efficient, and error-free operation. Imagine a digital workspace where all information is readily accessible and easy to manage.
- Error Prevention – Eliminate the risk of manual errors with automated traceability and integrated label/barcode scanning. The integration captures data accurately, ensuring that your traceability records are precise and reliable. This reduces the risk of costly mistakes and enhances the trustworthiness of your processes.
- End-to-End Traceability – Achieve complete visibility across your production cycle, from raw materials to finished products. This comprehensive traceability ensures that you can monitor every step of the process, providing transparency and accountability. It’s a critical feature for industries where tracking product history is essential for safety and quality.
- Operational Flexibility – Benefit from a highly adaptable system that can be customized to meet the unique needs of your business. Whether you’re expanding operations or tailoring specific processes, the integration supports your growth and adaptability. It scales with your business, ensuring that your systems evolve as you do.
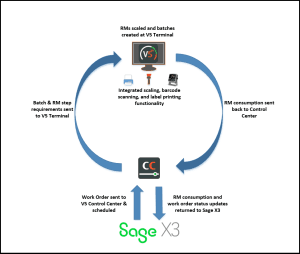
6. Operational Workflow
6.1. Batch Execution Workflow
We can take a look at an example workflow where finished products are being made from component batches produced from raw materials.
- RM (raw material) codes & inventory, along with work orders/jobs, are all held in Sage X3.
- BoM codes are held in Sage X3, along with their step order and RM requirements.
- However, in the example integration we are looking at in this document, BoMs are created separately within V5 Traceability. This is due to additional functionality within V5 Traceability that Sage X3 cannot replicate. More details on this will be discussed below and demonstrated in the production case study.
- Step orders from Sage X3 are referenced in V5 via a custom field.
- Not all ingredients from the Sage BoM are used, as some can be used in place of others depending on stock availability. V5 will handle these via manually created ‘optional steps’.
- Additional step types for events such as ‘container changes’ can also be manually inserted in V5.
- Work orders using BoM codes stored in Sage X3 are sent to V5 Control Center and scheduled within V5 Traceability using the V5 BoM setup.
- Batch production occurs at V5 Terminals. Customization options are available here for:
- Batch size calculation
- Use of bulk and remainder
- Integration of bulk dispensers
- Assigning production based on physical locations
- Custom label fields
- And much more!
- Batches are then mixed and processed using the V5 Terminal
- Data is then returned to Netsuite to account for:
- Raw material consumption for batches
- Produced batches data
- Work order status updates
A simplified top-down view of this can be seen below:
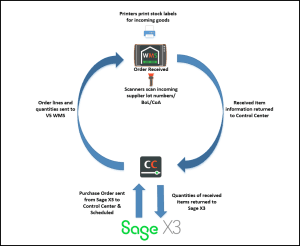
6.2. Purchase Order Workflow
We can now take a look at an example workflow for a purchase order utilizing Sage X3 and V5 Traceability.
- Purchase Orders are scheduled within Sage X3
- Material codes to be ordered are held within Sage X3 and synchronized with V5 Traceability
- Registered suppliers are managed by Sage X3 and synchronized with V5 Traceability
- Purchase Orders are then sent to V5 Control Center and scheduled automatically within V5 Control Center.
- The order, along with expected order lines and quantities, are sent to V5 WMS tablets to receive.
- V5 WMS receives the order. Configurable options are available here to enter information against received lots such as:
- Manufacturing & expiry dates
- BoL/CoA numbers & image capture
- Stock labels can also be printed by V5 WMS automatically upon receipt.
- Data is then returned to Sage X3 to account for:
- Quantities of order line items received
A simplified top-down view of this process can be seen below:
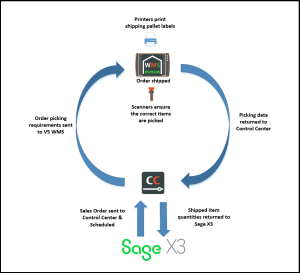
6.3. Sales Order Workflow
Sales order integration between V5 and Sage works in a very similar manner to what we have just seen with purchase orders. So first let’s take a look at the workflow for a sales order.
- Sales orders are scheduled in Sage X3.
- Product codes for ordered items are held in Sage X3 & synced with V5.
- Customer information is also held within Sage and is then synced with V5
- Sales Orders are then sent to V5 Control Center and scheduled automatically.
- Order lines and required quantities to be picked are sent to V5 WMS tablets.
- V5WMS ships the order. Configurable options are available here to ensure that:
- Correct items are picked/scanned onto the order by connected barcode scanners
- FEFO/FIFO rules are enforced
- Shipping pallet labels and order delivery notes can be printed here to attach to the order.
- Data is then returned to Sage X3 to account for:
- Quantities of items shipped
- Order line status updates
A simplified top-down view of this process can be seen below:
6.4. Transfer Order Workflow
Transfer order integration between V5 and Sage works in a very similar manner to what we have just seen with both purchase and sales orders, combining elements from both workflows. So let’s take a look at the workflow for a transfer order.
- A sales order is created in Sage X3
- This order is set as ‘Intersite’ – this allows V5 to pick this up as a transfer order rather than a sales order.
- RM codes for items to be transferred are held in Sage X3 & synced with V5.
- Information about a customer’s various sites is also held within Sage and is then synced with V5 to allow user to specify transfer ‘to’ and ‘from’ locations.
- This sales order is then sent to V5 Control Center and scheduled automatically in the ‘Transfers’ window.
- These Transfers are set up as ‘Direct Transfers’ in V5, meaning that a V5 WMS device is not required at the receiving site to receive the order.
- V5 WMS picks ships the order. Configurable options are available here to ensure that:
- Correct items are picked/scanned onto the order by connected barcode scanners
- FEFO/FIFO rules are enforced
- Labels are printed to attach to the order
- Once shipped, Sage X3 automatically generated a ‘Purchase Order Receipt’ for the receiving site, because as discussed above, in this example there is not a WMS device to receive the order.
- Data is then returned to Sage X3 to account for:
- Quantities of items shipped
- Order line status updates
A simplified top-down view of this process can be seen below:

6.5. Hardware & Software Interaction
As we can see in the flow diagram above, once V5 Traceability has the BoM/work order information from SAge X3, there are several instances where the V5 software will interact with SG supplied/customer hardware. These interactions are:
- Scales – V5 Traceability provides full connectivity with a variety of scales and balances from a wide variety of manufacturers. These can either be connected via the local network, or via a direct serial connection. Scales can be used with:
- V5 Terminal – Allows floor operators to be able to accurately weigh raw material requirements using the V5 Terminals built in weighing dial.
- V5 WMS – In order to weigh incoming/outgoing goods. Note that a direct serial connection is not available for WMS tablets.
- Label Printers – Labels can be printed at all stages of the production process, including:
- Stock labels for incoming RMs.
- Batch labels on batch completion.
- Finished product labels to meet a wide variety of requirements for product distribution.
- Shipping/pallet labels for pallets/shipments.
- Barcode Scanners – Whether wired or wireless, barcode scanners can be connected to the Terminals to ensure that floor operators are always selecting the correct item for:
- Batching ingredients.
- WiP components and labels that are used for finished products.
- Products for shipping.
- Internal transfers.
7. Case Study
7.1. Production
In this case study we will be looking at how work orders for particular BoM codes sent from Sage X3 are produced within V5 Traceability, as well how data return to Sage X3 is handled.
As discussed above, while BoM codes and RM requirements are held in Sage X3, these are also manually entered into V5 Traceability by the customer to account for additional V5 functionality, particularly optional steps to add alternative ingredients.
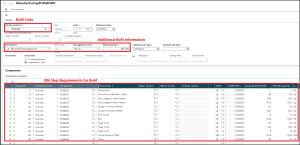
We can see an example BoM for a batch in Sage X3 below:
We can now see what this BoM would look like when recreated in V5. Remember that we are not syncing BoMs from Sage X3, rather using them as a template to add further additional step types to.
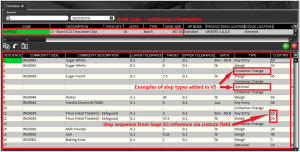
We can see an example of an optional step here, so in this example the Terminal batching operator would have the choice to add whichever option (‘VENTURA BLUE’ or ‘STRATUS’) they want for this step. This is useful if one ingredient may not always be available and might need to be swapped for another if this was the case.
So if we use this formula for our example, we can return to Sage X3 and create a work order using it.
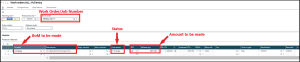
We can assign a work order number here, as well as specifying the BoM to be scheduled. The amount to be made can also be set here and the number of batches required will be determined by the ‘Base Quantity’ that we saw in the Sage X3 BoM setup above (so in this case 1 batch based on the 387.03 base quantity). The work order status in Sage X3 will then be set to ‘In Progress’.
This work order is then synchronized with V5 Traceability, where the information entered in Sage X3 is used to populate V5 Control Center’s production plan, as we can see below.
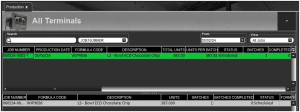
Note the ‘In Progress’ status from Sage X3 translates to the ‘Scheduled’ status in V5’s production plan. This status means that this job would now be immediately available to the Terminal on the production floor.
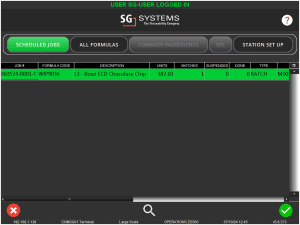
If we then start this job by highlighting it and using the green check mark in the bottom right corner, we will then be asked to select the lot for the first required RM (Sugar White).
Note however that, in this example, lot numbers within V5 are just that, and are only referenced in V5. Only quantities used are returned to Sage X3 once batching is complete. These quantities are then deducted from the master item inventory held there.
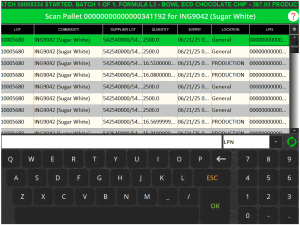
Here the Terminal operator can either select a lot themselves, or stock order (based on FEFO/FIFO rules) can be enforced to force the selection of a lot, or the system can automatically select the lot to use, taking the choice away from the Terminal operator.
Scanning of lots using an attached barcode scanner can also be mandated, further ensuring that the correct lot is selected for the job.
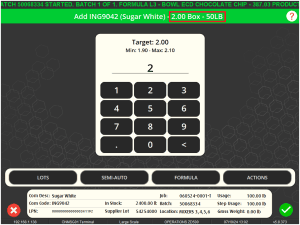
Once selected we will see the ‘key entry’ screen, based on the formula setup in V5 that we saw above. So here the operator will be asked to dump 2x 50lb boxes into the mixer.
Moving on to the next step, we will see the same lot select screen (or have the lot automatically selected based on the options above) but since the next step is for a ‘weigh’ step for 8lbs, we will see the weighing dial for the Terminal operator to weigh manually.
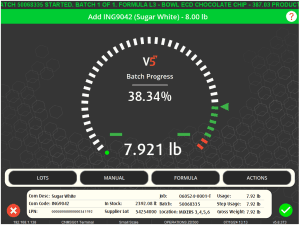
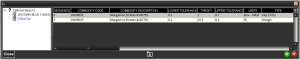
Note here that the operator can weigh within the tolerances of the step set in V5 Control Center, in this case 0.1lbs.
Next we can see an example of what an optional step would look like on the V5 Terminal below. In this case we are looking at the same optional step that we looked at in V5 Control Center above, where the operator is choosing the option that we had highlighted there (‘STRATUS’).
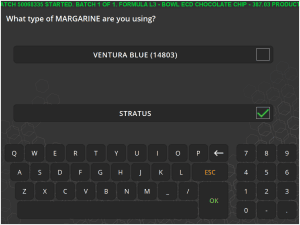
Selecting this optional routine will then execute the steps that were contained within it in Control Center.
The batch would then proceed in this manner until all RMs have been added to the mix in the order laid out in Control Center.
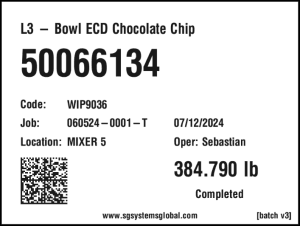
Once the batch is complete then the system can print a label to attach to the resulting batch. An example of this can be seen below, but as mentioned above these can be fully customized to a customer’s specification.
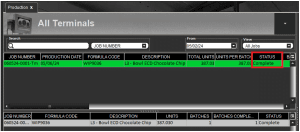
Returning to Control Center we can see that the job is now marked as ‘Complete’.
Data is then returned to Sage X3 with a total consumption for the batch. RM usage is then deducted from the master inventory held in Sage. As mentioned above, lot numbers are not referenced here, but rather stock is deducted from the master lot of each particular RM.
Also of note here is that the total quantity for the batch was not achieved as the batch composition was altered as it was being produced, hence the ‘In progress’ status that we can see above. However, the existing achieved quantity is referenced so as to allow the correct deduction of RM quantities.
Options to change batch composition on the fly can be restricted to supervisors only, or force a supervisor override so that a standard batch operator cannot make these decisions themselves.
7.2. Purchase Orders
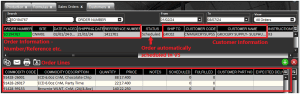
Purchase Order synchronization from Sage X3 to V5 Traceability starts with the order being scheduled within Sage X3.
We can see a scheduled purchase order in Sage X3 below:
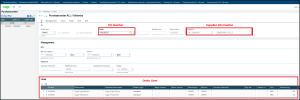
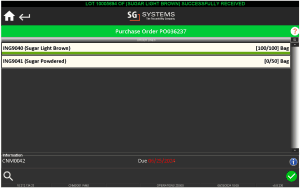
So we can see here that for this PO (PO036237) we have ordered 100 bags of ‘Sugar Light Brown’ and 50 bags of ‘Sugar Powdered’. Also note that we have a supplier and order date assigned, which will also be sent to V5 Traceability.
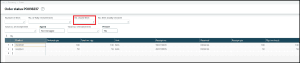
Once this is sent to V5 Control Center, we can see it as a ‘pending’ order in the ‘Purchase Order’ window.
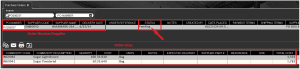
So here we can see that the relevant amounts that were ordered, as well as the costing for these (also drawn from Sage X3), and the assigned vendor have all been imported to V5 Traceability.
Since the order is imported to V5 Traceability as ‘Pending’, it will immediately be visible on the V5 WMS (Warehouse Management System) tablet in the receiving location.
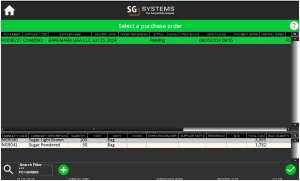
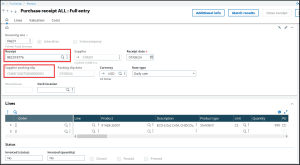
Selecting and entering an order using the green check in the lower right corner will then show the order lines that are awaiting receipt.
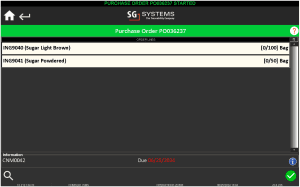
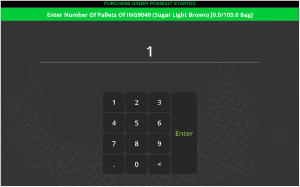
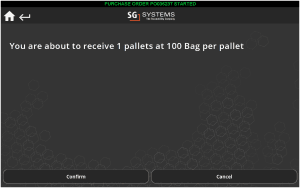
Selecting a line to receive will then allow the operator to receive that item. In this instance we are receiving a palletized item, so the system will know to prompt for number of pallets, and how many bags are on each pallet. In this case we are receiving a single pallet of 100 bags of ‘Sugar Light Brown’.

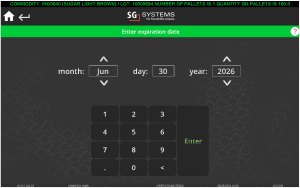
Several optional triggers are available here to enter additional information against the received lot such as internal & supplier lot numbers, manufacturing and expiry dates, costs etc. Here we can see an example with our operator entering the expiry date of the received sugar.
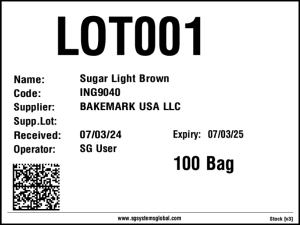
Labels can then be printed and applied to the received items. The number of labels made here can be fixed, or a request can be presented to the operator. Label design can be fully customized by each customer depending on their individual requirements.
We would then be returned to the order line view where we can see that this line has successfully been received.
We would then receive the other order line in a similar manner, after which we can complete the order using the green check in the lower right corner of the order line view.

Once received we can see the completed Purchase Order in Control Center, now with the ‘Received’ status. The lower right panel in Control Center will also now be populated with information about the received lot, including internal lot numbers, the operator who received the order, and timestamps.
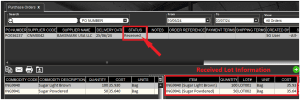
Returning to the order in Sage X3, we can see that the lines have now been closed, indicating, along with the information in the panel below, that the items have been successfully received and will subsequently be added to the master item inventory held in Sage X3.
7.3. Sales Orders
As with purchases, sales orders are first scheduled in Sage X3, where a customer can be assigned to the order, as well as other desired information such as order reference numbers, assigned sites to be shipped from, and placed dates.
Order lines for the items required can then be added further down the page in Sage:

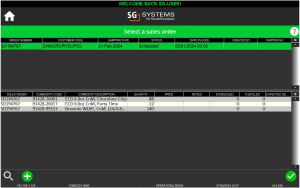
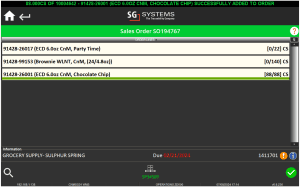
So we can see here that for this SO (SO194767) we have an order for 88 cases (CS) of ‘Chocolate Chip’, 22 cases of ‘Party Time’ and 140 cases of ‘Brownie’.
Once scheduled in Sage X3 the order is sent to V5 Control Center, we can see it as a ‘scheduled’ order in the ‘Sales Order’ window.
So here we can see that the relevant amounts that were ordered, as well as the costing for these (also drawn from Sage X3), and the assigned vendor have all been imported to V5 Traceability.
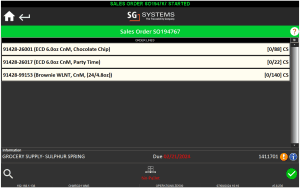
As with purchase orders, the sales order here is imported as already scheduled, so no action from the Sage X3 user is required for the order to be ready and available for fulfilment by the V5 WMS tablet in the sales department.
Once scheduled the order will then be able to be picked by the WMS tablet.
Within V5 there are several options for picking orders, with the option to choose by FEFO/FIFO rules, as well as directed wave picking modes to assist the sales operators. QA questions and answers can also be added here to direct the operator at various stages of the shipping process.
As above we will then see the order line view for the sales order, listing its picking requirements.
If we select the top line for ‘Chocolate Chip’ then we will be given the option of lots to pick from. Again FEFO/FIFO order can be enforced here to prevent the operator choosing the wrong lot to pick from.
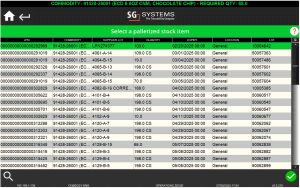
Once the lot is selected we can assign the stock. Note that if not following strict FEFO/FIFO order, then lots can be mixed onto the order. Here we are picking from lot 10004642.
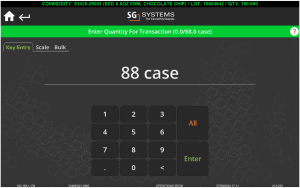
Once we have picked the correct amount this line will be fulfilled.
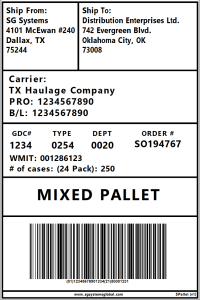
Note at the bottom here that a ‘sales/shipping pallet’ has been created. This is an optional process offered by the system that allows the quick printing of pallet labels for the shipment. Note that labels can be fully customized to a customer’s individual requirements.
Once all lines are fulfilled then, as above, the order can be completed (shipped) by using the green check in the bottom right of the screen.
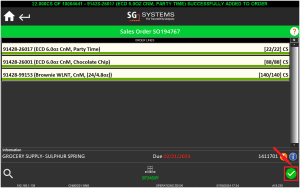
After which we will be returned to the WMS home screen, with a notification in the top banner of the software that the order has been completed.

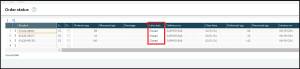
Back in Control Center we can see that the order status has been updates, and the lower right panel now contains the information about what lot was picked for the order.
Returning to Sage X3, we can see that the order lines have been closed and we can see the amount of the required items that were shipped.
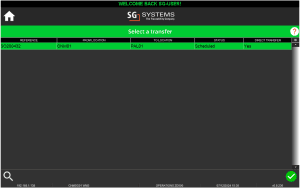
7.4. Transfers
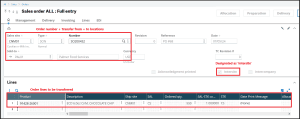
As with purchases and sales orders, transfer orders are first created and scheduled in Sage X3 as sales orders. Here a source and destination can be assigned, as well as other desired information such as order numbers/reference numbers, placed dates, as well as the items to be transferred. As mentioned above, these types of sales orders are set to ‘Intersite’ to allow V5 Traceability to pick them up as ‘Transfers’.
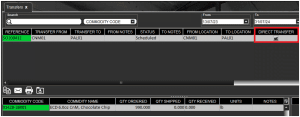
Once scheduled this order would then appear in V5 Control Center as a transfer, along with all the relevant information that was entered in Sage X3. In this example, transfers are always imported as ‘Direct Transfers’, and are automatically scheduled.
Once imported and scheduled, the transfer order will be available for V5 WMS to pick.
Similar to the sales order procedure above, we would then see the order lines waiting to be picked.
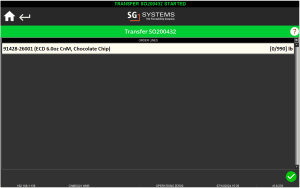
In this example the operator will be scanning from pallets of the required item, so they will opt for the scan option on this next screen.

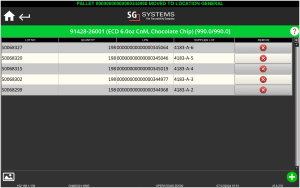
So our operator would scan 5x pallets onto this order to complete the picking.
Once these have been scanned on and the order line is completed, the order can be completed as usual by using the green check in the bottom right corner of the order line screen.
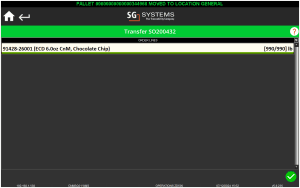
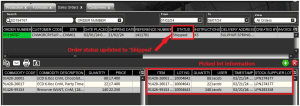
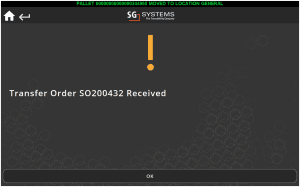
Here we will then see the following message telling us that the order has been received. This is a consequence of using the ‘Direct Transfer’ feature that was discussed above.
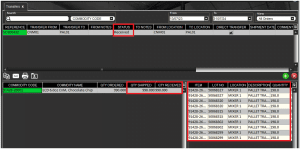
Returning to Control Center, we can see that the order status has updated to ‘Received’. The lower right panel has also been updated to show the lots & pallets that were used to fulfil the order, while the lower left panel has had its quantities shipped and received updated accordingly.
As mentioned above, once a transfer has been dispatched by WMS, a purchase order receipt will automatically be generated in Sage X3 with a receipt and packing slip number.
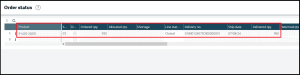
And if we check the status of the order lines we can see the confirmed amount of the requested item that was transferred, and that the status of the order is now closed.
8. Conclusion
In summary, integrating Sage X3 with V5 Traceability can benefit your business by ensuring real-time data exchange, maintaining batch consistency and compliance, and enabling paperless operations. It prevents manual errors, offers end-to-end traceability, and provides operational flexibility, adapting to your growing business needs. This integration enhances efficiency, accuracy, and scalability, making it an indispensable asset for modern enterprises.
Discover more about this transformative solution at SG Systems Global.
9. Appendices
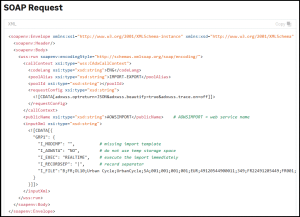
The implementation example seen above works on a line by line basis for SOAP requests/receipts. We can see an example of a SOAP template that SG will use to create requests below:
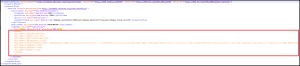
If we take a return from V5 to Sage X3, in this case a PO receipt line, we can see an example of how SG will take the above template and modify it to create a usable file in order to transfer this information:
This example file can be downloaded here.
Further documentation on developing with Sage X3 web services can be found here.