Client (Suppliers & Customers)
Your Guide to V5 Integration!

The ‘Client’ import endpoint can be used to create both suppliers and customers within the V5 Traceability system, which can then be used to receive Purchase Orders and ship Sales Orders respectively.
Related Integration Guides:
This guide will focus on how to use this ‘Client’ endpoint, both via CSV import and using JSON via the V5 API.
Table of Contents
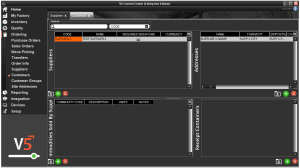
1. Control Center Layouts
2. API Links
To find out more about the definitions for this ‘Client’ and related database class, please see the following link:
3. Client Field Guide
3.1. Primary Keys
For importing via the ‘Client’ endpoint, the primary key is:
Code – The unique code for the supplier or customer.
3.2. Required Fields
Other fields that are required to create a valid entry in V5:
Type – the client type, this should be 0 for Suppliers and 1 for Customers.
3.3. Additional Fields
Other options here that we can add from the ‘Client’ database class are:
Name – The name of the supplier/customer.
SignatureRequired – a 0 or 1 to indicate whether or not a signature is required when receiving from/shipping to the client.
There are also some additional fields that are specific to Suppliers:
Website – The website of the supplier.
Currency_Name – to set the currency that the supplier uses.
And for Customers:
LabelSet_Description – allows for a label set to be assigned for use with that customer’s products.
4. Example Dataset
For this piece we will look at importing 1 supplier and 1 customer so that we can see how our import methodologies will work in practice.
5. Methodology
5.1. JSON – Import
‘Client’ import Endpoint/URI –
http://host:port/V5-API/api/integrate/import/client
Samples:
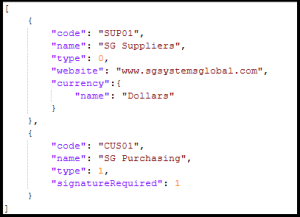
Using the ‘Client’ endpoint, we can structure an import file to add a supplier and customer as below:
This sample JSON file can be downloaded here.
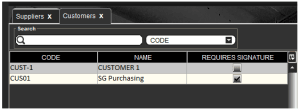
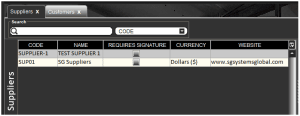
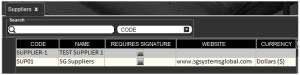
Once we have posted this to the system, we can see the new supplier has been added:
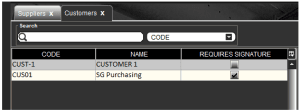
Along with the new customer:
5.2. CSV – Import
For CSV imports we first need to construct a header file for our imports.
Header/column definition filename: “client.csvh”
Completed header files should be placed in: “<installdir>\SG Control Center\gateway\import\column_defs”
Import CSV filename: “client-datetime.csv”
CSVs for import should be placed in: “<installdir>\SG Control Center\gateway\import”
Samples:
Header File:
An example header file can be seen below. As above, we will add a customer and a supplier with the same parameters:

For further information on how we structure these files, please see the main integration page. This sample header file can be downloaded here.
CSV Import File:
We can then use the defined order of data points in the header to structure our import file. Note that this first row can be ignored by Control Center and so can be kept in the file when submitting for import. An example import based on our requirements above would look like this:

This sample import file can be downloaded here.
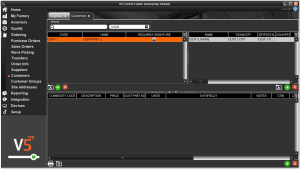
We can then drop this file into our import folder as defined above, and once the import is complete we can see once again that our supplier:
And customer have been created: