The Printer Select screen will present itself to the Terminal operator when they hit the printer selection button at the bottom of the main Terminal window.
The operator will then be able to choose from a selection of available printers.
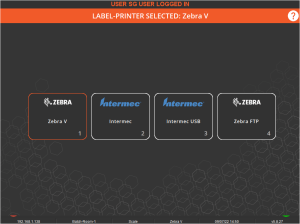
On this screen you will typically see something that looks like this:
From here, the operator can simply choose whichever printer they need to use, after which they will be returned to whichever screen they were viewing before hitting the printer select button.
Printers are set and configured globally from within Control Center.
Screen Help
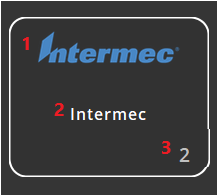
Each tile present in this screen represents a different printer that is currently set up in the V5 system. They will typically look like this:
Custom logo for the printer manufacturer. This is automatically assigned depending on the printer type selected during setup.
The name assigned to the printer when it was set up.
The number of the printer as set up in Control Center.
For more information on setting printers up in V5, please click here.
FAQ
I can select my desired printer, but it isn’t working?
Once printers are initially set up within Control Center, they will always be visible for selection, so if you can select the printer but nothing is printing the reason could be one of the following:
The printer is not powered on.
It is not connected to the Terminal (if connecting via USB/serial connection).
It is not connected to the local network (if connecting via LAN).
If all this has been checked, it is also possible that you have selected a printer that is loaded with a different label set than the current batch/product you are trying to process. It is worth checking with your line supervisor to verify that you are using the correct printer.
Was this page helpful?
YesNo
Manage Cookie Settings
We want to make your experience on our website as personalized and enjoyable as possible. To do this, we use cookies – these are tiny bits of data that help us understand how you use our site and tailor it to your preferences.
Rest assured, we value your privacy and are committed to keeping your data safe. By clicking "Continue with recommended settings," you're giving us permission to use cookies. Of course, you're in control – feel free to adjust your cookie settings anytime in our Privacy Preferences.
Functional
Always active
The technical storage or access is strictly necessary for the legitimate purpose of enabling the use of a specific service explicitly requested by the subscriber or user, or for the sole purpose of carrying out the transmission of a communication over an electronic communications network.
Preferences
The technical storage or access is necessary for the legitimate purpose of storing preferences that are not requested by the subscriber or user.
Statistics
The technical storage or access that is used exclusively for statistical purposes.The technical storage or access that is used exclusively for anonymous statistical purposes. Without a subpoena, voluntary compliance on the part of your Internet Service Provider, or additional records from a third party, information stored or retrieved for this purpose alone cannot usually be used to identify you.
Marketing
The technical storage or access is required to create user profiles to send advertising, or to track the user on a website or across several websites for similar marketing purposes.
To provide the best experiences, we use technologies like cookies to store and/or access device information. Consenting to these technologies will allow us to process data such as browsing behavior or unique IDs on this site. Not consenting or withdrawing consent, may adversely affect certain features and functions.
Functional
Always active
The technical storage or access is strictly necessary for the legitimate purpose of enabling the use of a specific service explicitly requested by the subscriber or user, or for the sole purpose of carrying out the transmission of a communication over an electronic communications network.
Preferences
The technical storage or access is necessary for the legitimate purpose of storing preferences that are not requested by the subscriber or user.
Statistics
The technical storage or access that is used exclusively for statistical purposes.The technical storage or access that is used exclusively for anonymous statistical purposes. Without a subpoena, voluntary compliance on the part of your Internet Service Provider, or additional records from a third party, information stored or retrieved for this purpose alone cannot usually be used to identify you.
Marketing
The technical storage or access is required to create user profiles to send advertising, or to track the user on a website or across several websites for similar marketing purposes.